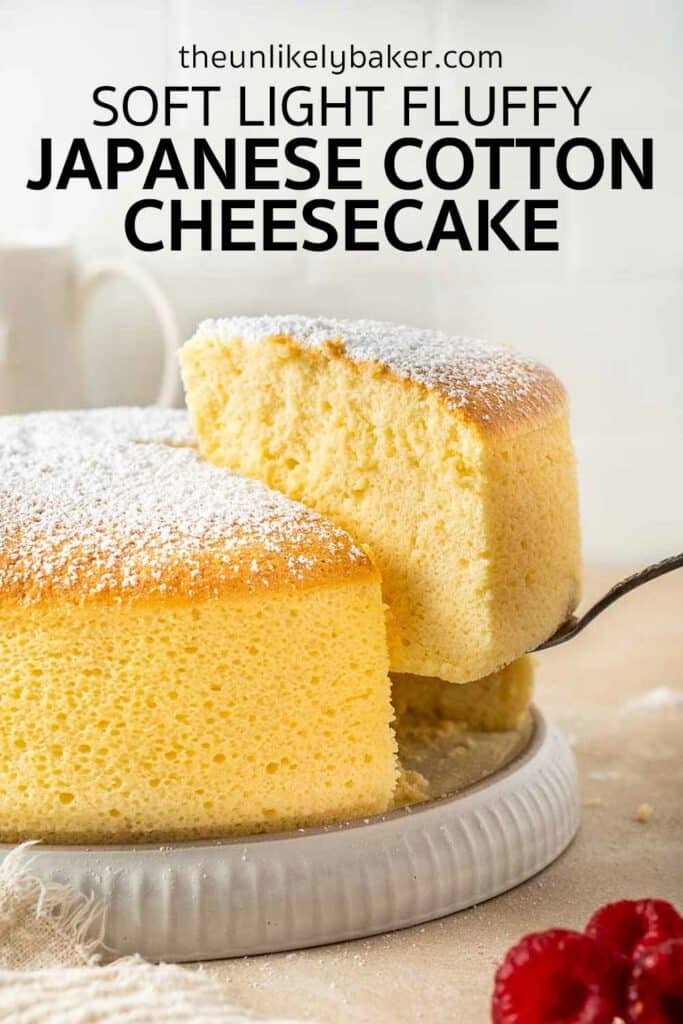
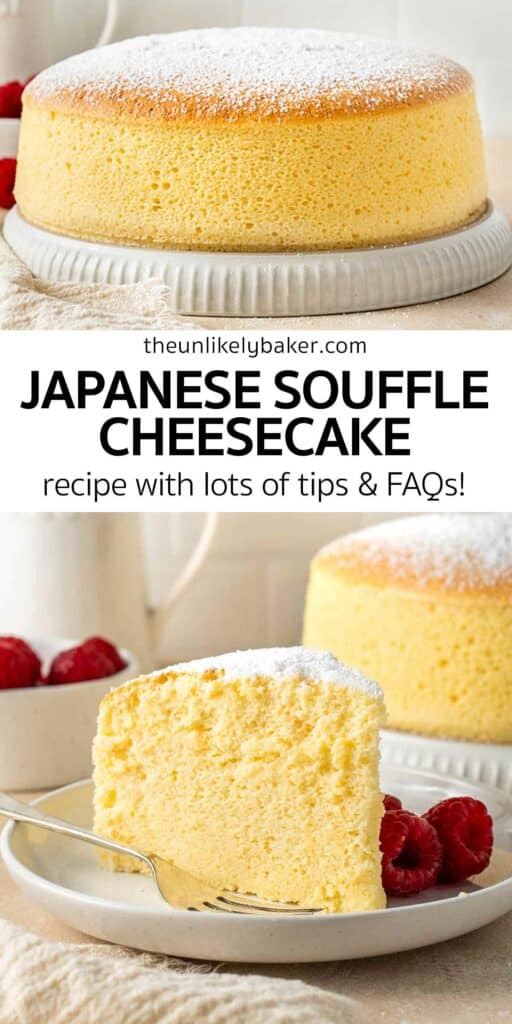
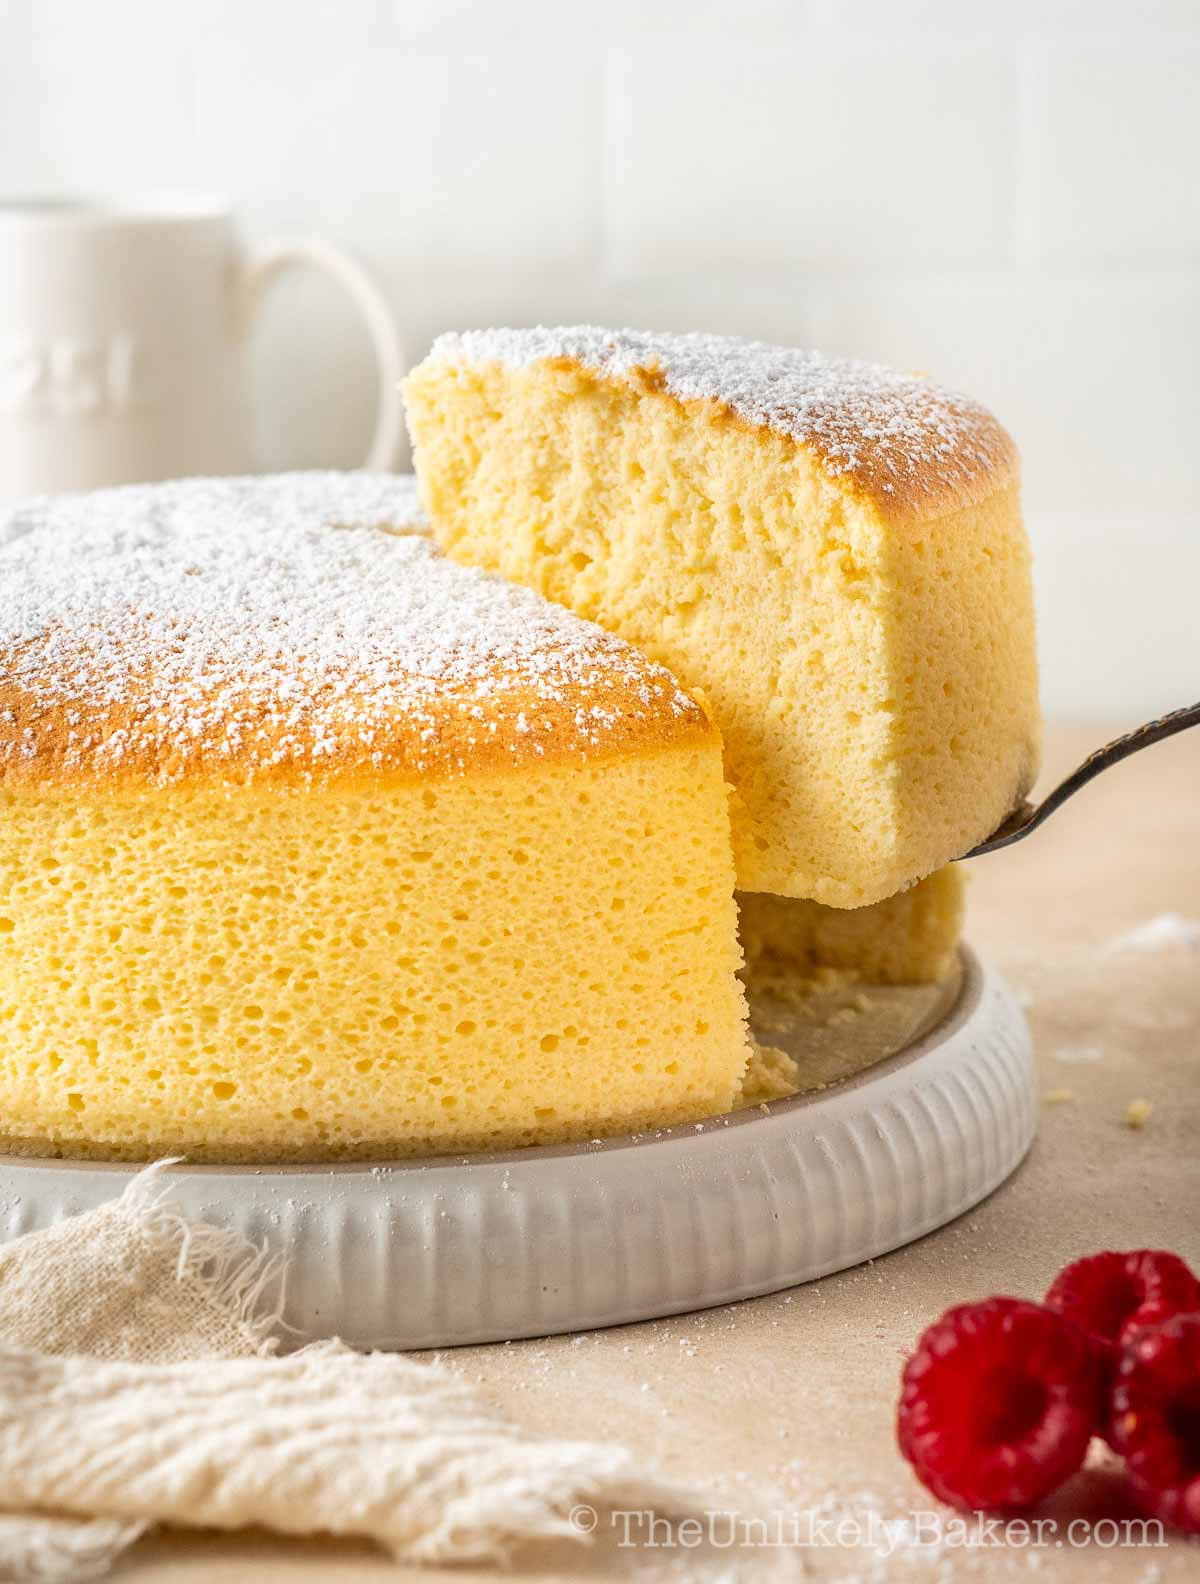
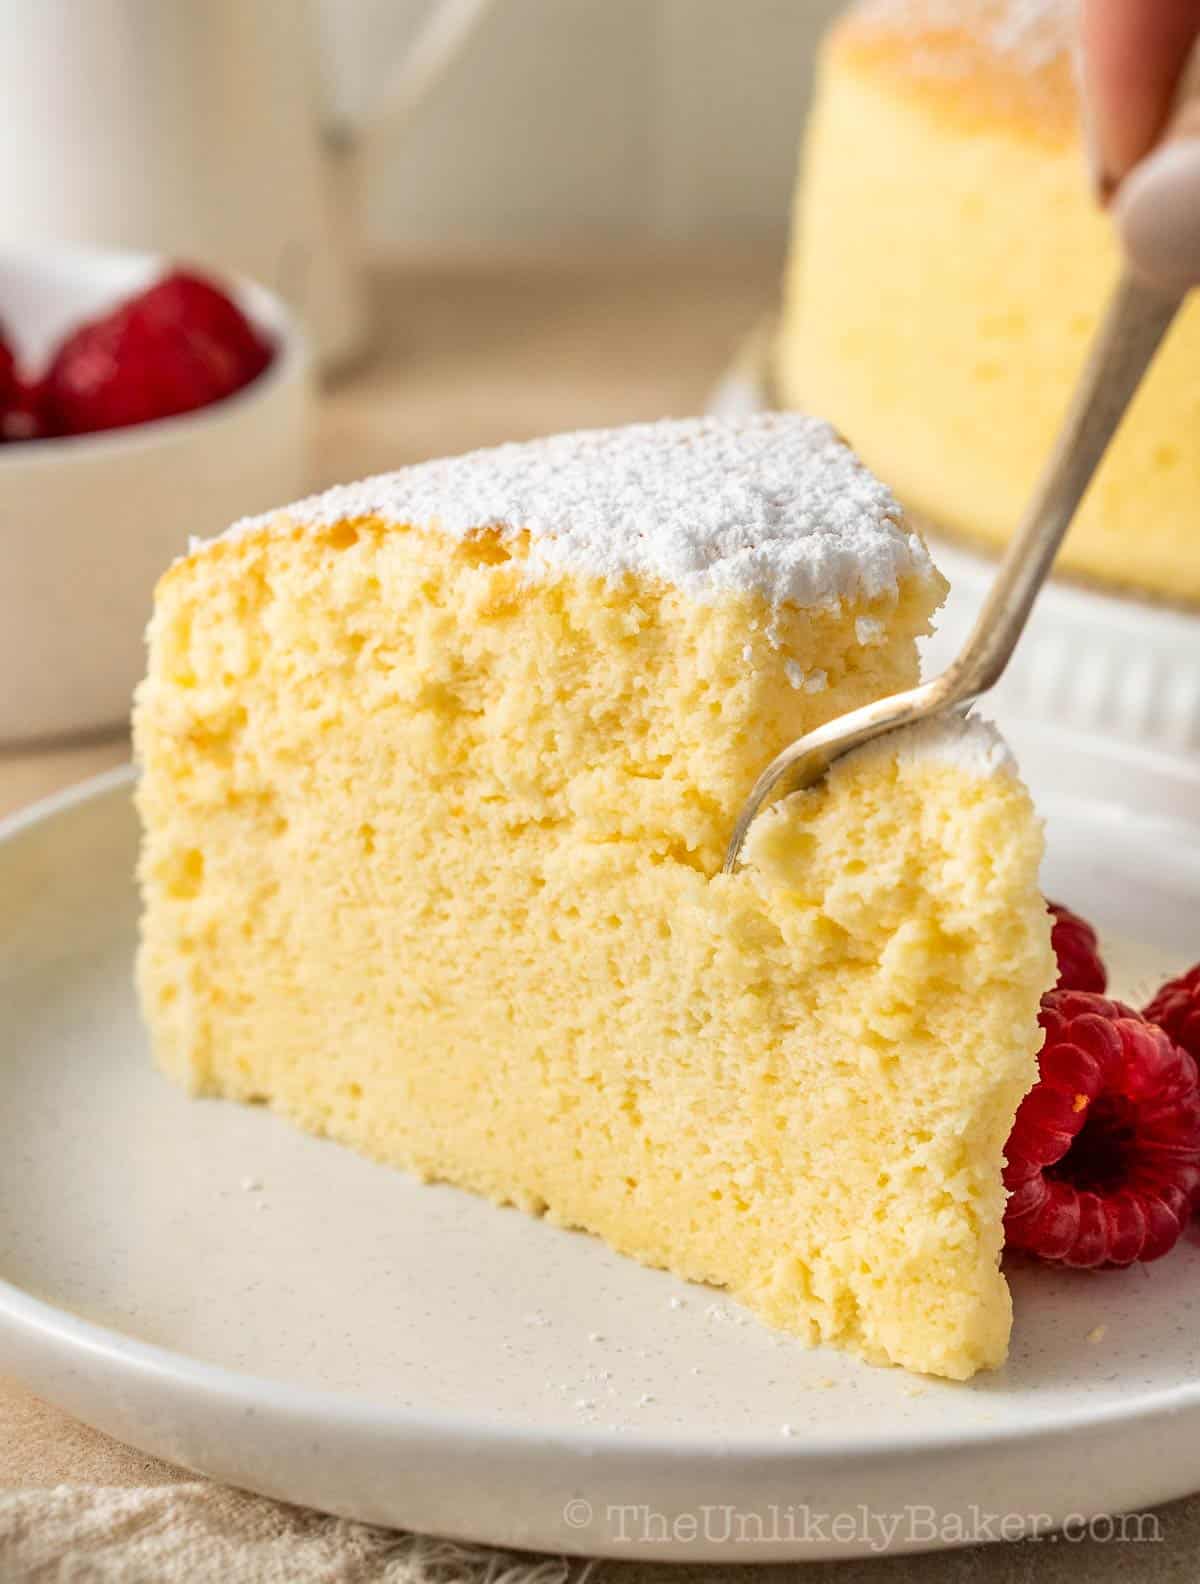
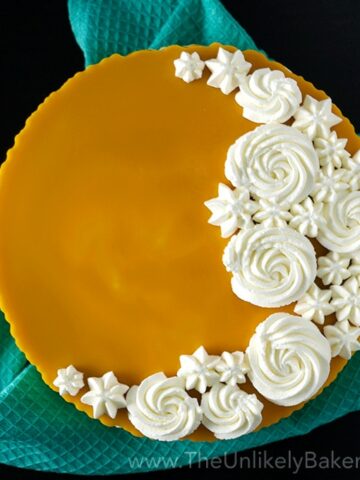
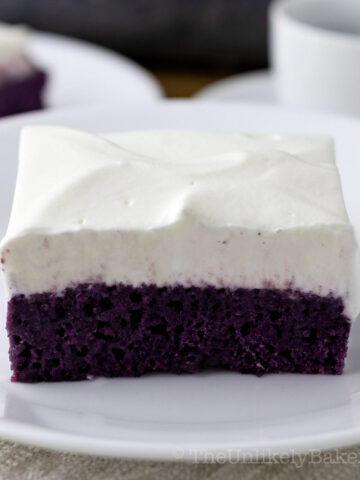
Japanese cheesecake (also called soufflé cheesecake or cotton cheesecake) is a soft and fluffy Japanese cake. While this also has a cream cheese base, unlike its Western counterparts which tend to be on the rich and decadent side, Japanese style cheesecake is light and delicate, not too sweet, a delight!
(If you’re interested in more easy Japanese dessert recipes, try Hokkaido baked cheese tarts and Hokkaido chiffon cupcakes!)
When Japanese cheesecakes (or Japanese cheesecake soufflé or Japanese cotton cheesecake) became all the rage several years ago, I was determined to learn how to make it at home because the line ups to buy them were always ridiculously long.
After a few tries I managed to recreate that light texture and delicate taste however, my cheesecakes would — 8 out of 10 times — deflate after baking, losing that signature fluffy top.
A decade later and many thanks to my fellow food blogger Sally, we’ve finally perfected my Japanese soufflé cheesecake recipe!
We also provide you with all the tips you need for perfect Japanese cotton cheesecake every time.
Let’s get to it.
Why you’ll love this Japanese cotton cheesecake recipe

This Japanese fluffy cake is one of my more technical recipes and a novice baker may need to do a few practice bakes to perfect it.
Not to worry, it’s a delicious baking adventure and we provide lots of tips and tricks to arm you with everything you need to bake a cheesecake that:
- Light and fluffy. It’s very different from the regular cheesecakes we’re used to. Japanese cotton cheesecake is light, soft and fluffy. And it doesn’t have a crust, just like these mini basque burnt cheesecakes, fun cheesecake cupcakes!
- Has an equally delicate taste. It’s also not overwhelming sweet or rich. Its taste matches its dainty texture.
- Simply delightful. Just like a proper soufflé, it’s jiggly, wiggly and fun.
This is definitely a fantastic addition to any baker’s recipe collection.
How to make
If you’re used to baking using cup measurements, this is the perfect recipe to try to bake using a kitchen scale; it’s a must in this recipe.
It’s really one of those things that you can grab for cheap but will improve your baking ten-fold.
Ingredients
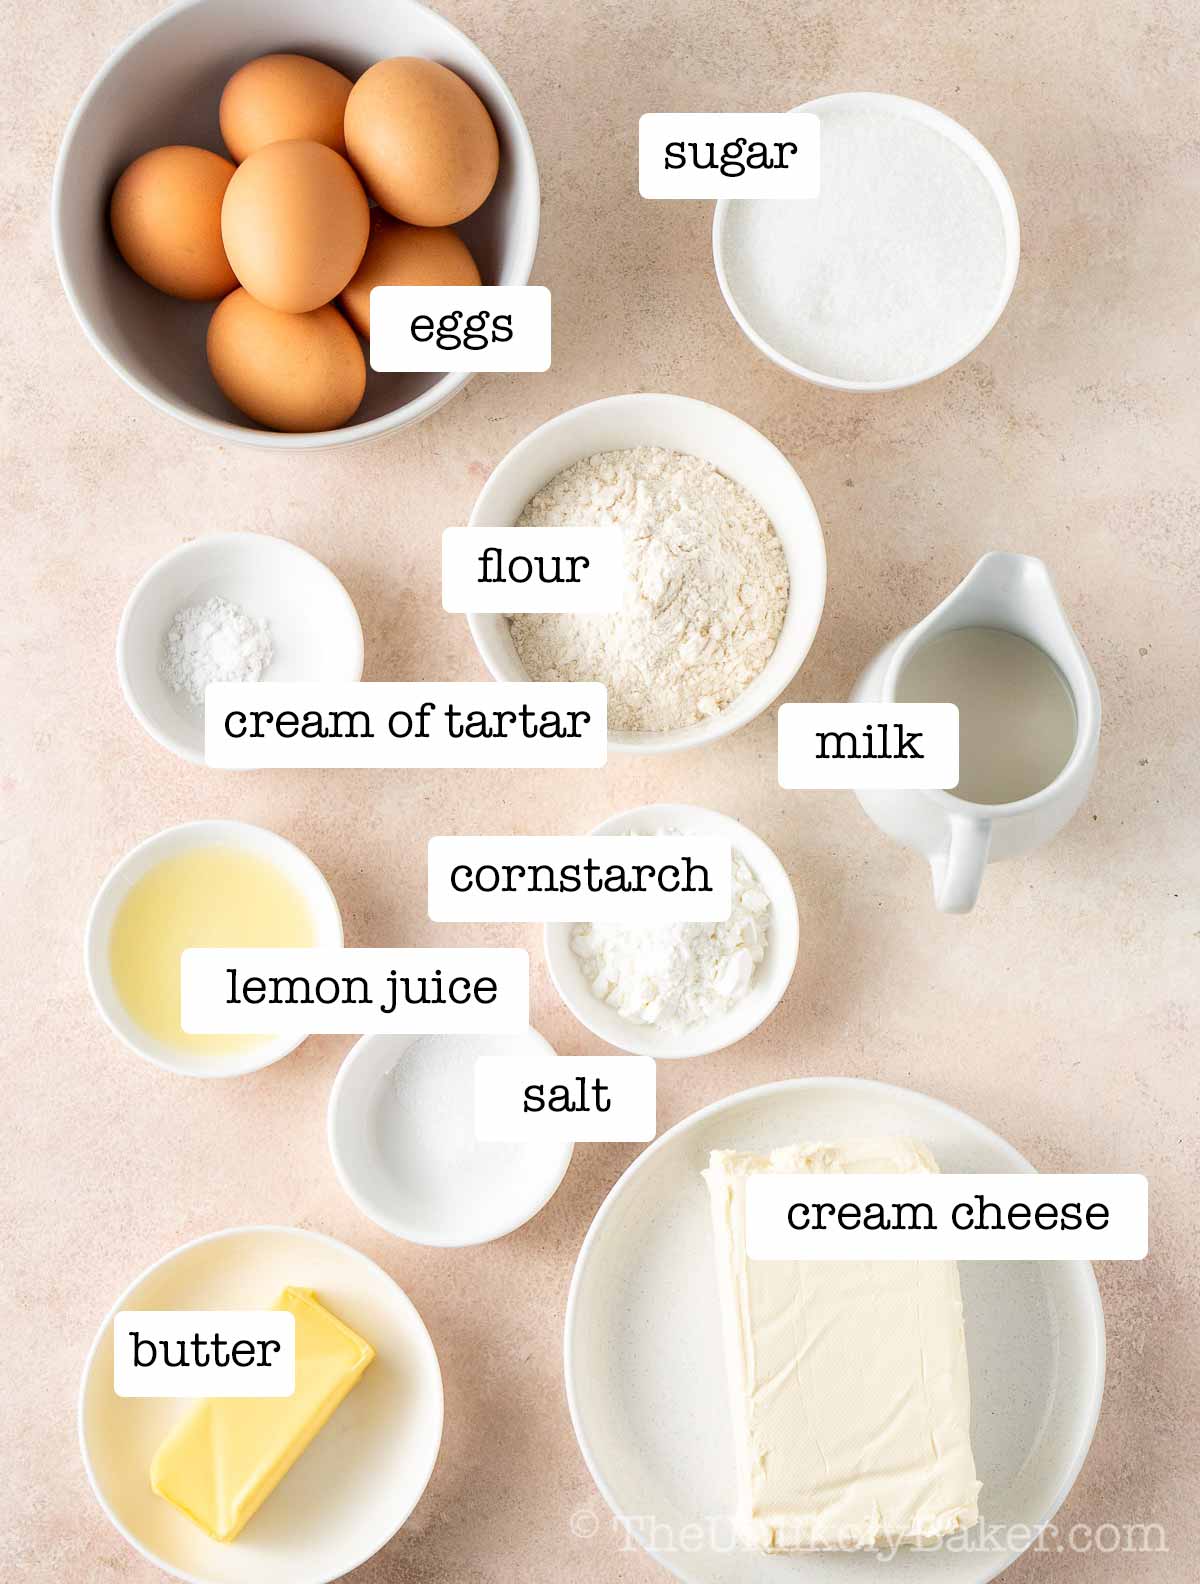
You’ll need pantry staples like all purpose flour, cornstarch, sugar, salt and lemon juice. You can find the full ingredients list in the recipe card at the bottom of this page.
A few things to note:
- Cream cheese — I usually use Philadelphia cream cheese when making cheesecakes. Whatever brand you use, remember to use full-fat for best results.
- Butter — we use unsalted butter here.
- Milk — I usually use 2% skim.
- Eggs — we need the eggs separated and in room temperature. However, it’s easier to separate the egg yolks from the egg whites while the eggs are cold so do that then let the separated eggs come down to room temperature.
- Cream of tartar — helps provide structure to the egg whites.
Baking tools
Like I mentioned, you will need a kitchen scale to weigh the ingredients.
You’ll also need an 8-inch springform pan.
Step-by-step photos
(For detailed instructions, scroll down to the bottom of the page for the recipe card.)
Line the base of an 8-inch springform pan with parchment paper. Wrap the pan completely with aluminium foil as this cake will be cooked in a water bath.
Preheat the oven to 150C / 302F.
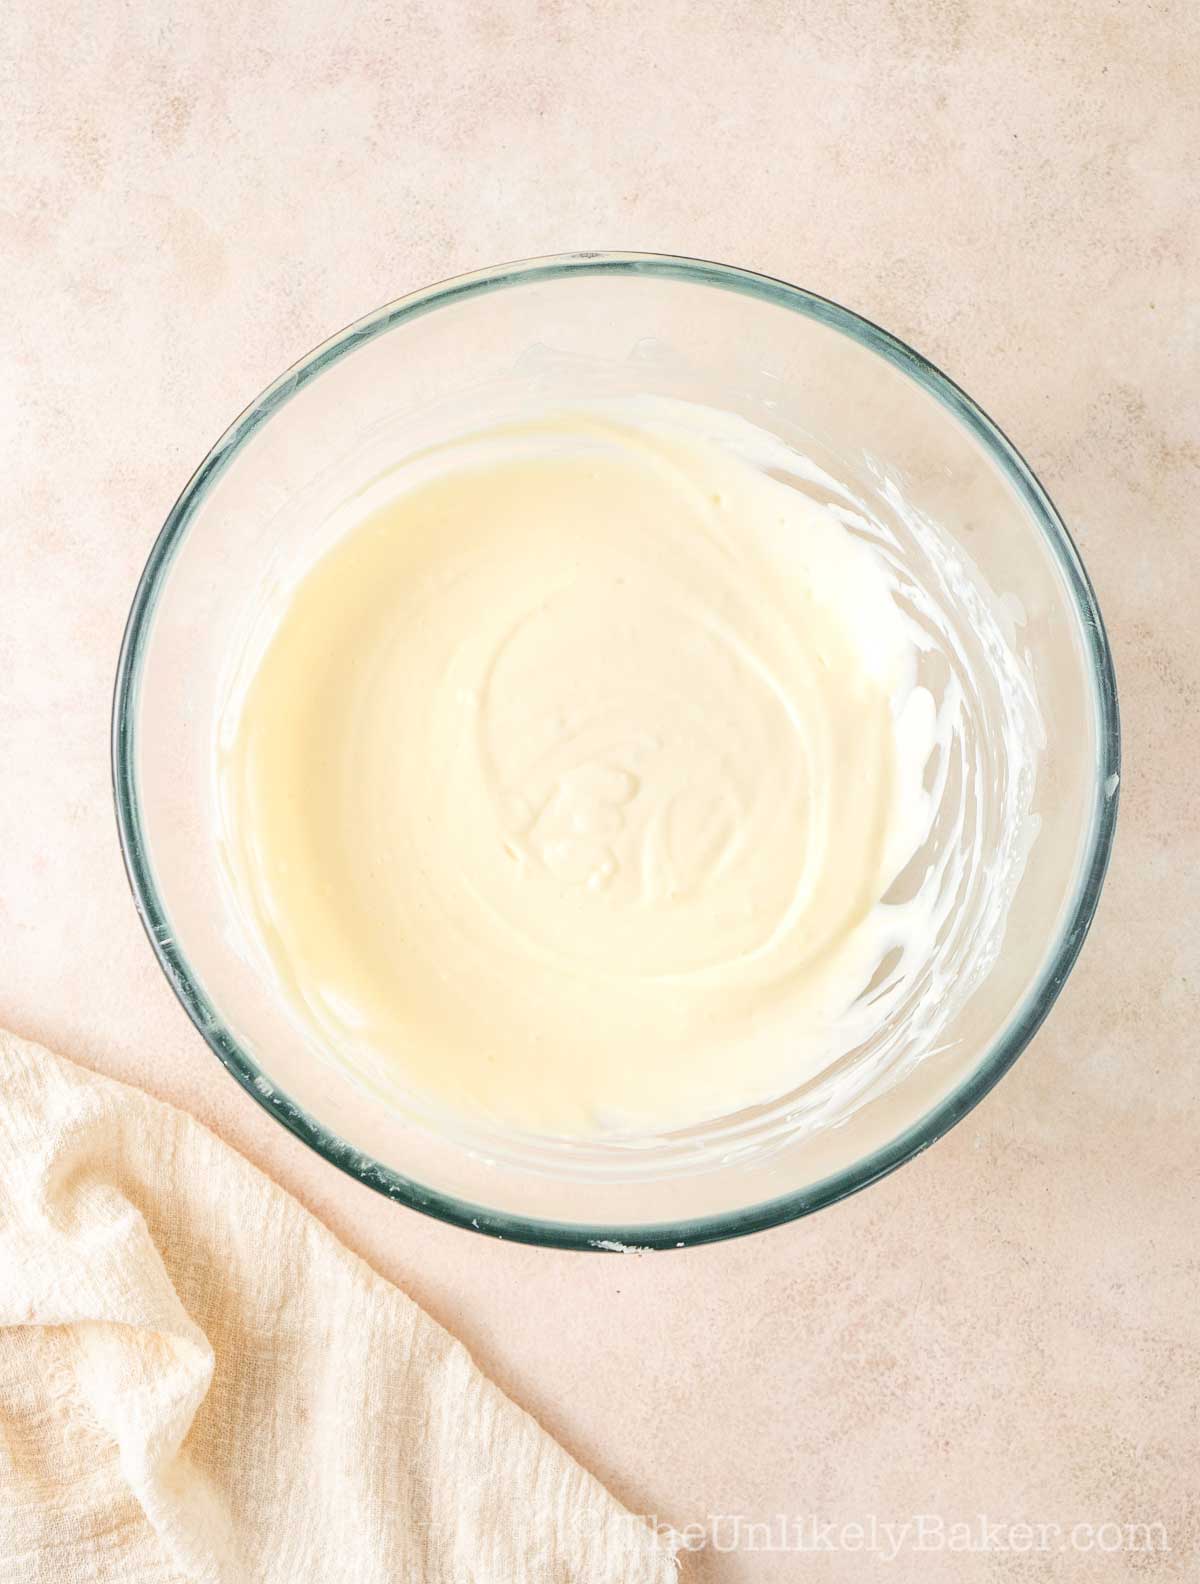
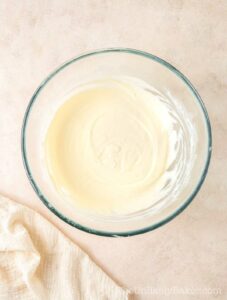
Gently melt the cream cheese in a double boiler until soft, then add the butter and milk. Whisk well until smooth and combined.
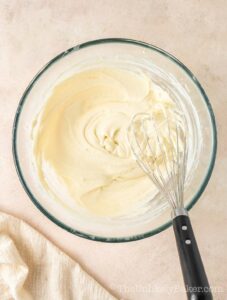
Remove from heat and add in the flour mixture (flour, cornstarch and salt) and lemon juice. Whisk really well again until the mixture is smooth and creamy. You don’t want any lumps. Set aside to cool.
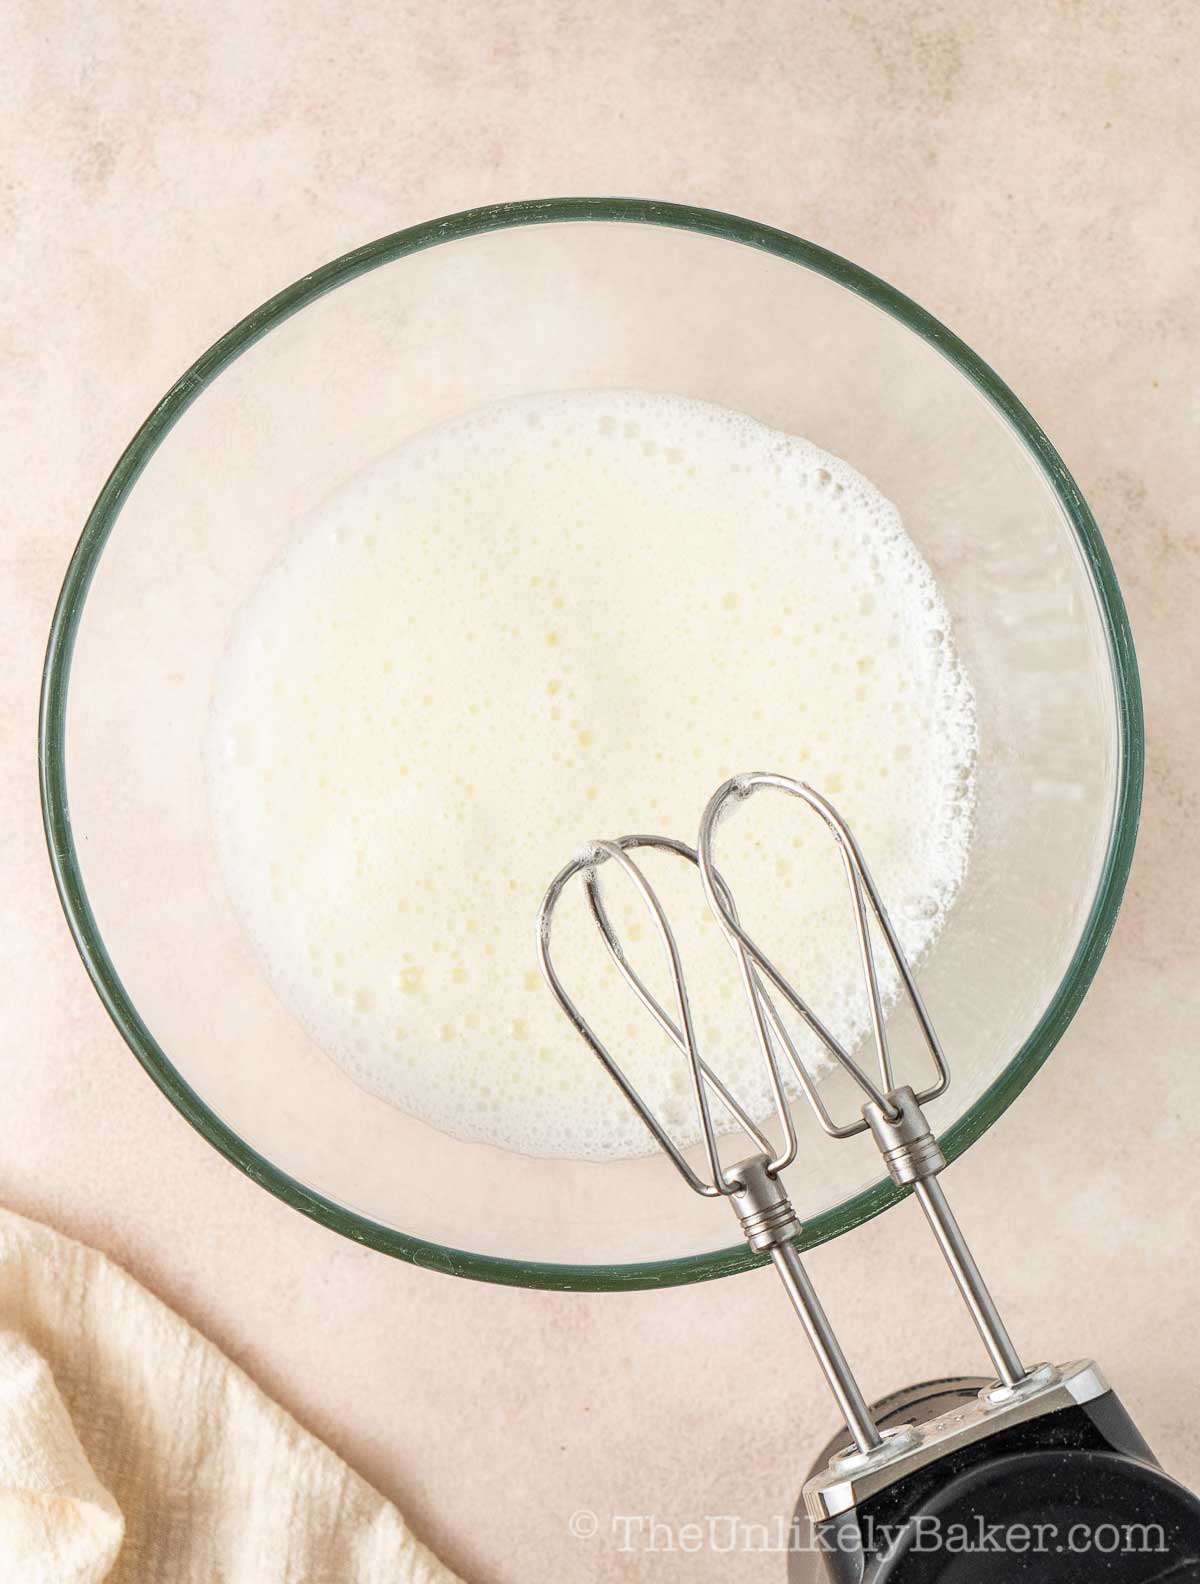
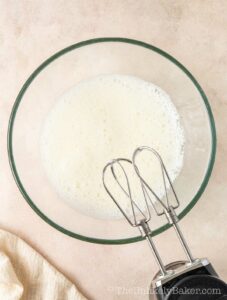
Using a stand mixer fitted with the whisk attachment or an electric hand mixer, whisk the egg whites and cream of tartar until foamy.
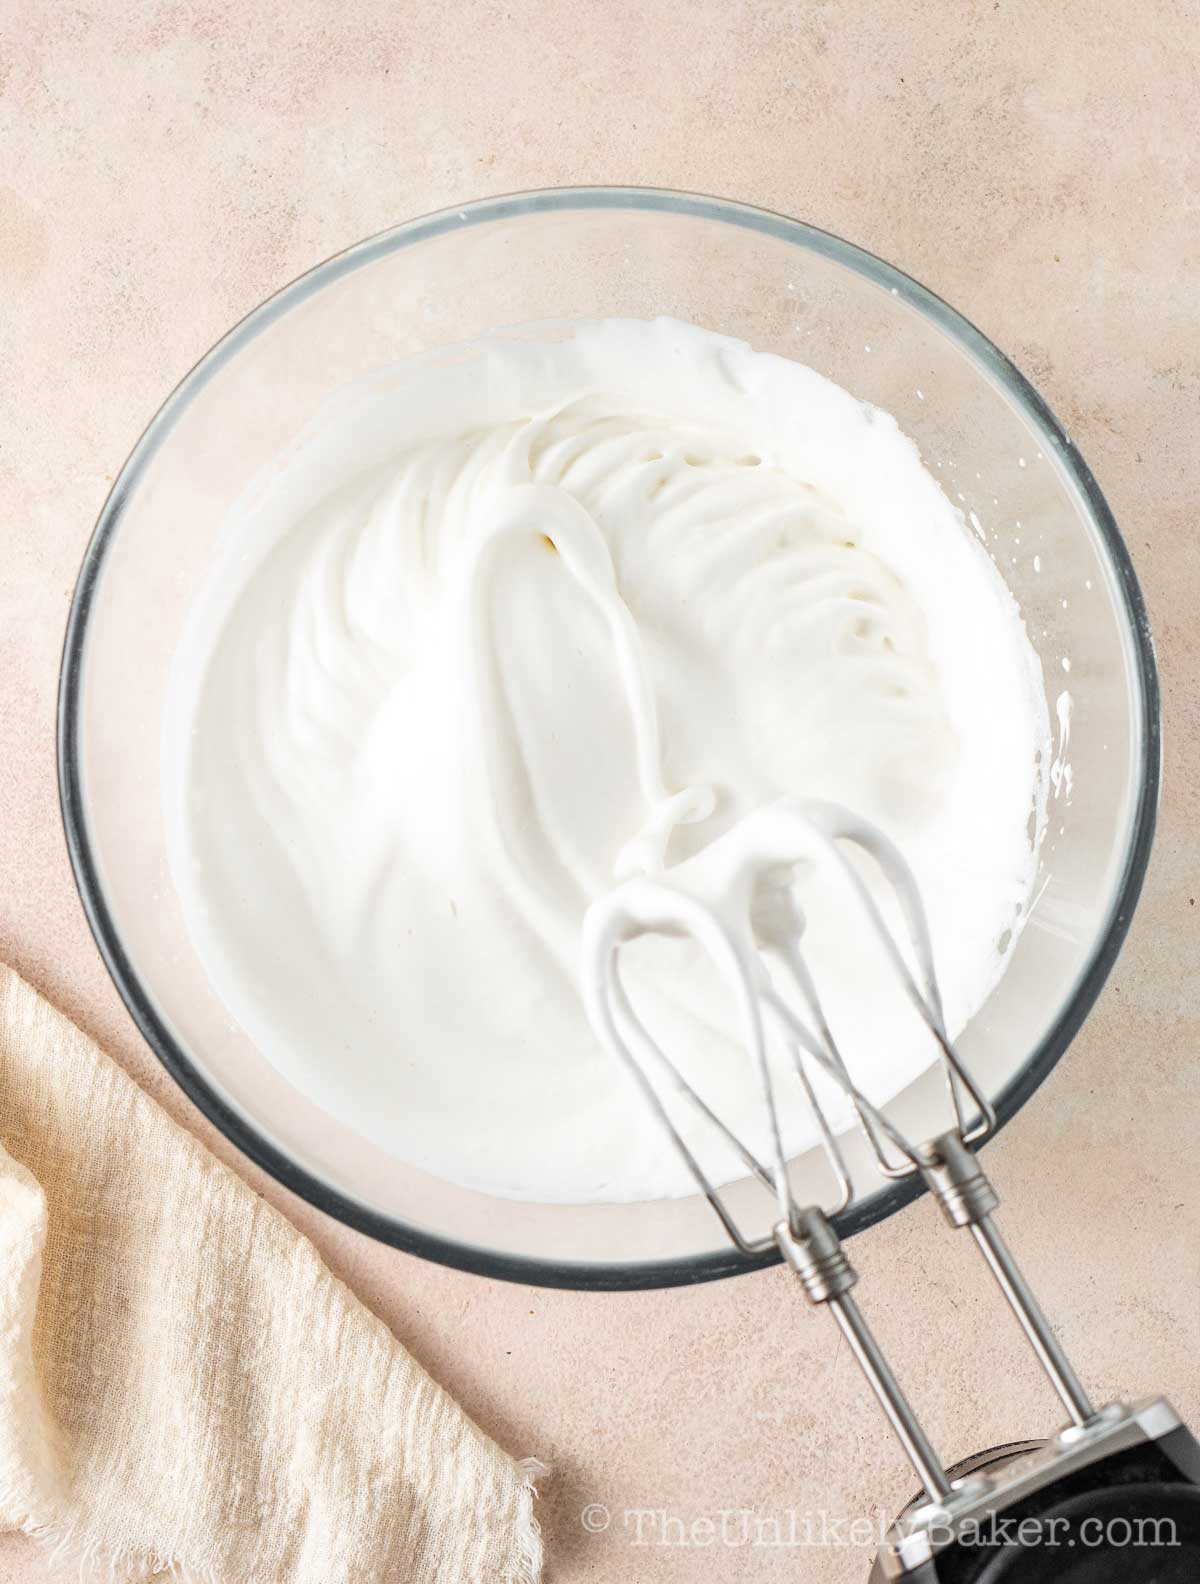
Gradually add the sugar, a little at a time whisking constantly on medium speed. Once all of the sugar has been added, turn the speed up to high and whisk until soft peaks form. This looks like the meringue mixture being shiny and holding its shape, but the peak falls over itself when you pull out the beater. Set aside.
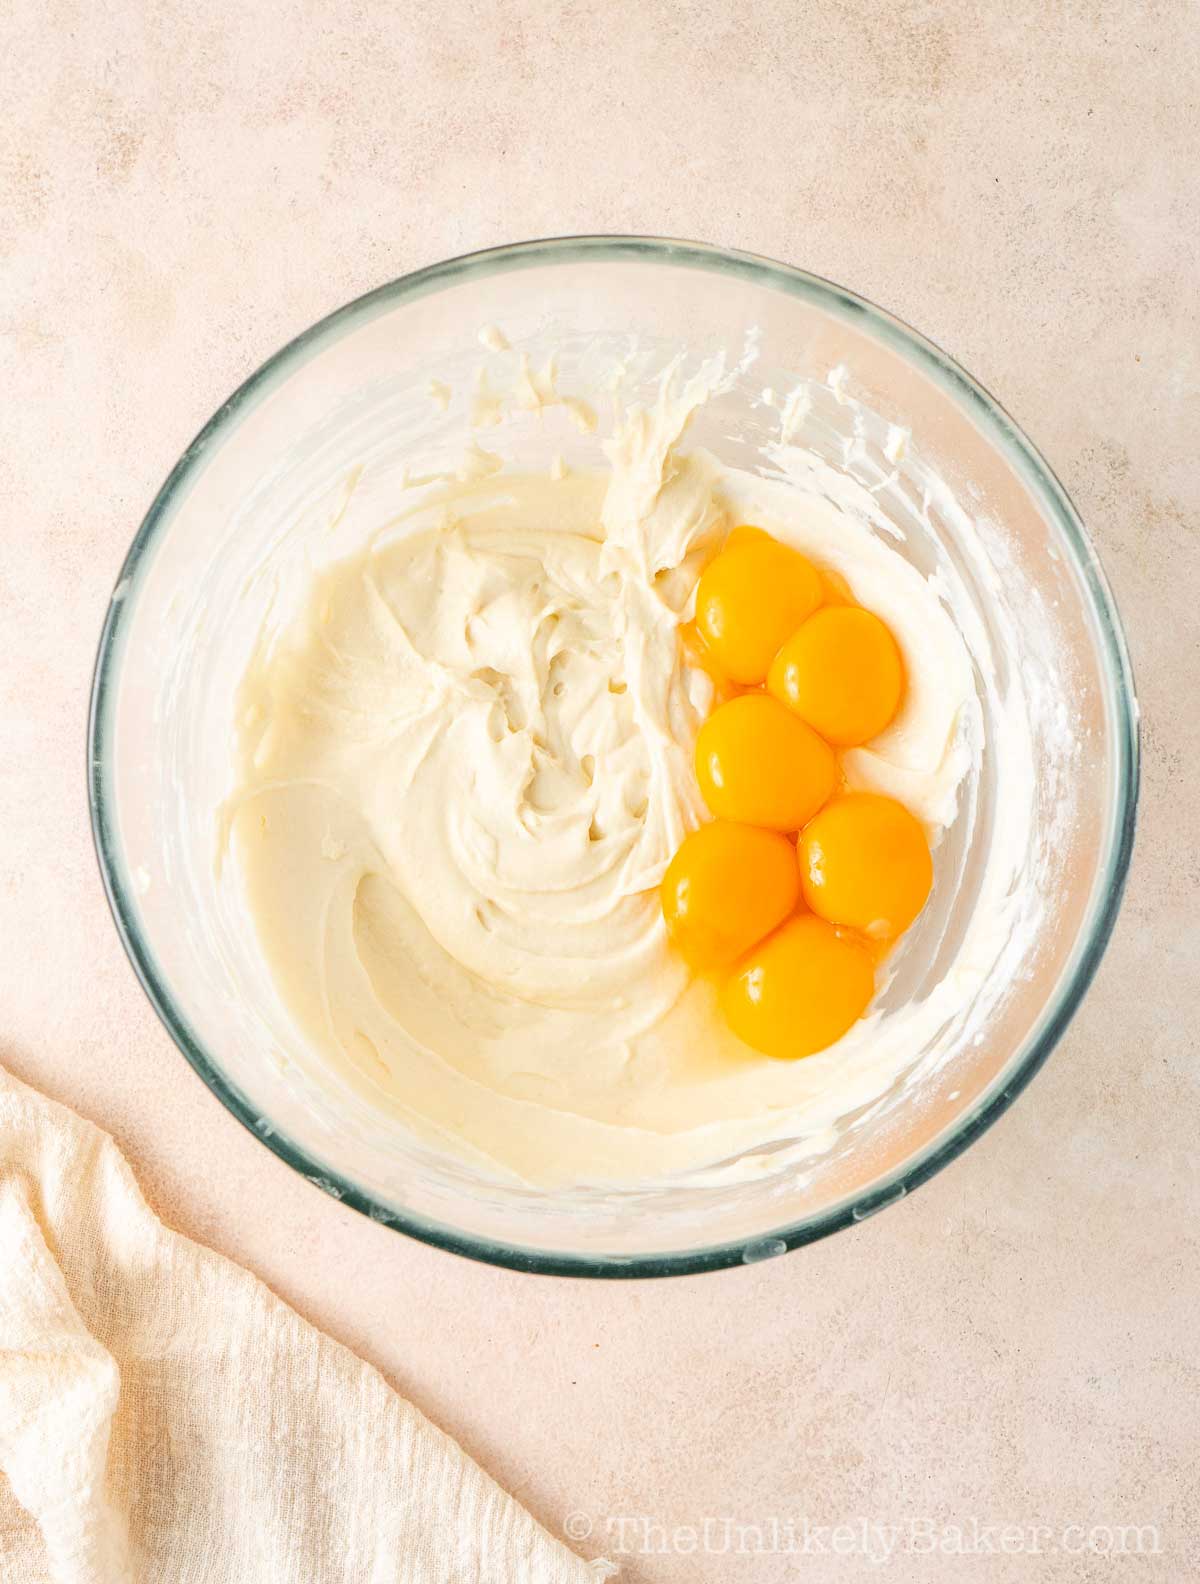
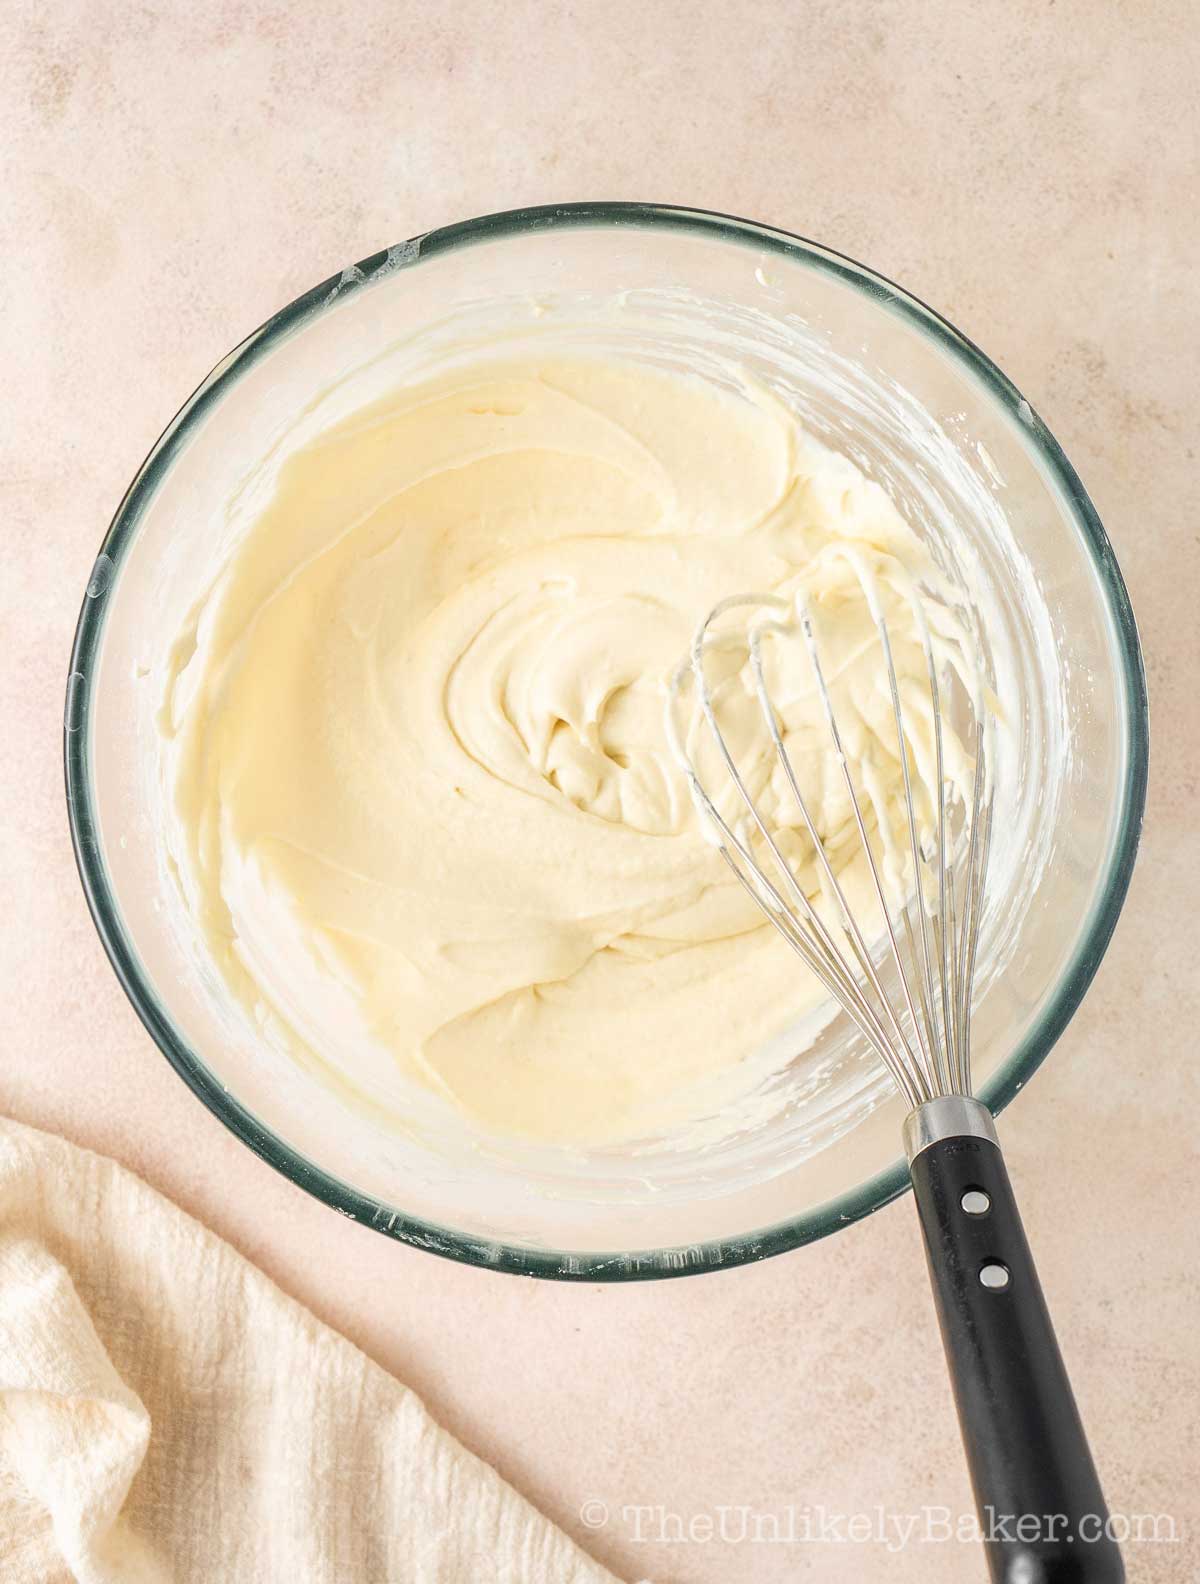
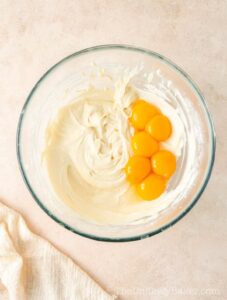
Add the egg yolks to the cooled cream cheese mixture and whisk well to combine. Put the kettle on to boil water for the water bath.
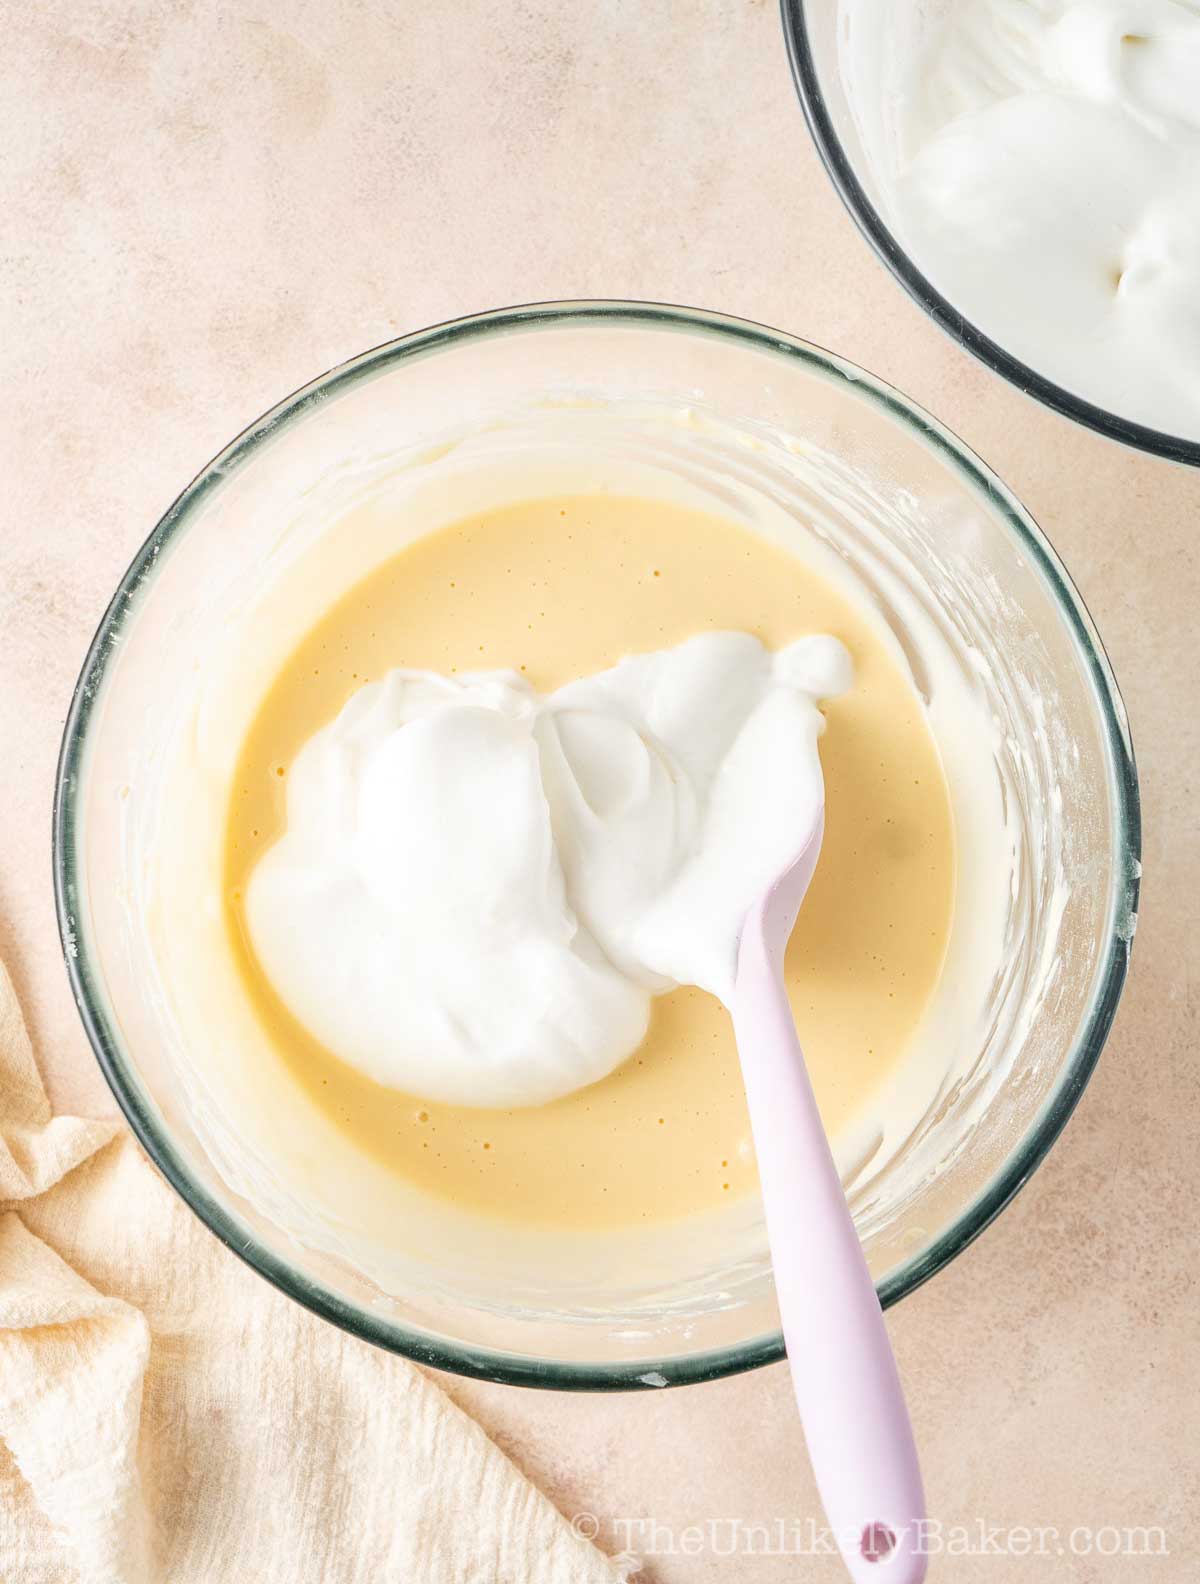
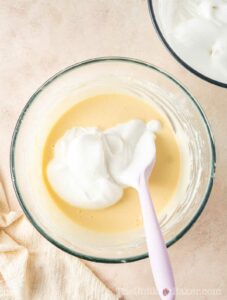
Add a third of the egg whites to the cream cheese and egg yolk mixture and gently fold. Add another third and continue to fold. Finally, add in the remaining egg whites and fold through until just combined. Be careful to keep the air and volume in the batter but there should be no streaks remaining.
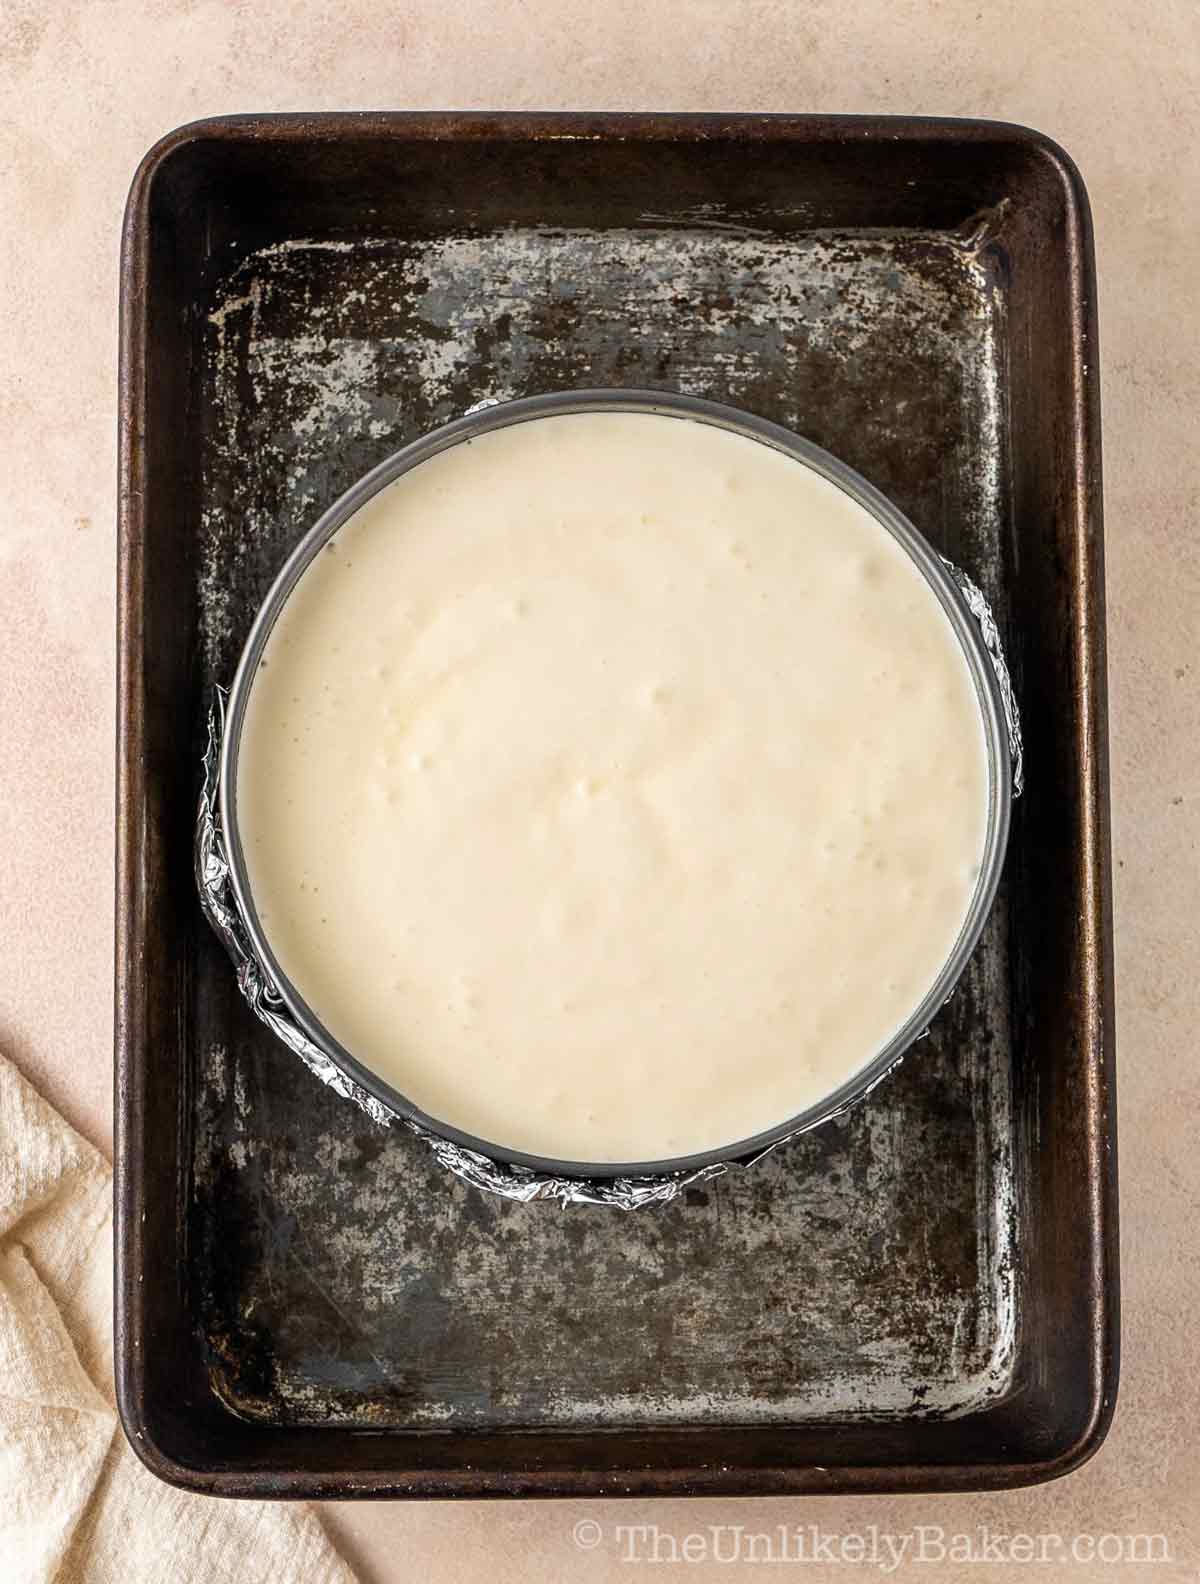
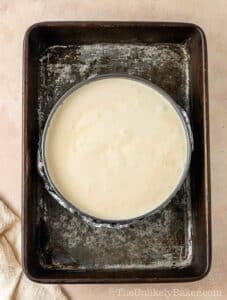
Pour the batter into the prepared pan, it will be quite full. If there are large air bubbles on top you can gently tap the pan on the counter a couple of times to settle them. Place the pan in a deep roasting pan and fill with boiling water about an inch deep. It should be around half way up the sides of the springform pan.
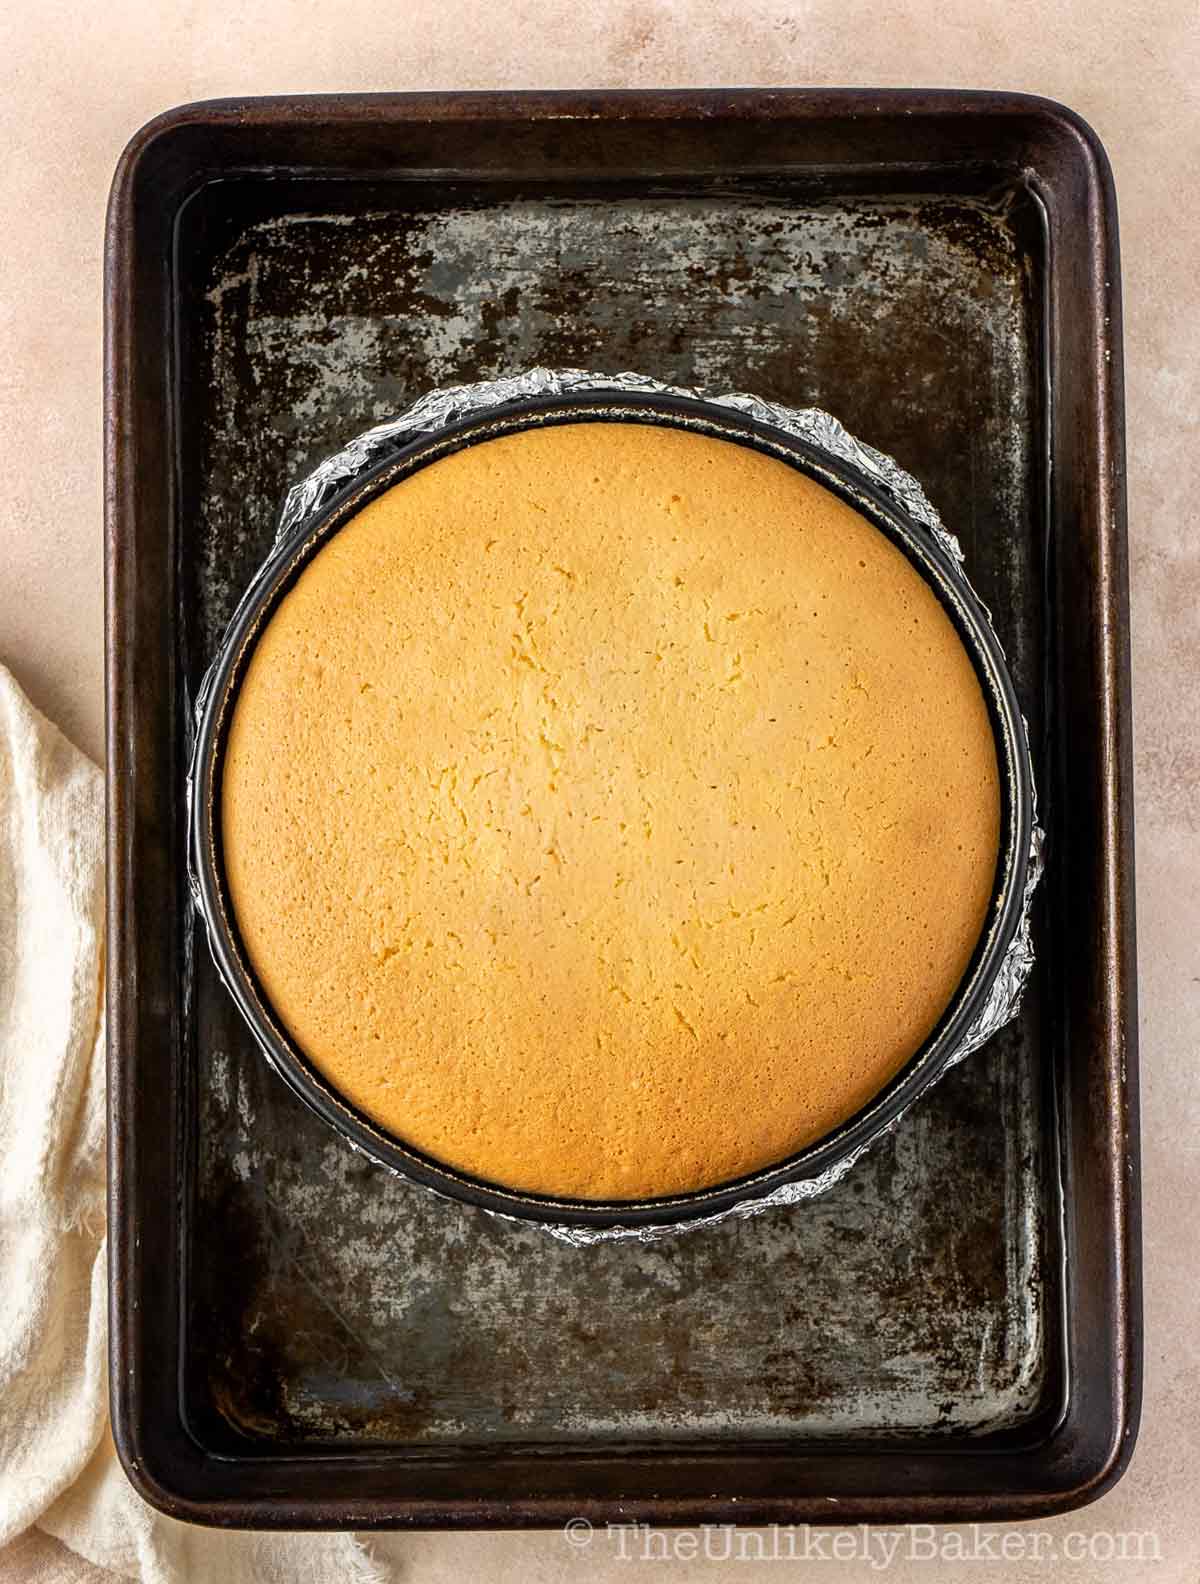
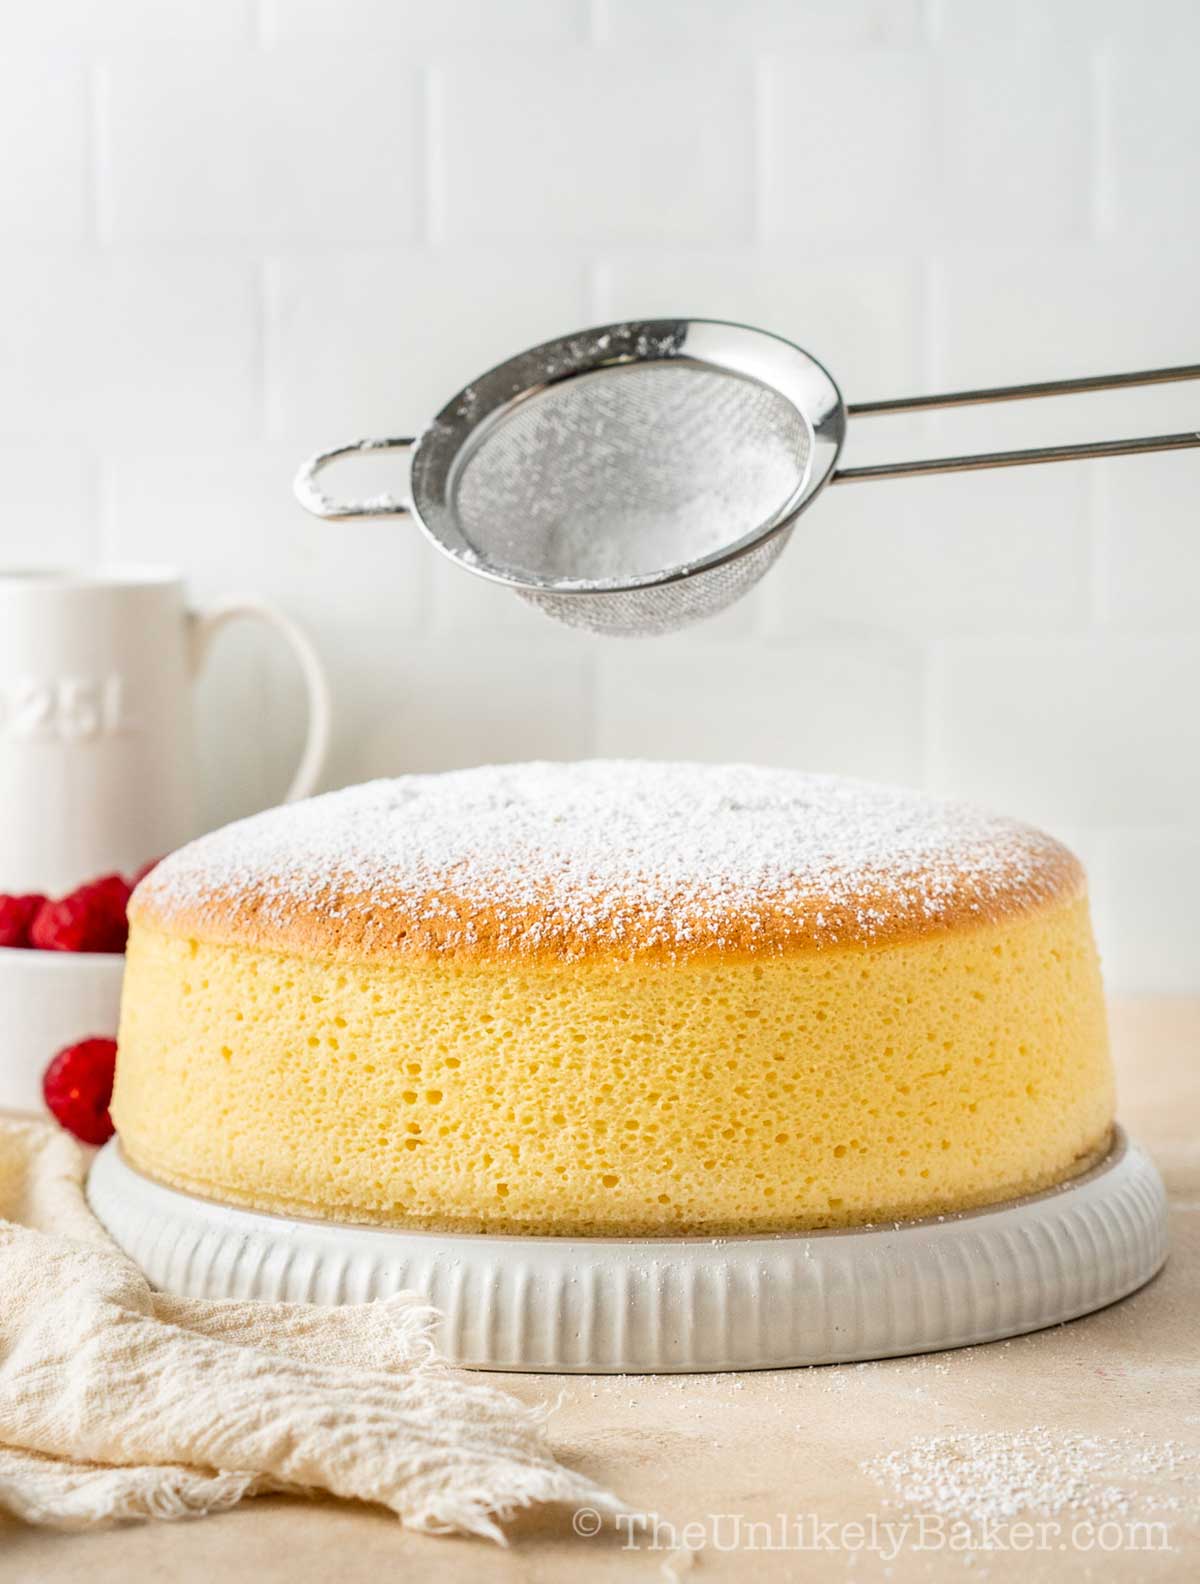
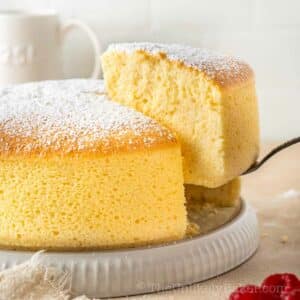
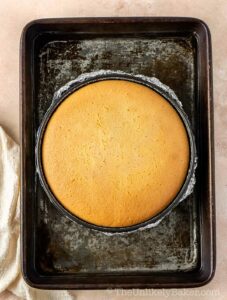
Bake and gradually cool according to instructions (see below). Remove the cheesecake from the water bath and gently release it from the pan. Allow to cool completely before dusting the top with icing sugar and enjoy!
Expert baking tips
Remember these tips for perfect Japanese soufflé cheesecake every time.
- Room temperature ingredients. Make sure to allow your ingredients to come to room temperature. They are easier to incorporate and helps you avoid over-mixing.
- Double boiler. The double boiler method is the best method for melting the cream cheese because you’d have better control and can ensure your mixture isn’t over-heating.
- Kitchen scale. In some cake and cookie recipes, you can get away with using cup measurements however, you definitely need a kitchen scale here. There is little room for error and every gram makes a difference!
- Soft peaks. Watch that you only beat the egg whites until soft peaks i.e. the meringue mixture is shiny and holds its shape, but the peak falls over itself when you pull out the whisk or beater. Over beating will cause the cheesecake to sink in the middle and/or crack.
- Smooth batter. Make sure your cream cheese flour mixture batter is smooth, fully incorporated and lump-free. Passing the batter through a fine mesh sieve is optional but should help. And once you add in your egg whites, fold gently so as not to deflate the meringue but make sure there are no streaks of eggs whites remaining before transferring to your pan.
- Oven temperature. It’s also very important to bake at the correct oven temperature. Like a kitchen scale, an oven thermometer is an inexpensive investment that will reward you with better cakes.
- Water bath. Make sure to use hot / boiling water for the water bath (or bain-marie) and not cold as this can result in temperature shock when put in the oven.
- Follow instructions. Ensure to read the recipe thoroughly before prepping, and to follow the instructions to a T, especially the ones relating to egg whites (above) and baking (below).
- Bake accordingly. To ensure best results, bake as follows:
| Instructions | Notes |
| Bake for 20 minutes at 150C / 302F. | Cheesecake should already have risen and look tall/soufflé-like. |
| Prop door ajar slightly and bake for an additional 20 minutes. This allows some of the heat to escape. | The top should be a light golden brown color. |
| Close the oven door and turn the oven off. Let the cheesecake sit for another 20 minutes. The residual oven heat will finish cooking the cheesecake. | |
| Finally, prop the door ajar and let cool gradually for 20 minutes. | This helps prevent shrinking however, expect some settling as the cake cools. |
| Remove from oven and allow to come to room temperature before dusting with icing sugar and serving. |
Recipe FAQs
The most common culprits are:
– Under-beaten or over-beaten egg whites. The meringue must be properly beaten to soft peaks.
– Not using a water bath. This ensures your oven stays at a gentle, even heat throughout baking.
– The cake cooled too quickly. For best results, follow the baking instructions and leave the cheesecake in the oven for 20 minutes to gradually cool.
There can be several reasons why egg whites won’t whip properly. Here are two things you can do to make sure that doesn’t happen next time:
– Make sure your bowl and beaters are dry and oil-free. Oil is meringue’s enemy!
– Start at medium speed before gradually switching to high speed.
Japanese cotton cheesecake is best served at room temperature the day it’s baked.
You can keep leftovers in the fridge where it should keep for a few days.
Note however that it would lose some of its jiggle and become a bit denser the longer it sits in the fridge.
More Asian cheesecake recipes
Looking to mix things up? Try these Asian-inspired cheesecake recipes.
Japanese cotton cheesecake will test your skills as a baker however, once you master it, it will be the highlight of any gathering you bring it to!
Perfect for Easter, Mother’s Day, the holidays or simply to enjoy on a lovely spring day.
Happy baking!
Did you make this Japanese cheesecake soufflé recipe? I’d love to hear all about it! Leave a comment or a star rating below. You can also tag me on Instagram or Facebook. I’d love to see your creations!
You can also find me on Pinterest and YouTube.
Japanese Soufflé Cotton Cheesecake
Equipment
Ingredients
- 60 g all purpose flour
- 15 g cornstarch
- ¼ tsp salt
- 1 250-g block cream cheese room temperature
- 50 g unsalted butter room temperature
- 100 ml milk room temperature
- 1 tbsp fresh lemon juice
- 6 large eggs separated, room temperature
- ¼ tsp cream of tartar
- 120 g granulated sugar
Instructions
- Line the base of an 8-inch springform pan with parchment paper. Wrap the pan completely with aluminium foil as this cake will be cooked in a water bath.
- Sift flour, cornstarch and salt. Set aside.60 g all purpose flour, 15 g cornstarch, ¼ tsp salt
- Gently melt the cream cheese in a double boiler until soft, then add the butter and milk. Whisk well until smooth and combined.1 250-g block cream cheese, 50 g unsalted butter, 100 ml milk

- Remove from the heat and add in the flour mixture and lemon juice. Whisk really well again until the mixture is smooth and creamy. You don’t want any lumps. Set aside to cool.1 tbsp fresh lemon juice
- Preheat the oven to 150C / 302F.
- Using a stand mixer fitted with the whisk attachment, or using a handheld electric mixer, whisk the egg whites and cream of tartar until foamy.6 large eggs, ¼ tsp cream of tartar
- Gradually add the sugar, a little at a time whisking constantly on medium speed.120 g granulated sugar
- Once all of the sugar has been added, turn the speed up to high and whisk until soft peaks form. This looks like the meringue mixture being shiny and holding its shape, but the peak falls over itself when you pull out the beater. Set aside.
- Add the egg yolks to the cooled cream cheese mixture and whisk well to combine.6 large eggs
- Put the kettle on to boil water for the water bath.
- Add a third of the egg whites to the cream cheese and egg yolk mixture and gently fold through. Add another third and continue to fold. Finally, add in the remaining egg whites and fold through until just combined. Be careful to keep the air and volume in the batter but there should be no streaks remaining.
- Pour the batter into the prepared pan, it will be quite full. If there are large air bubbles on top you can gently tap the pan on the counter a couple of times to settle them.
- Place the pan in a deep roasting pan and fill with boiling water about an inch deep. It should be around half way up the sides of the springform pan.
- Place the pan in the oven for 20 minutes. During this time it should rise high.
- After 20 minutes, gently open the oven door about 1 cm to release steam. Hold it slightly open using an oven mitt and continue baking for another 20 minutes.
- Close the oven door and turn off the oven for a final 20 minutes. It’s important at this step to not open the door all the way as the residual heat is going to continue to cook the cheesecake. At this point the top should be golden brown and starting to look a little dry.
- Gently open the oven door and prop open with a wooden spoon for a final 20-30 minutes to allow the cheesecake to slowly cool. This helps prevent shrinking and cracking.
- Remove the cheesecake from the water bath and gently release it from the pan. Allow to cool completely before dusting the top with icing sugar and enjoy!

Video
Notes
- Read through the recipe and follow it to a T for best results.
- Use a kitchen scale to weigh your ingredients.
- Use an oven thermometer so you know your oven temperature is accurate.
- Do not grease the sides of the cake pan, as this allows the cake to climb up the sides and results in a better looking cheesecake that doesn’t pull away from the sides too much.
- Whisk the egg whites only to the soft peaks stage. Do not over-whisk.
- Use hot/boiling water for the water bath and not cold as this can result in temperature shock when going in the oven.
Nutrition
Nutritional information are estimates only.
Sarah Walker Caron
I don’t really understand lines like that. But I do understand — and want — this lovely, light cheesecake. It sounds amazing!
Jolina
Oh me too. When there’s “hot” new place I wait until the hype has died down and then I call to make a reservation! 🙂 Thanks Sarah!
Raj
I am so curious about this. And after reading your story about the 2 hour lines, I have to try this!
Jolina
It’s crazy isn’t it? Hope I got you curious enough to do a little baking this weekend! 🙂 Thanks Raj!
Nicole Burkholder
Thanks for including the measurements along with the weight! There are so many more advanced baking recipes I’d love to try, but I don’t want to go buy a kitchen scale just for the fun of a few recipes! 🙂 Yours looks amazing!
Jolina
You’re very welcome Nicole 🙂 I find that Japanese desserts are really the only ones I need a kitchen scale for but I thought, hey I’m sure I can measure these out too and I’m so glad it worked! Hope you give it a try. Would love to hear how it goes.
Heather
I’ve never tried a Japanese cheesecake, but anything good enough that people form long lines for them, even knowing they may not get one, sounds like something I need get to know! It definitely looks light and fluffy and inviting. Adding to my try-soon list!
Jolina
Right?? I don’t know how that tastes like but this is one of my most requested cakes 🙂 Hope you like it! Thanks Heather!
Krysti
Looks absolutely divine! I love cheesecake and I’ve never tried Japanese. Saving for later xx
Jolina
Thanks Krysti! Japanese cheesecake is a wonderful surprise for those of us who are more used to the heavier NY cheesecake. Hope you enjoy it.
candy
I would much rather make this at home nice and fresh over standing in line and going home empty handed.
Redawna
Your photos are great, the cheesecake looks feather light and so delicate!
I have two men in my house who are not fans of traditional cheesecake but I do believe they both would love this version, with only 8 oz of cream cheese it is definitely nothing near traditional!
Bookmarking to try.
Jolina
Thank you! These are really super light and cottony soft. If you’ve never had them before and have only had the usual cheesecake you’re in for a happy surprise 🙂 Hope you guys enjoy it as much as we did! Do let me know how it goes 🙂
Sean
What a beautiful cake, and seriously tempting! I’ve always loved these Japanese cheesecakes. Even though Japan isn’t exactly the center of the dessert universe, there’s an exceptional dedication to perfecting a handful of amazing recipes there. Castella, Langue de chat, and of course… light, airy cheesecake. I’d never thought of tackling it myself, but your recipe is wonderfully helpful and detailed. Cheers.
Jolina
I love Japanese desserts. They are never too sweet, always delicate, just perfect IMO. Thanks for stopping by!
Hilary
Fabulous!! Love the idea of a less dense cheesecake. Will try!
Jolina
You will love how not dense it is 🙂 Thanks for stopping by!
Maria
Hi Jolina, This looks absolutely delicious! You make it seem so easy. I no longer have an excuse not to try. Thanks for the empowerment 🙂
Jolina
Thank you! Hope you try it and like it as much as I do!
Janice
This is incredible! I have avoided the cotton cheesecake recipes because they honestly scare me a little. Yours came out perfectly! The texture is beautiful! And you do make a good point, sometimes we psych ourselves out of trying new recipes because they seem so daunting, but often, if you just take it one step at a time, and follow along carefully, they turn out great!
Jolina
I feel like that about carrot cake. And pecan pie. And chocolate ganache. I can go on lol! But I’m slowly (oh so slowly) trying new things and experimenting and learning. Some fail, some succeed. Such is the like of a an unlikely baker lol! Hope you decide to try this recipe 🙂
KELLIE
A late bloomer and an unlikely baker – ha,ha what a great intro.
You hit a few nails on the head for me. I really despise New York Cheesecakes, I get all queasy and dizzy and then break out into a cold sweat if I try to eat even a bit of that stuff. I love the idea of a Chinese version although, I’m no baker but with a ‘if I can do it…’ endorsement I think I’m hooked.
This is my first time reading your blog and when I saw your name on the FBC thread I actually laughed out loud at the Banana part. So glad I took the time to visit your site. I enjoyed your post.
Jolina
Thanks! Means a lot 🙂 And while I like NY cheesecakes once in a while, THIS cheesecake I can eat everyday…I’m not even kidding! It’s light and soft and not too sweet and just wonderful 🙂 Hope you try it and enjoy it as much as I do!
Vicky Chin
Nice! I made some Japanese Cheesecake a while ago too. Yours looks fantastic ! It’s a good idea to first melt the cream cheese. (I used soft cream cheese instead of the block.)
Jolina
This kind of cheesecake is just great isn’t it? I love it. Thanks for stopping by!
Tita Kim
Congratulations, Jojo. You made me proud! You’re a very good writer/blogger. I can see you writing your own cookbook someday featuring all the recipes that you tried baking/cooking and the story behind each recipe plus eye catching photos that will leave each reader heading to the kitchen and trying the recipe himself /herself. Looking forward to your next cooking adventure.
Jolina
Thanks Tita Kim! Really appreciate it 🙂 I was hesitant to start this whole project (I didn’t think I could do it) but support from you guys keeps me going!
Lilybells
I’ll try to have the hubby buy a kitchen scale for a change! 🙂