• Skip to primary navigation
  • Skip to content
  • Skip to primary sidebar
  • Skip to footer

The Unlikely Baker

Easy and Delicious Recipes for the Home Baker!

  • Home
  • About Me
    • Hello
    • Terms of Use
  • Recipes
  • Blogging Resources
  • Subscribe
  • Contact

You Can Make Any Cake a Rainbow Cake

June 1, 2016 By Jolina 101 Comments

You can make any cake a rainbow cake – you just need a basic white or yellow cake, lots of bowls, a little patience, and the colours of the rainbow. A happy disposition is recommended (but optional).

Rainbow Cake

Love for Toronto

Toronto is a remarkable city. If you haven’t been to visit, let me tell you, the things you hear about it are true – it’s clean, it’s safe, people are polite. It is such a welcoming city, too – no matter the colour of your skin, no matter your religion (or lack thereof), no matter your ethnicity or sexual orientation, Torontonians accept you for who you are.

Happy Pride!

In fact, we celebrate our diversity, it’s what makes our city unique. And this is most apparent during Pride Week. Pride used to be just about LGBTQ (and it still is) but it’s evolved to become even more inclusive. And it culminates in a Pride Parade where a million people are out on the streets, just being themselves, having a grand time.

Rainbow Cake

This year though, they’ve decided to make it Pride Month, starting today. And what better way to kick off celebrations than with cake? (Cake is always the answer). 
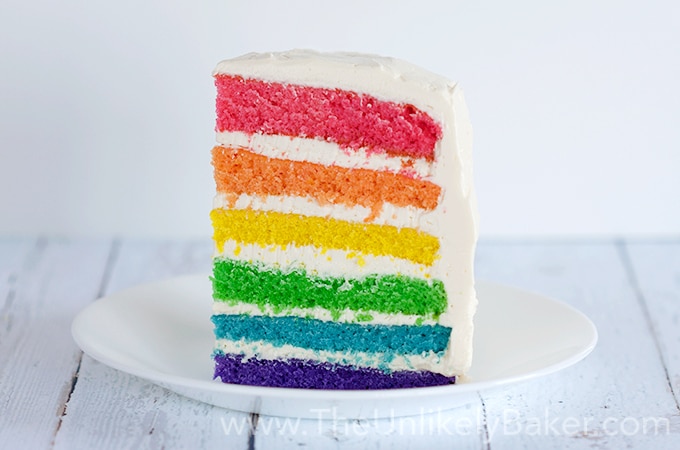
And what better cake to celebrate with than a rainbow cake?

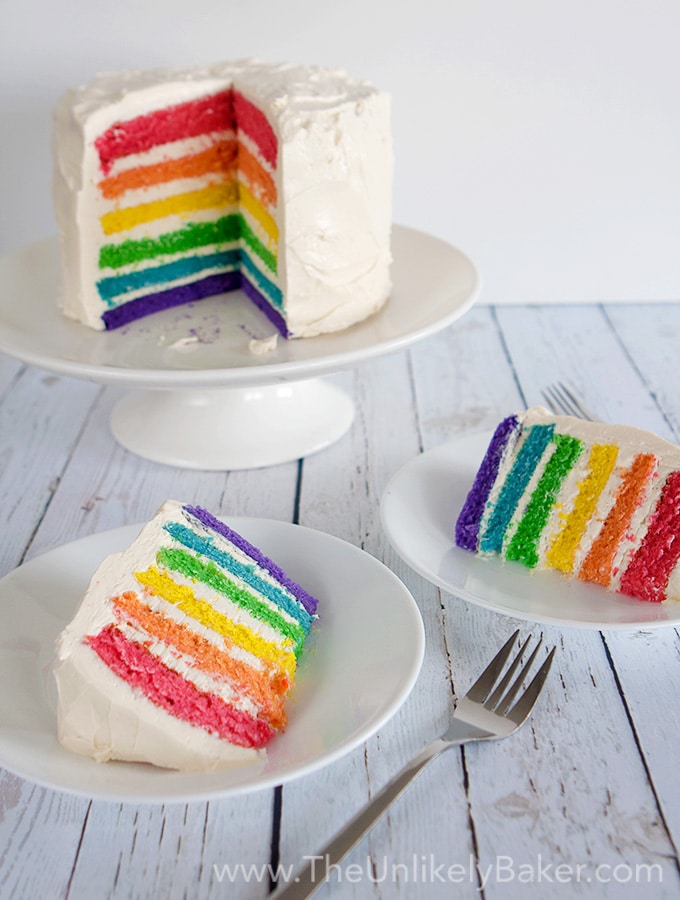
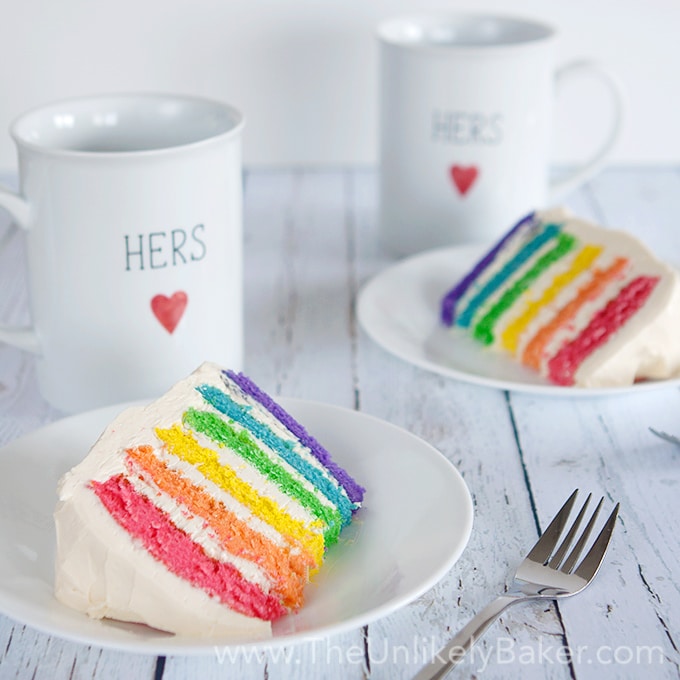
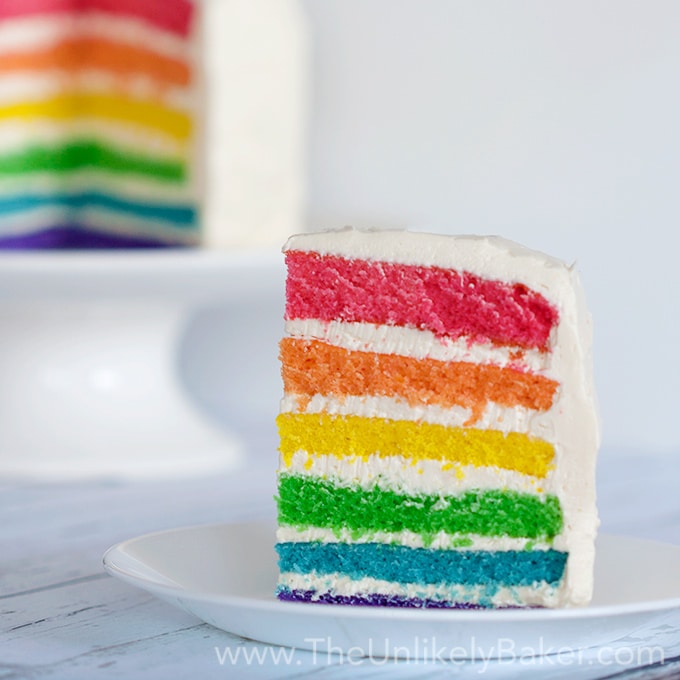
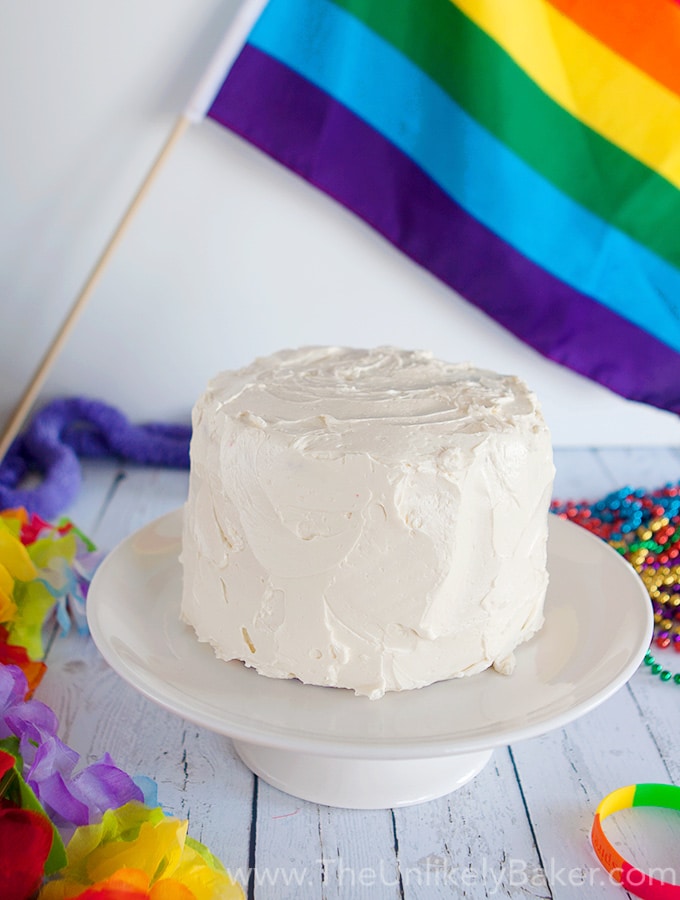
Your favourite cake, rainbow-fied

Rainbow Cake

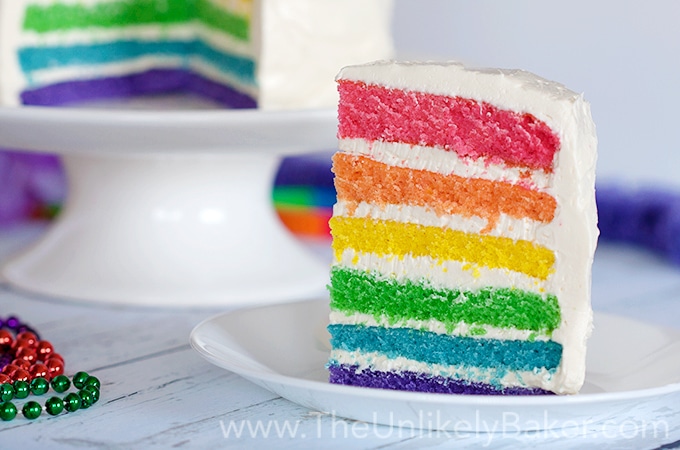
A rainbow cake looks intimidating (6 layers!) but it’s really just your favourite white or yellow cake (in my case, I used my favourite vanilla cake) that’s divided into 6 layers and tinted the colours of the rainbow. It takes time and patience but the end result is worth it.

Rainbow cake tips and tricks

You can’t just take any cake and tint it though. There are some things you need to keep in mind:

Rainbow Cake

  • Since this is going to be a 6-layer cake, the cake you pick has to be dense. Stay away from the soft and too moist cakes because after the 4th layer, your cake might not be able to support any more and either sink, sag or just collapse.
  • Pick a cake that has enough batter to be divided into 6. You want layers, not pancakes.
  • When dividing the batter, use a kitchen scale. You can eyeball it but do you really want to take the chance and end up with uneven layers? A kitchen scale is very useful here. You can get one for less than $20.
  • When dividing your batter, remember that there will be residue batter left on the bowl or the cup you’re using to transfer or the spatula you’re using to scrape. So if you have a total batter of 1300g / 6 = 216.67, don’t transfer exactly 216.67 to each bowl because you won’t have enough for your last one. Transfer a gram or two under to account for rogue batter.
  • If you don’t have enough pans, don’t be tempted to use different sizes and plop them into the oven all at once. And you can’t let the batter sit in the bowl waiting for the first batch to bake because the ingredients are reacting to one another more than they should. You’d need to divide the recipe and make only enough for the pans you have (i.e. if you only have 2 8-inch pans, you will have to divide the recipe into 3 so you’ll make it 3 times).
  • You need to use gel food colour. The liquid kind just won’t be vibrant enough and you’ll need to use a lot, which will put too much unnecessary liquid into your batter.
  • Once your cakes are baked, trim the top as well as the sides. Not only to ensure they are even, but also to ensure you get the burnt/brown spots out of there.

Rainbow cake frosting

Rainbow Cake

Now what to frost your cake with. I say pick your favourite frosting and go with it! White is always stunning with the rainbow colours but hey, it’s your rainbow cake and it’s all about celebrating who you are and what makes you happy. Just make sure you have enough frosting to frost between and all over your cake.

In my case, I used my go-to Swiss Meringue Buttercream and it went perfectly with my vanilla rainbow cake. It was delicious.

[clickToTweet tweet=”Brighten up someone’s day with this insanely happy rainbow cake!” quote=”Brighten up someone’s day with this insanely happy rainbow cake!”]

Step back and bask in the colours of the rainbow

Rainbow Cake

I know it looks like a lot of work but when you get into it, it’s really not that difficult. And the moment you cut into the cake and your exquisite layers look right back at you – take a moment and pat yourself in the back. Well done you.

So do your planning, bake this cake and wow your guests, birthday celebrant, yourself.

Print
You Can Make Any Cake a Rainbow Cake

You Can Make Any Cake a Rainbow Cake

You can make any cake a rainbow cake – you just need a basic white or yellow cake, lots of bowls, a little patience, and the colours of the rainbow.

Ingredients

    For the Cake:
  • 3 cups all purpose flour
  • 1 tablespoon baking powder
  • 1/2 teaspoon salt
  • 4 large eggs, room temperature
  • 2 cups granulated sugar
  • 1 tablespoon vanilla extract
  • 3/4 cup canola oil
  • 1 1/4 cup milk, room temperature
  • Gel food colour - red, orange, yellow, green, blue and purple
    For the Frosting:
  • You can use your favourite frosting or make this Swiss Meringue Buttercream

Instructions

    For the Cake:
  1. Preheat oven to 350F and grease the sides and the bottoms of 6 8-inch pans (see my tips on what to do when you don't have 6 pans). Line the bottom with parchment paper for easy release. Set aside.
  2. In a medium bowl, combine 3 cups flour, 1 tablespoon baking powder and 1/2 teaspoon salt. Set aside.
  3. Using a handheld electric mixer or a stand mixer fitted with the paddle attachment, beat the 4 eggs, 2 cups sugar and 1 tablespoon vanilla until light and triple in volume (about 10 minutes). Start on low speed then gradually move up to medium-high speed. Drizzle the 3/4 cup canola oil while beating.
  4. Switch to low speed and add a third of your flour then half your milk. Another third of your flour, the rest of your milk and finally the rest of your flour. Make sure each addition is incorporated well. Beat the batter until smooth (about 5 minutes).
  5. Weigh your batter and divide the total weight into 6. Transfer the corresponding weight into separate bowls (see my tips on how to correctly divide and transfer the batter). Tint each bowl in red, orange, yellow, green, blue and purple. Then transfer into prepared pans and bake for 20 minutes (see notes) or until a toothpick inserted in the middle comes out clean or with minimal crumbs.
  6. Let cool in the pans for 10 minutes before transferring to a rack to cool completely.
    For the Frosting:
  1. See Swiss Meringue Buttercream
    For the Assembly:
  1. Trim the tops of the cake to ensure they are level. Also trim the sides to remove any burnt spots. The important thing to remember is all your cakes must be of equal width and height.
  2. Put the purple cake on a cake turntable first and evenly spread frosting on top. Do the same for the blue, green, yellow, orange and red layers. Then proceed to cover the rest of the cake with frosting and decorate as desired.

Notes

You can also use 6 6-inch pans. Just remember that you will end up with a smaller width cake but thicker layers, and therefore a taller cake.

If you have 6 pans, they won't all fit on the middle oven rack position. So at 10 minutes, switch the bottom pans with the top pans for an even bake.

You can cook the cakes the day before and make the frosting the day you're serving the cake. Just leave the cakes on the counter and loosely cover with a tea towel.

You'll notice that my red layer is more pink/coral than red. I used the red gel colour but it turned pink. Any tips?

4.29
https://theunlikelybaker.com/rainbow-cake/
This delicious recipe brought to you by www.TheUnlikelyBaker.com | (c) 2016-2017

(Vanilla cake recipe adapted from Ricardo).

Happy baking! (And Happy Pride Toronto!)

Did you make this rainbow cake? Tell me about it in the comments section below. I’d love to hear all about it.

Want another fun cake? Check out this Funfetti Cake.

And let’s get social! Find me on Facebook, Pinterest, Instagram, Twitter, Google+ and Flipboard.

Or subscribe so you don’t miss a recipe. I promise I don’t spam (I hate spam too).

Do you want to improve your food photography, monetize your blog or start your very own food blog? Check out my Blogging Resources.


  • Share
  • Tweet
  • Pin
  • Stumble
  • Yum
  • Flip
  • 970shares

Filed Under: Cakes, Pies & Tarts, Recipes

« Turon (Filipino Banana Lumpia) with Salted Caramel Sauce
Croissant Bread Pudding with Lemon Butter and Blueberries »

Reader Interactions

Comments

  1. Sarah says

    October 17, 2017 at 11:23 am

    Thanks for the recipe, I’m making it for my youngest child’s 3rd birthday. I think with red food coloring, even the gel, you just have to use way more than you really want to or think necessary. You might also consider using a white cake as the base recipe rather than yellow, the yellow from the egg yolks might have an impact on the final colors.

    Reply
    • Jolina says

      October 17, 2017 at 6:05 pm

      Hi Sarah! I was just talking to my local baking supplies store about red food colour last Saturday! I was telling them how I cannot for the life of me get anything to turn Christmas red (who wants to receive fuchsia Christmas cookies LOL!). They explained that with butter based anything, it is almost impossible so using a white cake is a smart move. They did recommend I try using powdered food colour next time instead of gel. I haven’t tried yet though. Have you? PS: Happy birthday to your little one!

      Reply
  2. Meg says

    October 12, 2016 at 11:54 am

    This looks gorgeous and i’m hoping to give it a go as I need to make an Olympic themed ‘showstopper’ for a work bakeoff. I want to keep things simple and stick with your swiss mergingue buttercream – do you have a sense of how many batches of that I would need to make in order to assemble and cover the cake?

    Also – I plan to bake on Sunday and hopefully assemble on Monday – will it hold up to take into work on a Tuesday? I assume so but not sure if the color from the cakes bleeds at all or how well the frosting will hold up?

    Reply
    • Jolina says

      October 13, 2016 at 3:35 am

      Hi Meg! I used Swiss Meringue Buttercream here too. I have a recipe on my blog and that yields about 4 cups and it was enough. I didn’t do any sort of decoration though, just the layers, the crumb coat and the final coat so if you’re thinking of doing like flowers on top or on the sides, you may need to do 1.5 of the frosting recipe.

      Are you planning to make the buttercream the day you assemble it? That would be my suggestion. And yes the cake should stay in place. You can put it in the fridge once it’s frosted if you like and just keep at room temp about 20 mins before you’re serving it.

      The colours of the cake here don’t bleed even days after assembly. I used gel food colour. Good luck with the bake off!!

      Reply
  3. Dylan Cutler says

    August 20, 2016 at 11:31 am

    I love this PRIDE cake! How gorgeous. I should try a layered cake one day… I usually stick with layered smoothies haha

    Reply
    • Jolina says

      August 20, 2016 at 4:21 pm

      Hi Dylan! Thank you 🙂 I on the other hand should really have more layered smoothies haha! Hope you’re having a wonderful weekend!

      Reply
  4. YumGoggle says

    July 24, 2016 at 12:56 pm

    That is a beautiful, well done rainbow cake! Very nice!

    Reply
    • Jolina says

      July 24, 2016 at 7:33 pm

      Thank you! It was a challenge in mis en place but worth the effort 🙂

      Reply
  5. Ana says

    June 7, 2016 at 2:12 pm

    It looks so delicious! I feel like putting my hands inside my laptop and grabbing it right now! Have pinned it for my reference.

    Reply
  6. Sara says

    June 6, 2016 at 9:23 pm

    What a beautiful cake! The colors are just stunning. My daughter would love this for her next birthday.

    Reply
    • Jolina says

      June 6, 2016 at 9:50 pm

      Thanks Sara! Make sure to use the gel food colour instead of the liquid ones to get the vibrant colours. Hope your daughter loves it! 🙂

      Reply
  7. suki says

    June 6, 2016 at 12:14 pm

    OMG! I am drooling ! lovely 🙂

    Reply
    • Jolina says

      June 6, 2016 at 9:51 pm

      My job is done lol! Thanks for passing by Suki 🙂

      Reply
  8. Helena says

    June 6, 2016 at 12:49 am

    this is so cool! I have not seen the rainbow cake before and I think it is utterly great! thank you for sharing this!

    Reply
    • Jolina says

      June 6, 2016 at 9:52 pm

      Happy to hear that 🙂 You are most welcome Helena!

      Reply
  9. Sean says

    June 5, 2016 at 9:39 pm

    Very nice! I love the way you’ve really made rainbow cake accessible and do-able, instead of just posting a bunch of (admittedly gorgeous) cake photos.

    Oh and I’ve never lived in Toronto, but I love it too. I’ve never understood the haters. 🙂

    Reply
    • Jolina says

      June 6, 2016 at 9:53 pm

      What haters? Ha ha 🙂 Thanks Sean! I tried to make it as detailed as possible so everyone can recreate it 🙂

      Reply
  10. kid can doodle says

    June 5, 2016 at 1:51 pm

    gorgeous! and thanks for those tips! I’ve always wanted to try it, but I’ve never done any layer cakes!

    Reply
    • Jolina says

      June 6, 2016 at 9:55 pm

      I must admit layer cakes can really be daunting but organization is key to a stress-free kitchen 🙂 Hope you give it a shot!

      Reply
  11. Cassie | Crumb Kitchen says

    June 5, 2016 at 6:21 am

    Yesssss, Jolina! This is a fantastic post. Great tip about using dense cake—I would’ve forgotten entirely and had a collapsed rainbow mess on my hands. Love that you made this for Pride Month too! 🙂

    Reply
    • Jolina says

      June 6, 2016 at 9:56 pm

      Thanks Cassie! That’s lovely coming from you, you’re an awesome baker! And I just thought Pride = rainbow = rainbow cake 🙂

      Reply
  12. Gemima says

    June 4, 2016 at 11:16 am

    This looks so good :0 it belongs on pintrest and in my stomach .my older sisters birthdays coming up in going to “try” to do this .hopefull it’ll come out right

    Reply
    • Jolina says

      June 6, 2016 at 9:57 pm

      Hi Gemima! Thanks for pinning! And your sister is very lucky – she is about to receive a really awesome birthday cake 🙂 Let me know how it goes!

      Reply
  13. Sophie Beland says

    June 4, 2016 at 7:18 am

    This cake just looks absolutely perfect! I’m sure it’s harder than you made it sound but can’t wait to try.

    Sophie | MapleTreeBlog

    Reply
    • Jolina says

      June 6, 2016 at 9:58 pm

      Thanks Sophie! I promise it’s not difficult, just more steps than your usual cake 🙂 So planning ahead is really key here. Hope you give it a shot!

      Reply
  14. chloe | boxwood avenue says

    June 4, 2016 at 5:50 am

    I love this idea! So cute – I think I would do an ombre version!

    Reply
    • Jolina says

      June 6, 2016 at 9:59 pm

      An ombre version would look gorgeous! You must share a picture of the final product! 🙂 Can’t wait to see. Thanks Chloe!

      Reply
  15. Agatha says

    June 4, 2016 at 3:37 am

    I had the fortune of staying in Toronto for a over a month and fell in love with it. It is a very inclusive and embracing city and wish I could live there long term!

    Reply
    • Jolina says

      June 6, 2016 at 10:01 pm

      Hi Agatha! I do feel homesick a lot but living in Toronto helps counter that – it really is a lovely city 🙂 Winter I don’t care for so much (ha ha) but the summers are just stunning.

      Reply
  16. Marisa says

    June 3, 2016 at 10:42 pm

    I love it!! Beautiful colours, I have always wanted to try one

    Reply
    • Jolina says

      June 6, 2016 at 10:02 pm

      Thanks Marisa! It’s the gel food colour, it really makes a big difference. Hope you get to try to make one – maybe the next birthday that comes up 🙂

      Reply
  17. Cristina @ I Say Nomato says

    June 3, 2016 at 9:08 pm

    Happy Pride Month! What a beautiful way to celebrate, this cake is GORGEOUS. I love your tips – I never thought of measuring them out so they weigh slightly less to account for the extra batter, brilliant!

    Reply
    • Jolina says

      June 6, 2016 at 10:04 pm

      Hi Cristina! Happy Pride! Let’s just say I learn from my mistakes haha 🙂

      Reply
  18. janet @ the taste space says

    June 3, 2016 at 7:03 pm

    Happy Pride! When I saw your cake, I didn’t even think of a rainbow cake for that reason, but it is so fitting. I love the vibrant colours of your cake. Nice to know it isn’t as hard as one would think to make.

    Reply
    • Jolina says

      June 6, 2016 at 10:06 pm

      Hi Janet! Happy Pride! I was surprised too. It wasn’t as difficult as I expected; just more steps than usual 🙂 Hope you get to try making one sometime.

      Reply
  19. Rose Sahetapy says

    June 3, 2016 at 6:02 pm

    Your tips are valuable. It’s been a long time I wanted to make rainbow cake but I don’t really dare to make it because all those layers. Thanks for sharing the tips.

    Reply
    • Jolina says

      June 6, 2016 at 10:08 pm

      Hi Rose! You are most welcome. All those layers are intimidating TBH but if you plan ahead and manage your time you’ll do great 🙂

      Reply
  20. MDIVADOMESTICA says

    June 3, 2016 at 4:08 pm

    This is so fun and would put a smile on anyone’s face! Great tips on how to make it too. Thanks for sharing!

    Reply
    • Jolina says

      June 6, 2016 at 10:08 pm

      Doesn’t it? It’s just so colourful and bright and happy 🙂 Thanks for passing by!

      Reply
  21. Maggie Unzueta says

    June 3, 2016 at 3:23 pm

    Pinned for later. This is just so so so cool!

    Reply
    • Jolina says

      June 6, 2016 at 10:09 pm

      Hi Maggie! Thanks for pinning! Let me know how it goes when you get the chance to make it 🙂

      Reply
  22. Natanja says

    June 3, 2016 at 10:04 am

    I love this cake! It is soooo beautiful! The colors look so vibrant and the layers are very even. You did an amazing job!
    I’m happy to hear that Toronto is such clean and friendly city 🙂 I cannot wait to see it for myself in a bit over a month!

    Reply
    • Jolina says

      June 6, 2016 at 10:11 pm

      Thanks Natanja! You’re an awesome baker and you bake stunning cakes so I really appreciate it 🙂 And yes, I’m excited for your trip! Wee!

      Reply
  23. Rada (journous.com) says

    June 3, 2016 at 9:09 am

    Yum!! Love how all of the colors came out really bright!

    Reply
    • Jolina says

      June 6, 2016 at 10:11 pm

      Thanks Rada! I used gel food colour and it really makes a ton of difference 🙂

      Reply
  24. Aarika says

    June 2, 2016 at 10:23 pm

    This is a beautiful cake! I love the colors and concept. Stunning!

    Reply
    • Jolina says

      June 6, 2016 at 10:12 pm

      Thanks Aarika! Appreciate the kind words 🙂

      Reply
  25. Mindy's Cooking Obsession says

    June 2, 2016 at 9:03 pm

    I love the way this cake looks! Tanks for all the tips and tricks.

    Reply
    • Jolina says

      June 6, 2016 at 10:13 pm

      Thanks very much Mindy! And you are most welcome too 🙂

      Reply
  26. Brooke says

    June 2, 2016 at 8:50 pm

    I bet it tastes as good as it looks. The pride cake is amazing but your photos are off the chart. Great job with this post. I couldn’t wait to read and see more.

    Reply
    • Jolina says

      June 6, 2016 at 10:14 pm

      It actually does taste delicious. It’s a vanilla cake with a vanilla frosting and it’s just lovely 🙂 Thanks for your comment on the photos, too! Appreciate it 🙂

      Reply
  27. The Gifted Gabber says

    June 2, 2016 at 3:00 pm

    Another amazing creation from you! This is so impressive! – Amy @ http://thegiftedgabber.com

    Reply
    • Jolina says

      June 6, 2016 at 10:15 pm

      Thank you very much Amy! Happy Monday! 🙂

      Reply
  28. Amber Myers says

    June 2, 2016 at 2:35 pm

    This looks so awesome!

    Reply
    • Jolina says

      June 6, 2016 at 10:15 pm

      Thank you very much Amber! Appreciate it 🙂

      Reply
  29. liz says

    June 2, 2016 at 2:01 pm

    Mmmmm-mmmmm-mmmmm!!!! I think I’ve just found my next birthday cake as your rainbow cake looks amazing!!!! And great instructions too so it looks do-able! And I have a month to practice….now then, where’s my apron….?!! Great post, thanks for sharing!

    Reply
    • Jolina says

      June 6, 2016 at 10:17 pm

      Awesome! I’m excited for you Liz! Let me know how it goes (but just in case things get lost in cyberspace – I wish you a very happy birthday!)

      Reply
  30. JT says

    June 2, 2016 at 12:29 pm

    These are so pretty! I love how in the pictures. You show Hers and Hers mugs! My wife and I have thought about moving to Canada. The U.S. is getting more and more scary. Violence is getting way out of hand here. Maybe once it was a great nation. But now it is more like the ghetto side of town that you avoid….

    Reply
    • Jolina says

      June 6, 2016 at 10:21 pm

      Thanks very much JT! I got those mugs at a huge discount too 🙂 Sorry to hear about the violence. Toronto has crime too don’t get me wrong – I guess there’s crime anywhere. We all just really need to be smart and careful these days eh? It’s not the world our parents grew up in that’s for sure.

      Reply
  31. Amy Jones says

    June 2, 2016 at 12:08 pm

    I bet this tastes like happiness. Keep up the good work!!

    Reply
    • Jolina says

      June 6, 2016 at 10:21 pm

      Oh my, that’s exactly how I would describe it lol! Thanks Amy! Appreciate it 🙂

      Reply
  32. Ana De- Jesus says

    June 2, 2016 at 11:45 am

    AW Happy Pride and I love that Toronto is so welcoming and inclusive rather than exclusive. The cake is amazing!

    Reply
    • Jolina says

      June 6, 2016 at 10:24 pm

      Thanks Ana! There are some bad apples as with any city but generally people are nice and welcoming 🙂 Happy Pride!

      Reply
  33. Dreammerin says

    June 2, 2016 at 7:44 am

    Such an amazing idea ! These all colours and the whole idea is great!

    Reply
    • Jolina says

      June 6, 2016 at 10:25 pm

      Thank you very much! The colours just make you smile don’t they? 🙂

      Reply
  34. Kate @ VeggieDesserts says

    June 2, 2016 at 6:10 am

    What a stunning cake. My children would LOVE it!

    Reply
    • Jolina says

      June 6, 2016 at 10:33 pm

      Thanks Kate! Try keeping the layers a secret then watch their faces when they see the rainbow inside. FUN! 🙂

      Reply
  35. Dannii @ Hungry Healthy Happy says

    June 2, 2016 at 6:00 am

    I am hoping that my husband will make me a rainbow cake for my birthday – they look beautiful.

    Reply
    • Jolina says

      June 6, 2016 at 10:33 pm

      Drop a major HINT HINT 🙂 Hope you get your wish! Thanks Dannii!

      Reply
  36. Megan Indoe says

    June 2, 2016 at 2:31 am

    Oh my gosh this is so amazing! I would love to attempt this! Unfortunately, I lack the patience needed to make this! Haha. Perhaps on a special occasion I could muster up the patience to make such a beautiful cake! Thanks for sharing!

    Reply
    • Jolina says

      June 6, 2016 at 10:35 pm

      Believe me Megan, patience is NOT one of my virtues either haha. So if I can do it anybody can! Just a little planning and organization and you’re set. Let me know when you get the chance to attempt it! 🙂

      Reply
  37. Melanie says

    June 2, 2016 at 2:13 am

    My best friend will love this! I’ll makes it for her birthday.

    Reply
    • Jolina says

      June 6, 2016 at 10:36 pm

      She is lucky to have you! Hope you she loves it. Thanks Melanie! Let me know how it goes 🙂

      Reply
  38. Lainey Robinson says

    June 1, 2016 at 10:46 pm

    Great job! Looks amazing! Keep it up!

    Reply
    • Jolina says

      June 6, 2016 at 10:38 pm

      Oh my gosh Lainey really? Thanks!!! I kind of messed up the frosting outside so I opted for a “rustic” look haha. Someday I will get really sharp and smooth edges…

      Reply
  39. Elizabeth says

    June 1, 2016 at 10:11 pm

    Happy pride!!!

    Reply
    • Jolina says

      June 6, 2016 at 10:38 pm

      Thanks very much Elizabeth! Happy pride to you too! 🙂

      Reply
  40. Liz @ Ready to Yumble says

    June 1, 2016 at 4:16 pm

    Jolina you’re killing me – all I can think about is combining this rainbow cake with your funfetti cake! OMG the colors and the sprinkles together! I could die! Love love love.

    Reply
    • Jolina says

      June 6, 2016 at 10:43 pm

      Thanks very much Liz! Putting sprinkles in the rainbow cake will be an eruption of colours like you’ve never seen before. Your kitchen (and you) will never be the same lol! Cannot wait to see what you come up with 🙂

      Reply
  41. The Food Hunter says

    June 1, 2016 at 2:57 pm

    such a pretty cake but you had me at a lot of bowls 🙂

    Reply
    • Jolina says

      June 6, 2016 at 10:44 pm

      Hahahahaha yes, our dishwasher was overflowing with bowls of different sizes. It’s a small price to pay though 🙂 Hope you try it! 🙂

      Reply
  42. Helen @ Fuss Free Flavours says

    June 1, 2016 at 2:26 pm

    What an awesome cake!

    I loved Toronto when I visited two years ago – I’d love to return.

    Reply
    • Jolina says

      June 6, 2016 at 11:04 pm

      Thanks Helen! Hope you can visit again soon. We’re having a lovely summer so far 🙂

      Reply
  43. Georgina Ingham | Culinary Travels says

    June 1, 2016 at 1:55 pm

    This cake looks absolutely amazing. I love the look of rainbow cakes but hardly ever use food colouring. Swiss buttercream is my favourite too.

    Reply
    • Jolina says

      June 6, 2016 at 11:06 pm

      Thanks Georgina! I used gel food colour – you only need very little to get vibrant colours like that. And isn’t Swiss Buttercream just a dream to frost with? 🙂

      Reply
  44. Suchi @elegantmeraki says

    June 1, 2016 at 12:00 pm

    No idea how to make it red but it looks perfect! Rainbow cake is on my to do list forever. I love Toronto beautiful city and foodies heaven.

    Reply
    • Jolina says

      June 6, 2016 at 11:08 pm

      Hi Suchi! I had the same problem last Christmas. I gave away Christmas cupcakes that had fuchsia frosting haha. I don’t know why red does not like me! Hope you can visit Toronto; it is a great place for foodies 🙂

      Reply
  45. Tracy says

    June 1, 2016 at 11:39 am

    You make this look so easy!! Your cake making skills are definitely something I aspire to – I’m FAR from making any layered cake in general! This is simply gorgeous!

    Reply
    • Jolina says

      June 6, 2016 at 11:09 pm

      Thanks! Though I’m just learning too Tracy 🙂 So if I can do it anybody can for sure 🙂

      Reply
  46. Mary says

    June 1, 2016 at 11:35 am

    What a great way to celebrate Pride month! That cake is gorgeous!

    Reply
    • Jolina says

      June 6, 2016 at 11:10 pm

      Thanks very much Mary! Happy Pride to you 🙂

      Reply
  47. sue | theviewfromgreatisland says

    June 1, 2016 at 11:18 am

    I have ALWAYS wanted to make (and eat!) one of these rainbow cakes, you’ve made it sound so easy, I think I’ll finally give it a go — what a wonderful surprise to cut into the pure white cake and see the stripes 🙂

    Reply
    • Jolina says

      June 6, 2016 at 11:11 pm

      Hi Sue! It’s really not as difficult as it looks – just lots of planning and organization 🙂 I’m excited for you! Let me know how it goes 🙂

      Reply
  48. Brandon says

    June 1, 2016 at 10:55 am

    Happy Pride! This is a lovely way to celebrate 🙂 Those rainbow layers are just perfect.

    Reply
    • Jolina says

      June 6, 2016 at 11:12 pm

      Hi Brandon! Thank you very much! And happy pride to you too! 🙂

      Reply
  49. Just Jo says

    June 1, 2016 at 10:42 am

    Oh I do love the idea of a rainbow cake, but they are often so less well executed than this one – which is gorgeous! What a brilliant and informative post too, packed full of great hints and tips 😀

    Reply
    • Jolina says

      June 6, 2016 at 11:13 pm

      Thank you very much Jo! I tried to make it as detailed as possible so everybody can make rainbows 🙂

      Reply
  50. Julie | Bunsen Burner Bakery says

    June 1, 2016 at 10:31 am

    Seriously, so, so gorgeous. I need an excuse to make a rainbow cake now!

    Reply
    • Jolina says

      June 6, 2016 at 11:15 pm

      Thanks very much Julie! Everyday is cake day 🙂

      Reply

Trackbacks

  1. 25+ of the Best St Patrick's Day Recipes - My Turn for Us says:
    February 12, 2018 at 10:40 am

    […] Rainbow Cake […]

    Reply
  2. 6 Ways to Eat the Rainbow | Safari Hospitality says:
    February 7, 2017 at 11:48 am

    […] out this beautiful dessert from The Unlikely […]

    Reply

Leave a Reply Cancel reply

Your email address will not be published. Required fields are marked *

Primary Sidebar

Welcome to The Unlikely Baker!

Hi! I'm Jolina and I'm definitely a late bloomer, a thoroughly unexpected baker. You wouldn't find me in the kitchen as a child. And I have no memories of baking cookies with my grandma. I loved to eat, I just had absolutely no interest in cooking or baking. But now I can’t wait to come home and bake something. I guess life is funny that way. Extraordinary too. READ MORE.

Let’s Connect

  • Facebook
  • Google+
  • Instagram
  • Pinterest
  • RSS
  • Twitter

Footer

Lemons!

Best Lemon Cheesecake
Lemon Ricotta Muffins Recipe

More Lemon Recipes

Breakfast & Brunch

Pandesal Recipe (Filipino Bread Rolls)
Banana Buttermilk Pancakes

More Breakfast Recipes

No Bake & Frozen Treats

Mexican Chocolate Pudding
No Bake Cookie Butter Pie

More No-Bake Recipes

Copyright 2016-2018. The Unlikely Baker . Privacy Policy & Terms of Use

This site contains affiliate links. See Terms of Use for more information.