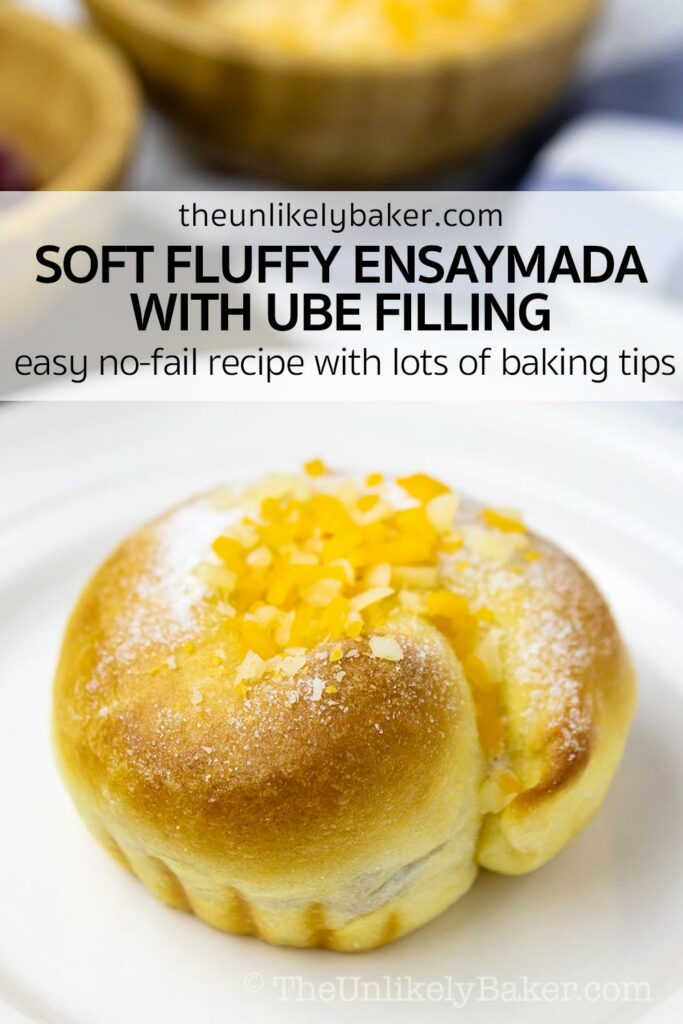

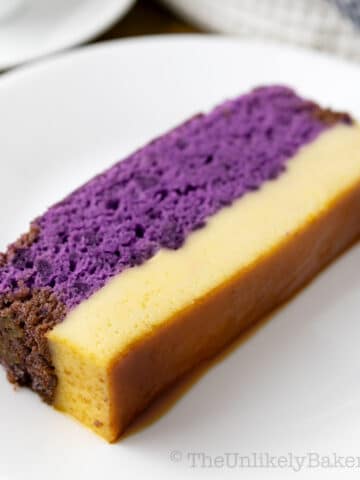
Ube ensaymada is your favourite soft and cheesy Filipino bread filled with delicious ube halaya. Unlike other ensaymada recipes, this recipe is simple, straightforward and easy to follow. Plus, I give lots of tips and a troubleshooting guide for the best ube ensaymada every time.
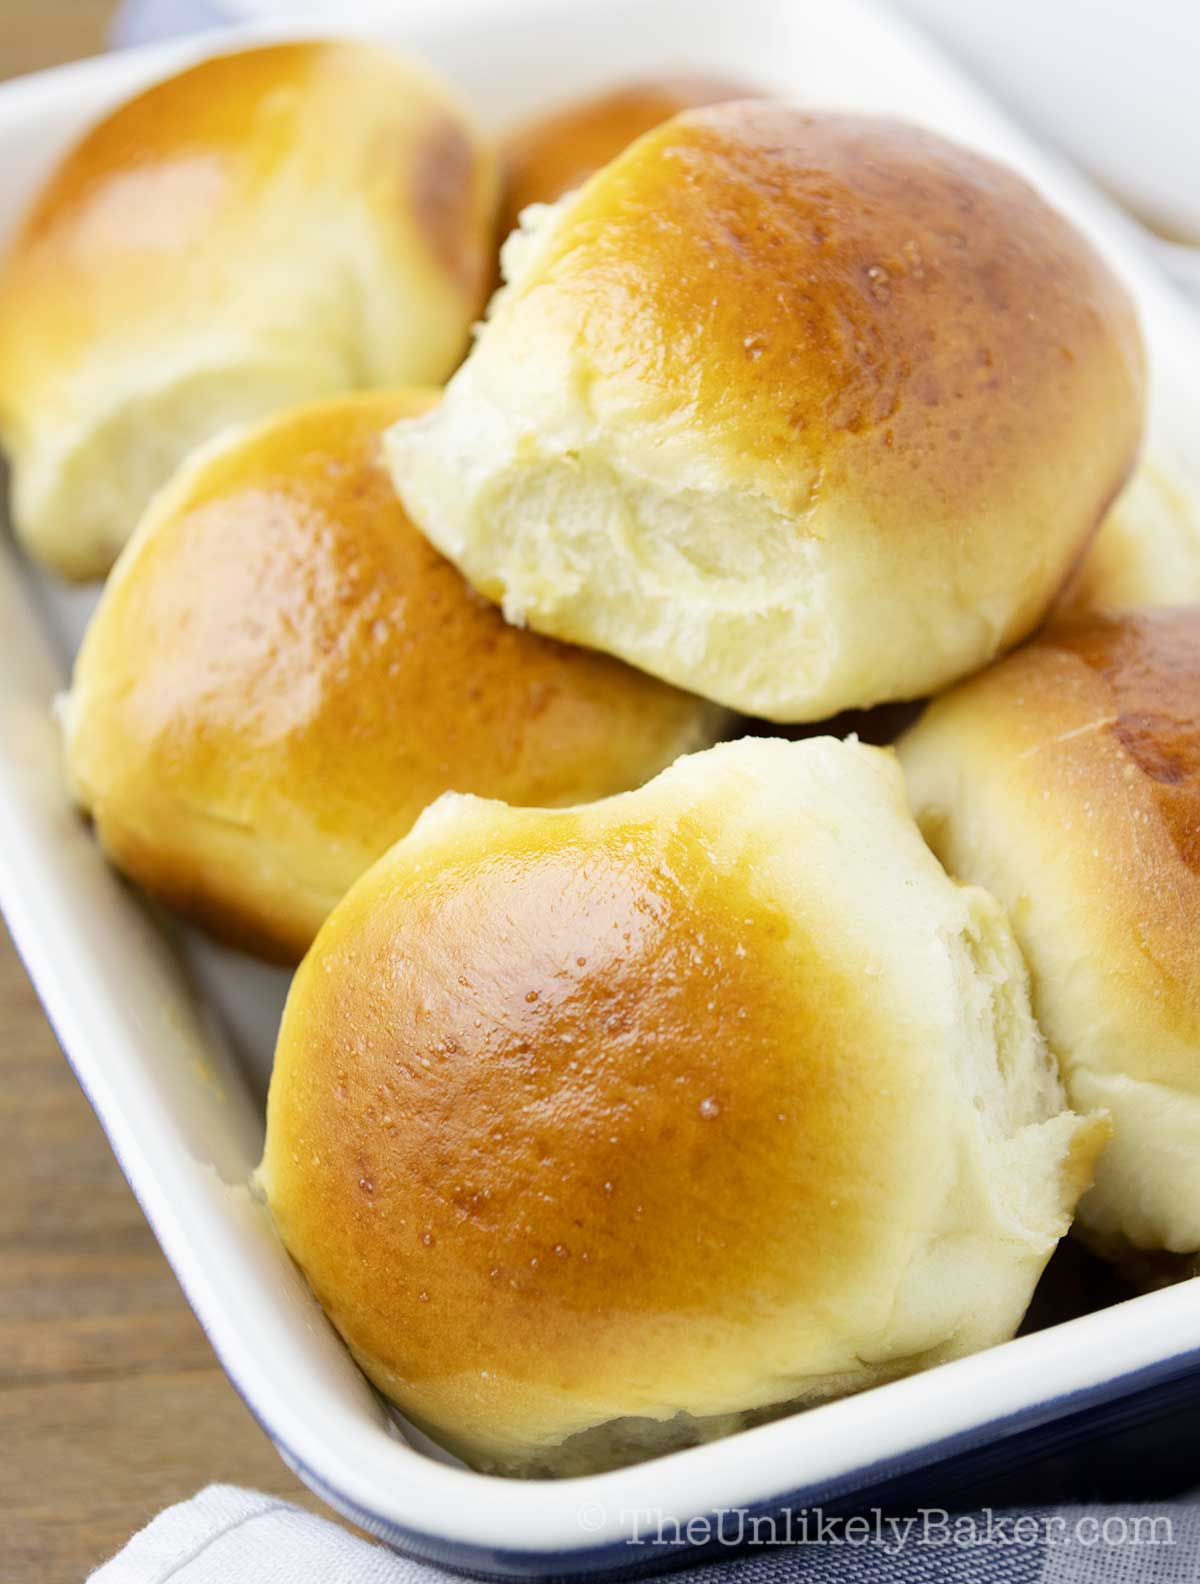
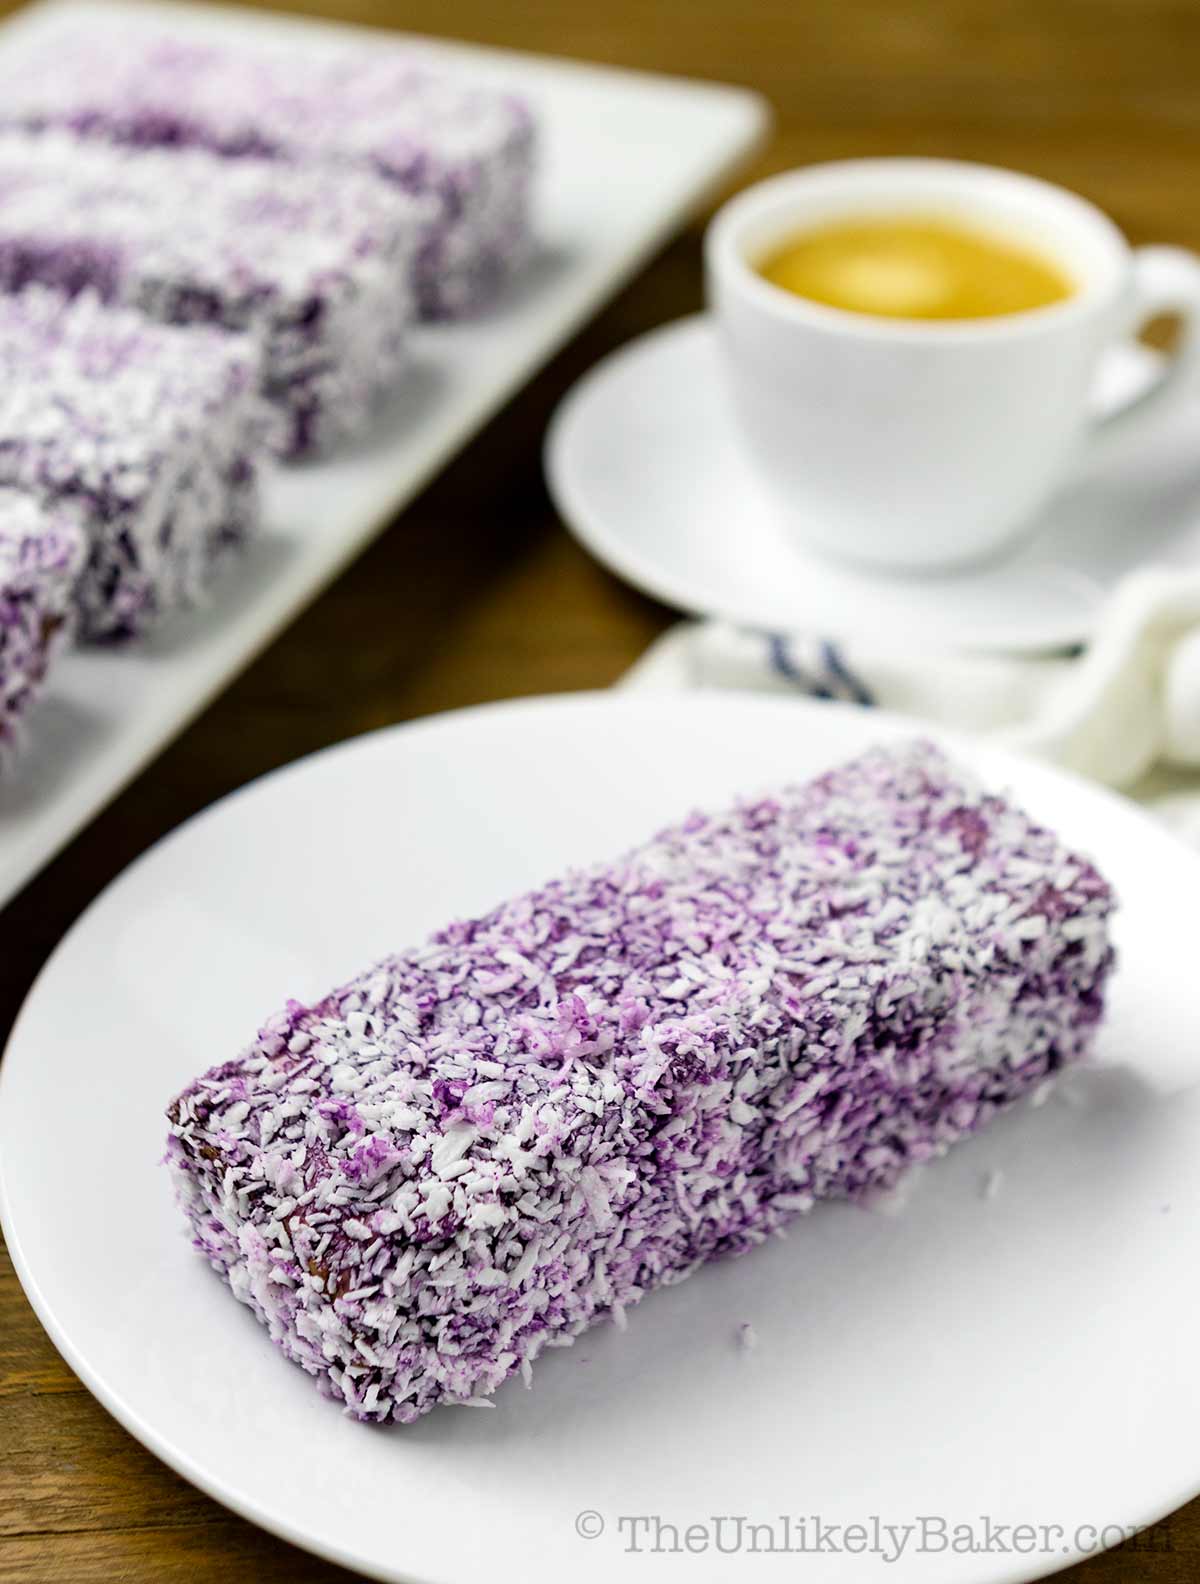
(Looking for more ube bread recipes? Start with delicious ube pandesal, which you can make plain, with cheese or with ube jam. Then shake things up and make a batch of ube bread rolls with coconut topping. So good!)
If you love making bread, you know nothing beats the smell of freshly baked bread filling your kitchen.
I love making pandesal but when I need a little something extra, I make ensaymada.
I have a tried-and-tested ensaymada recipe and that’s what I base this ube ensaymada recipe on. So you know it’ll be incredible! Let’s get baking.
Why you’ll love making ensaymada with ube filling
You already love cheese ensaymada, why change things and add ube?
Well, apart from ube (or Filipino purple yam) making everything so much better (warning: biased opinion lol), this recipe is:
- Just as easy and straightforward to make. You only need to add the extra step of filling the dough with ube jam. That’s it!
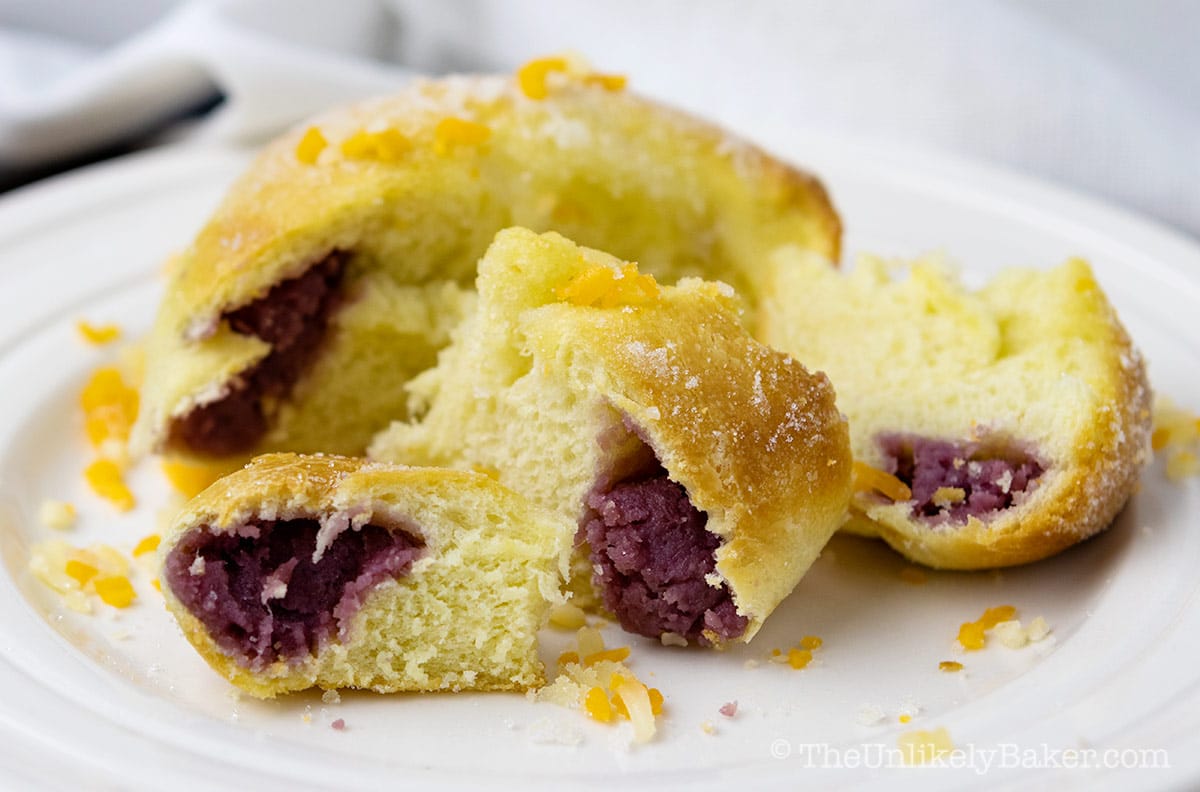
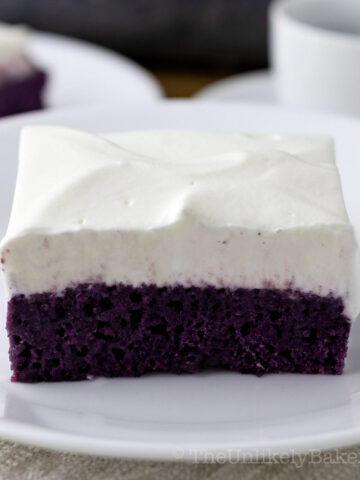
- Packed with real ube halaya. This recipe doesn’t depend on ube extract for ube flavour. In fact, we don’t use it at all. We use the real deal — good old fashioned ube jam for the best, most authentic ube taste.
- Delicious. Ube cheese is one of my favourite flavour combinations and it really shines here.
How to make
Making ube ensaymada has many steps but I break them down into small, manageable parts that are easy to follow. Let’s start with the ingredients.
Ingredients
Most of what you’ll need are pantry staples like all-purpose flour, granulated sugar and salt. Key things to note about some of the other ingredients:
- Active dry yeast — I always use active dry yeast (vs. instant yeast) when baking bread because I’m always required to proof it. This way, I can ensure the yeast is still active before adding it to my dough.
- Milk — I use 1% or 2% skim milk.
- Oil — I always use canola oil because that’s what’s always available at home. Vegetable oil or any flavourless oil will also work.
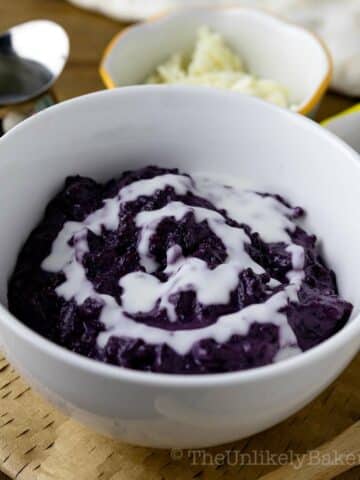
- Ube jam — when baking with ube jam, it’s important to use one that you enjoy eating on its own. I always buy Good Shepherd ube jam if I can, but I’ve since learned how to make my own ube halaya and that’s what I use when Good Shepherd is not available.
- Cheese — I always use sharp cheddar cheese.
Baking tools
I always knead my bread dough by hand but you can always use the hook attachment of your stand mixer. Just be careful not to over mix.
Other things that make bread making so much easier for me include:
- Silicone pastry mat — for easy kneading and even easier cleanup.
- French rolling pin — I find it easier to use than a regular rolling pin.
- Bench scraper — to divide my dough.
- Kitchen scale — to ensure I have evenly sized bread.
Recipe with step-by-step photos
Proof yeast
In a measuring cup or small bowl, stir warm water, active dry yeast and sugar until dissolved. Let this mixture stand until bubbly (around 10 minutes).

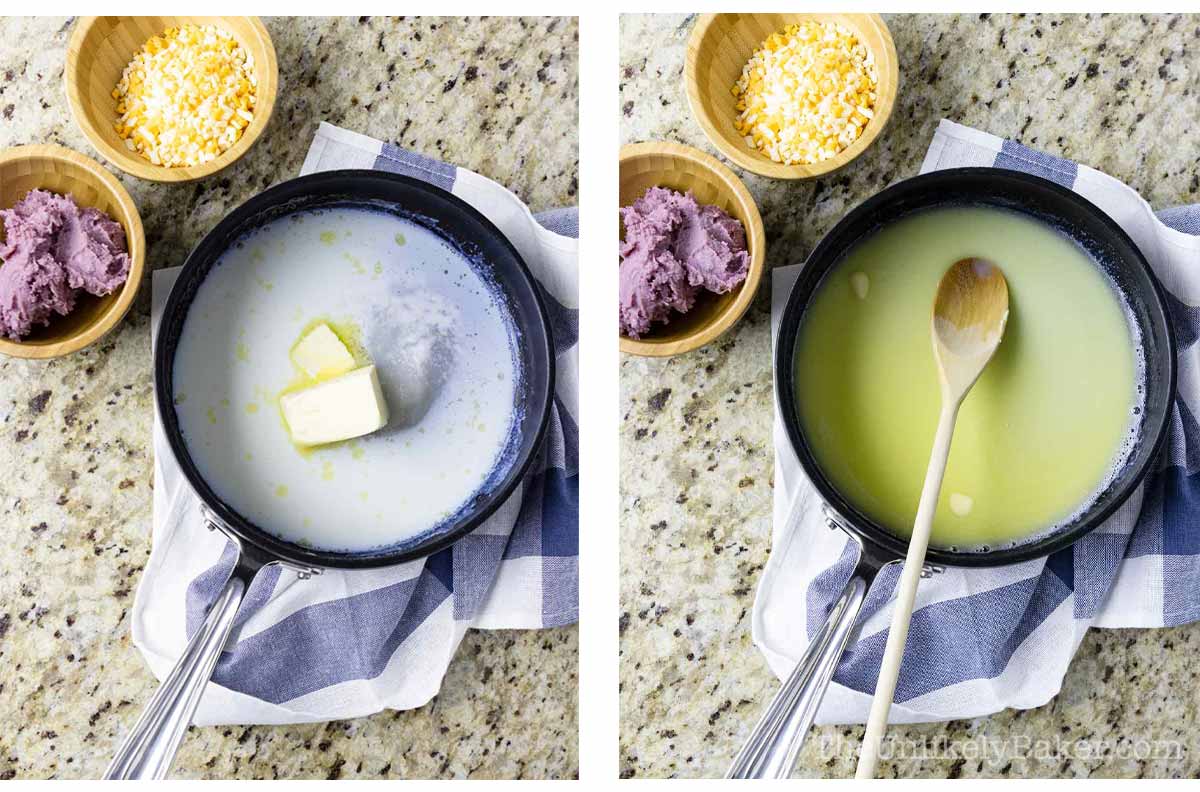
Milk mixture
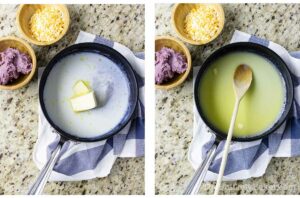
In a small saucepan on medium heat, warm milk until you see bubbles forming on the edges. Remove from heat and stir in sugar, salt and butter until the butter has completely dissolved.
Prepare dough
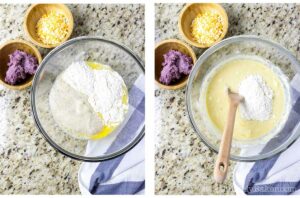
Combine yeast mixture, milk mixture, eggs and 1 ½ cups flour. Stir until combined. Proceed to add the rest of the flour ½ cup at a time combining well after each addition.

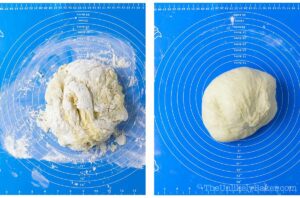
Once the dough starts pulling and sticking together in a ball and becomes harder to stir, transfer it to a lightly floured surface. Knead until smooth and elastic. Having doubts? Knead some more (see tips below).
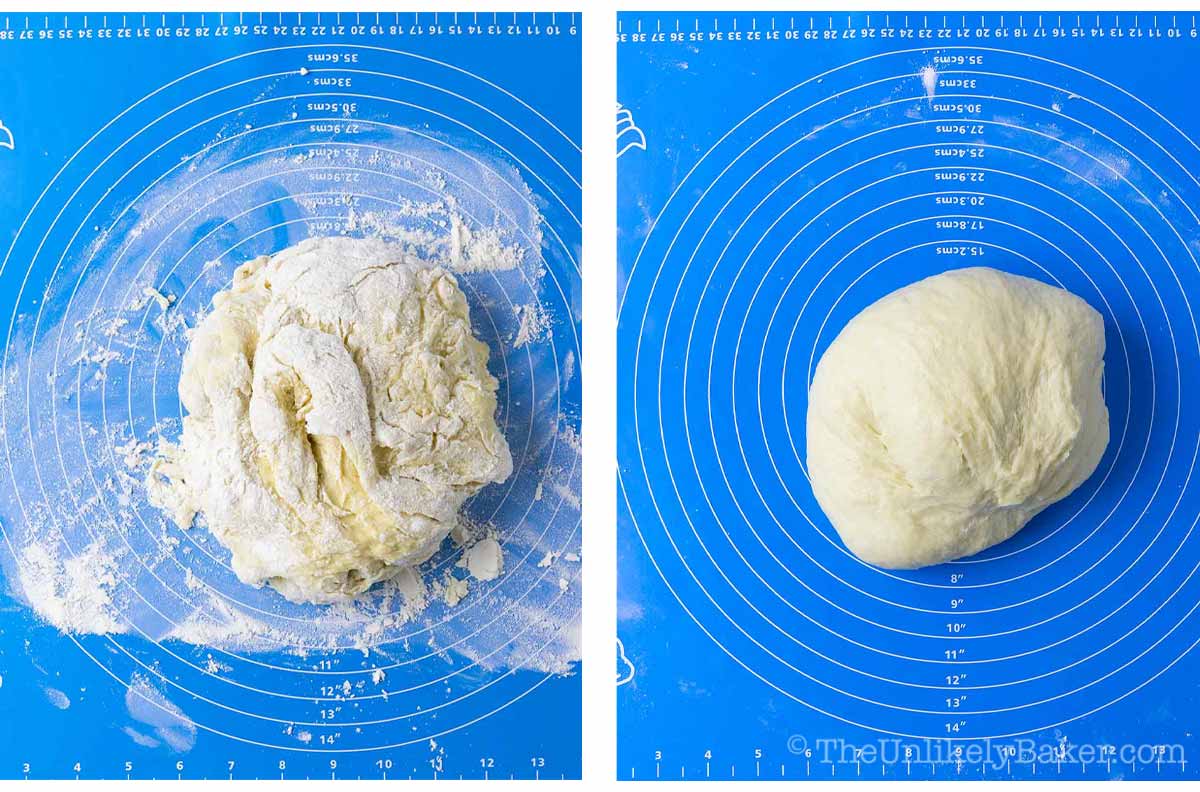
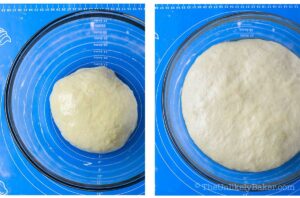
Oil a large mixing bowl with canola oil. Place your dough into the bowl and turn to ensure the whole dough is coated. Cover with a damp cloth or plastic wrap and allow to rise in a warm dry place until it doubles in size (about 1 hour).

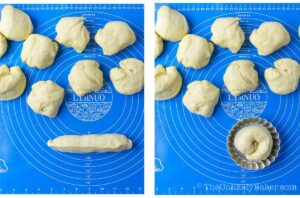
Fill, roll and bake
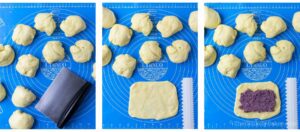
When ready, transfer to a lightly floured surface and roll out slightly. Divide into 12 pieces, flatten into a 4×6 inch rectangle and spread 2-3 tablespoons of ube jam. Be careful not to overfill and be sure to leave un-filled space around the edges.
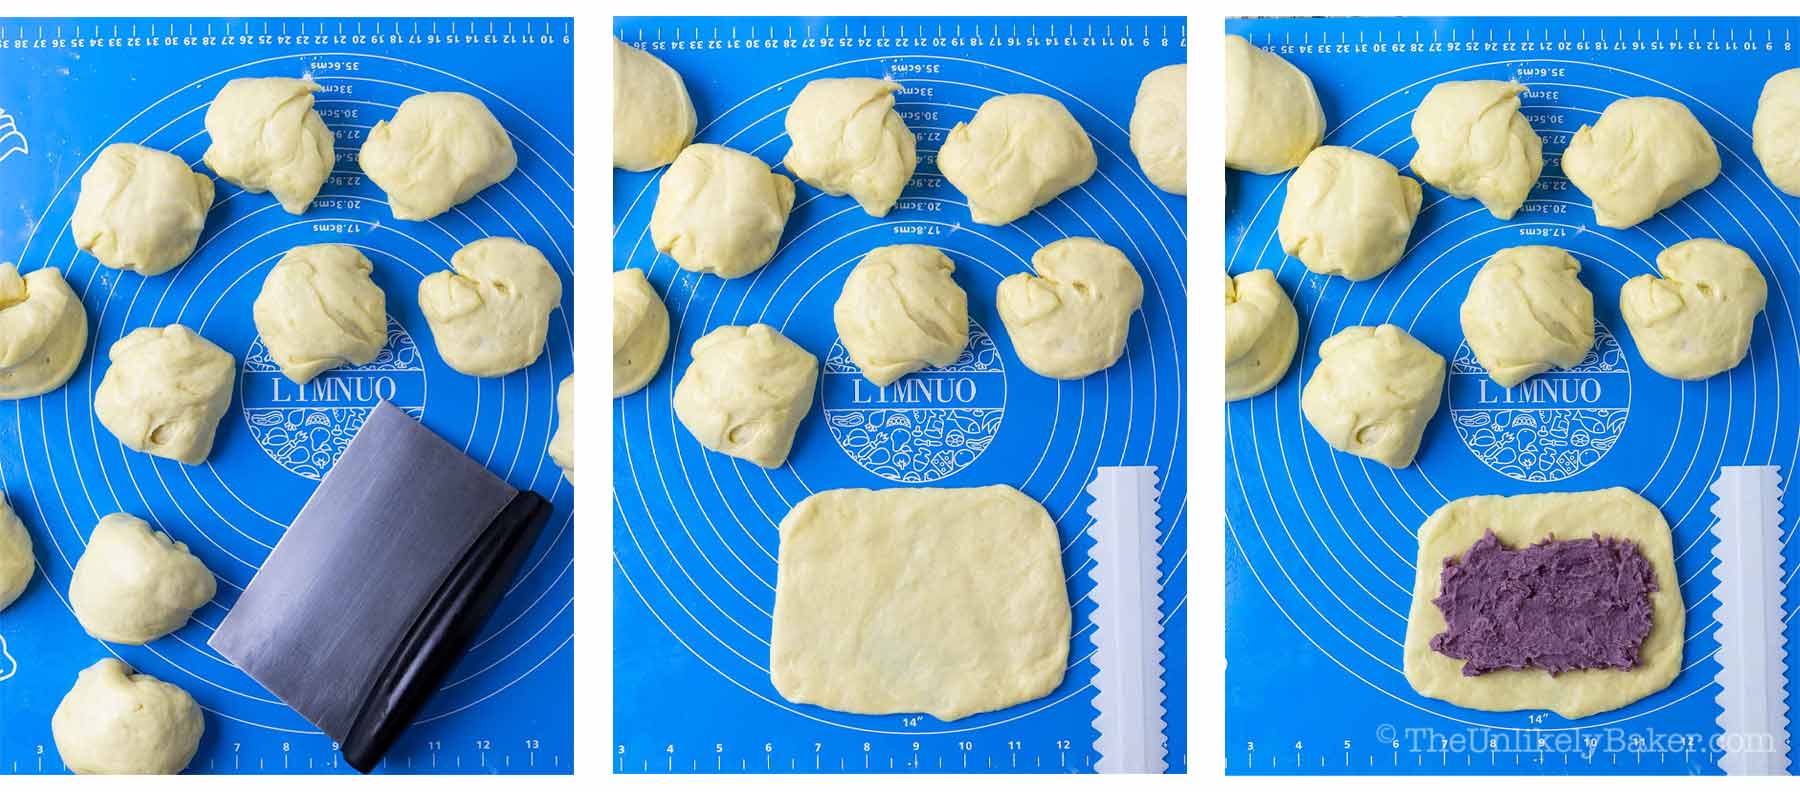
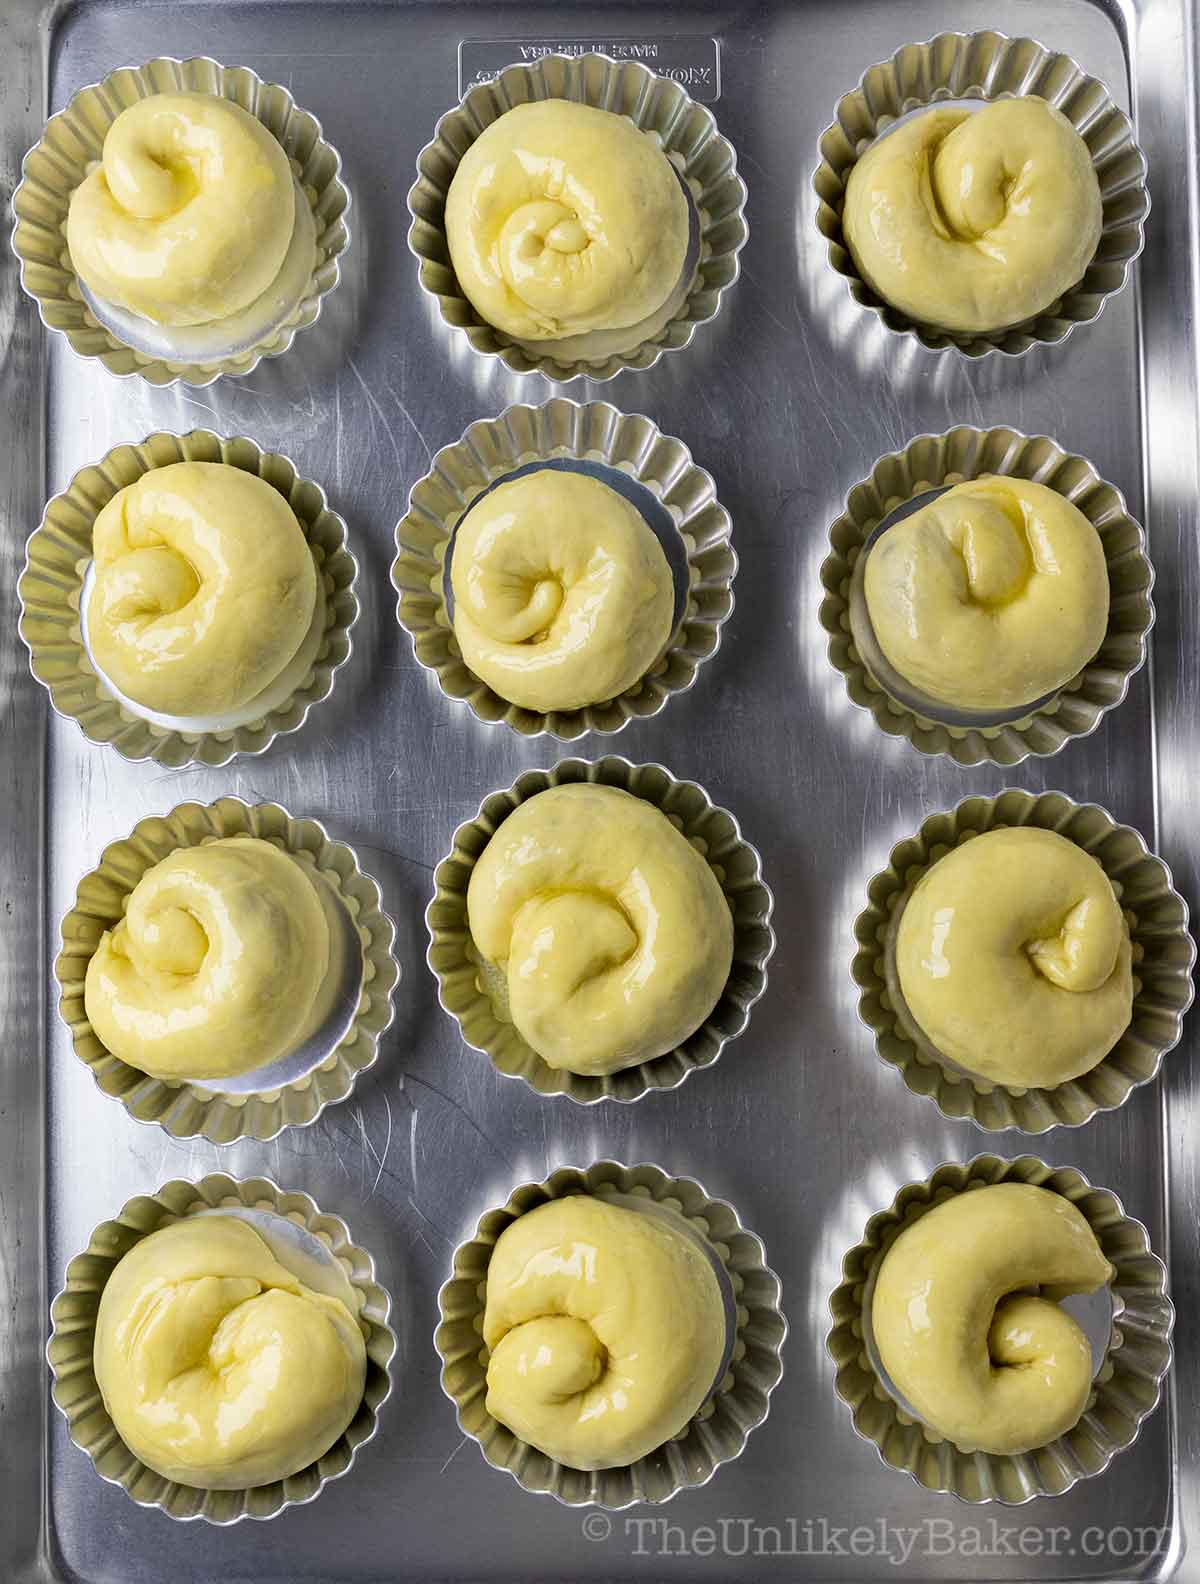
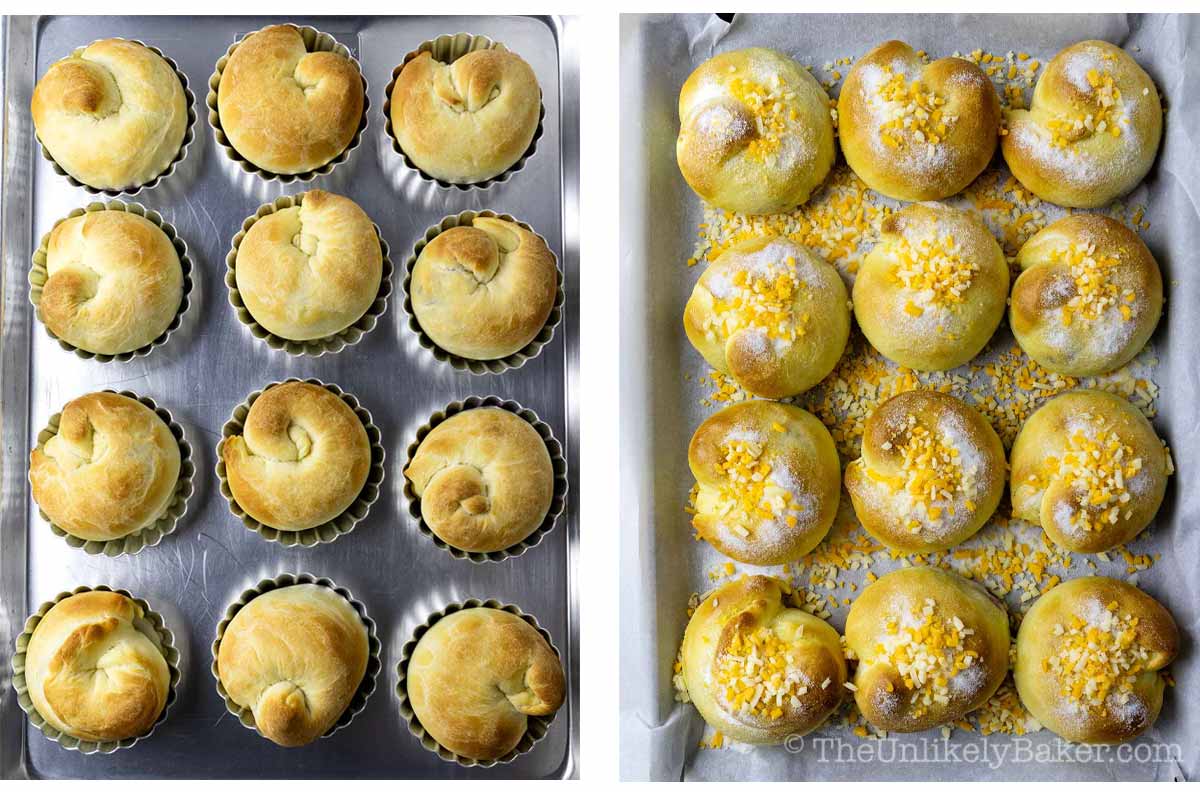
Roll the dough tightly up and pinch the edges to seal. Roll each one unto itself (like a spiral) and place into moulds (see tips). Place moulds on a baking sheet.

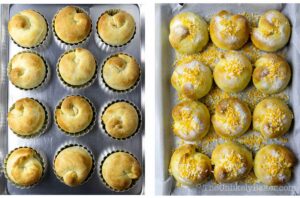
Brush the tops of the ube ensaymada with melted butter, cover and allow to rise a second time (about 30 minutes).
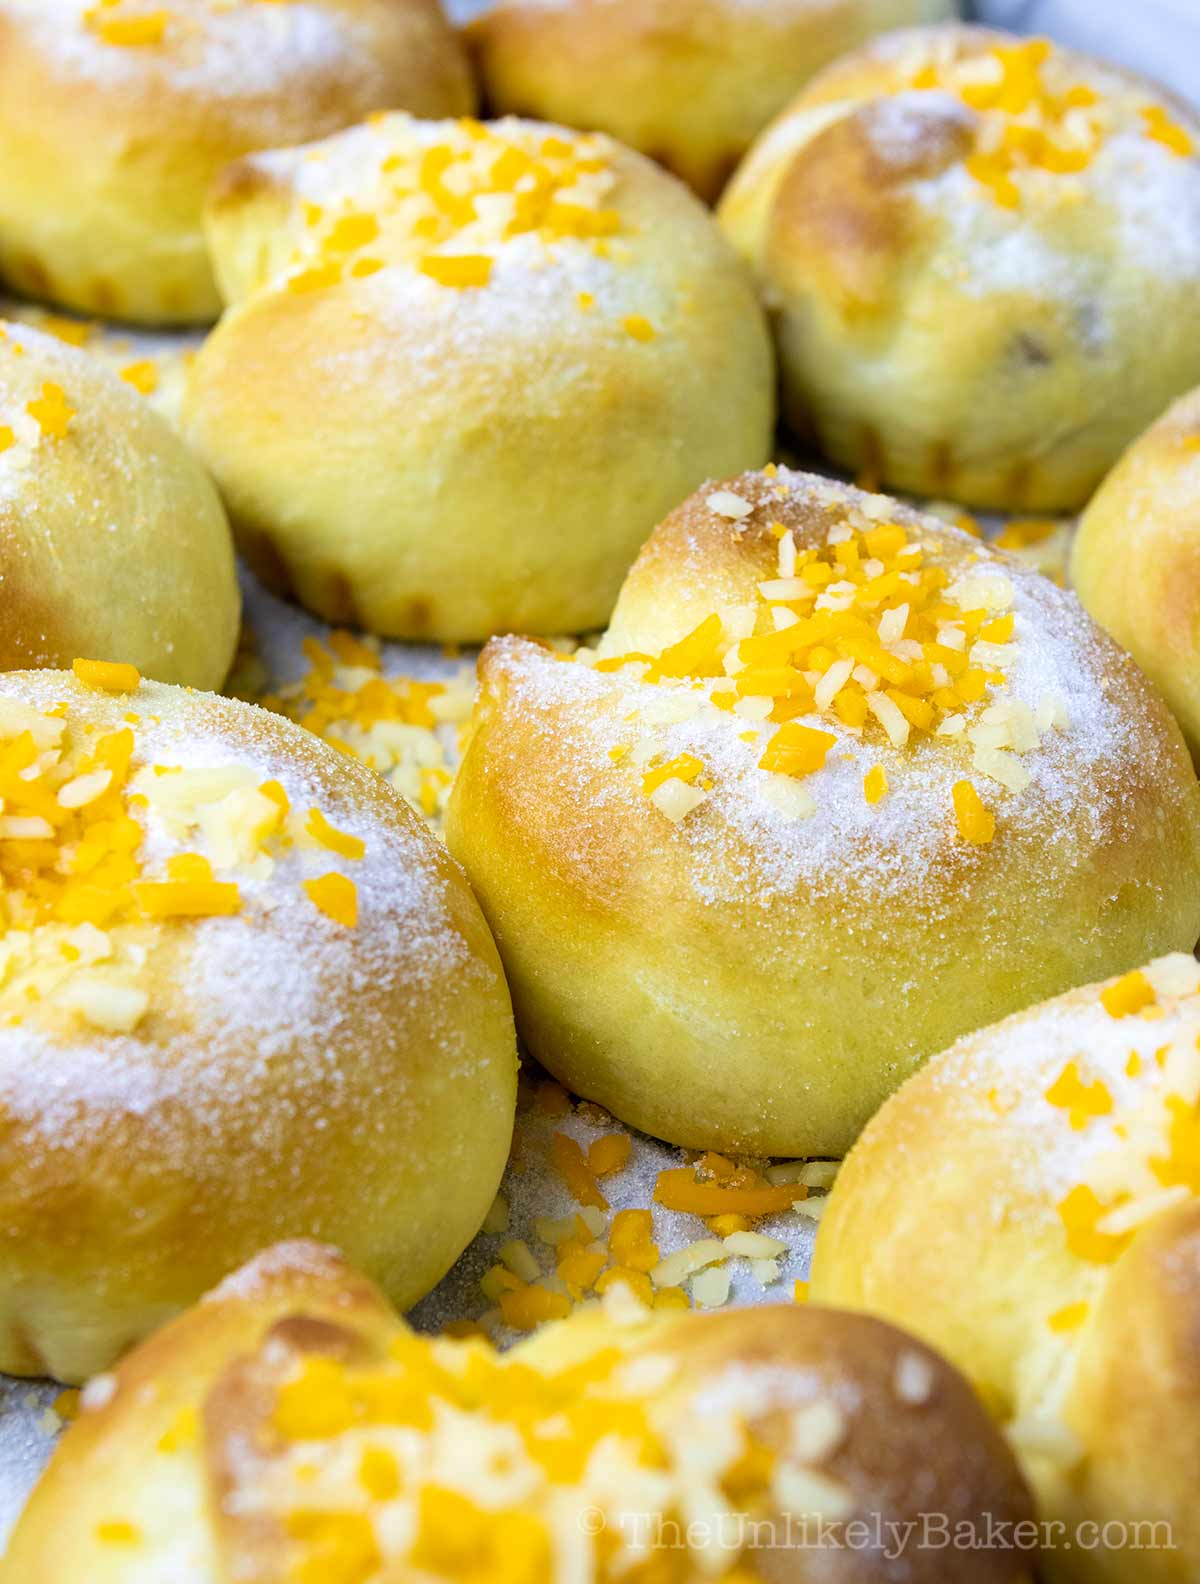
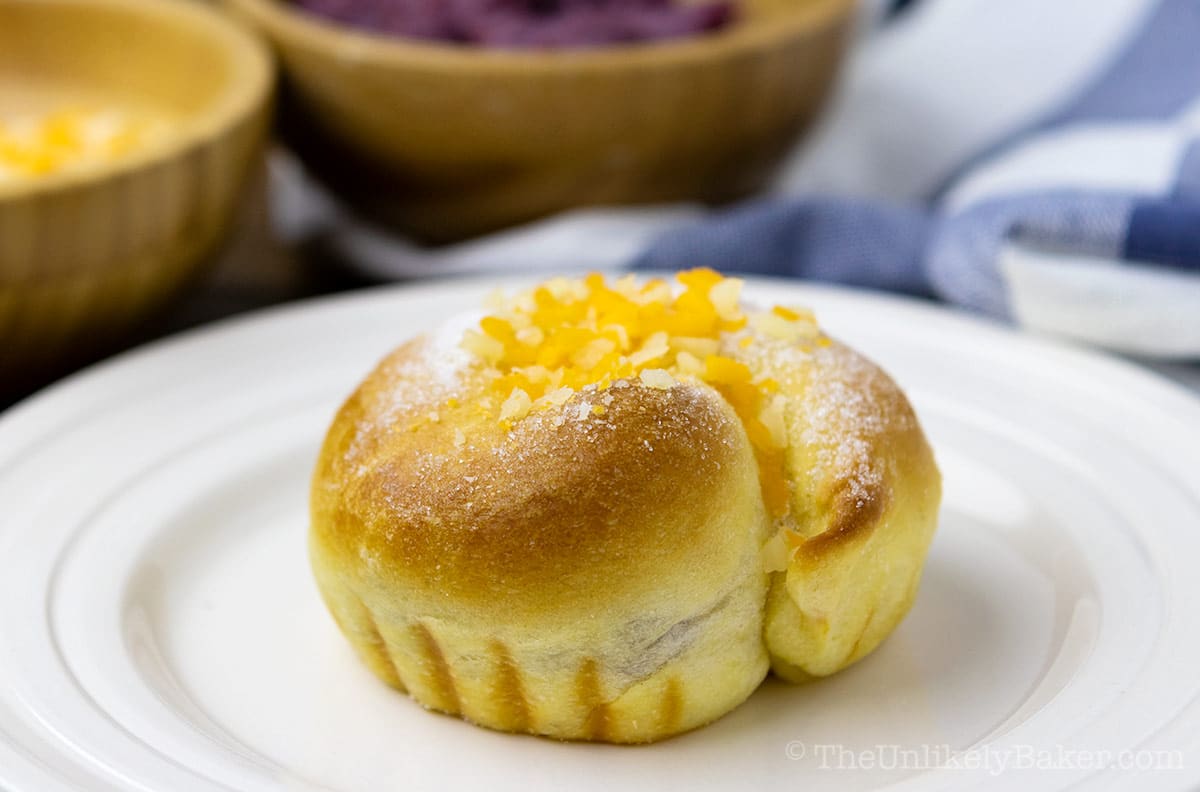
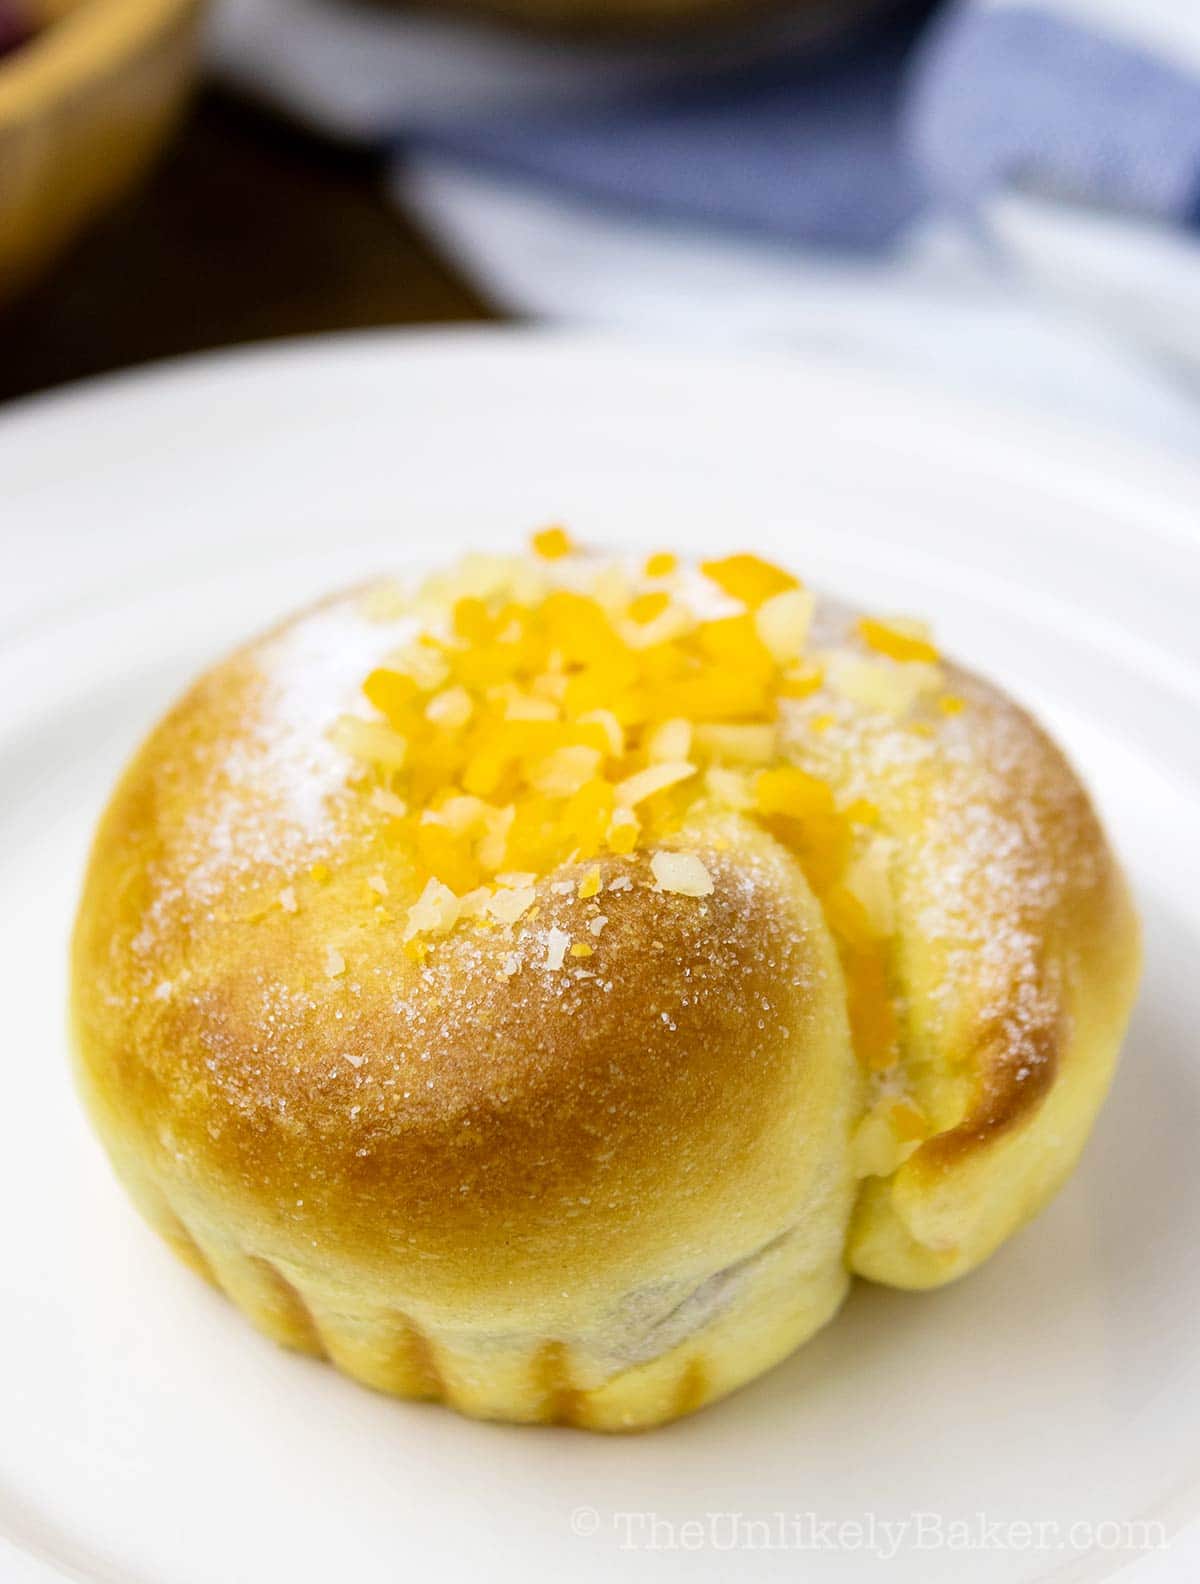
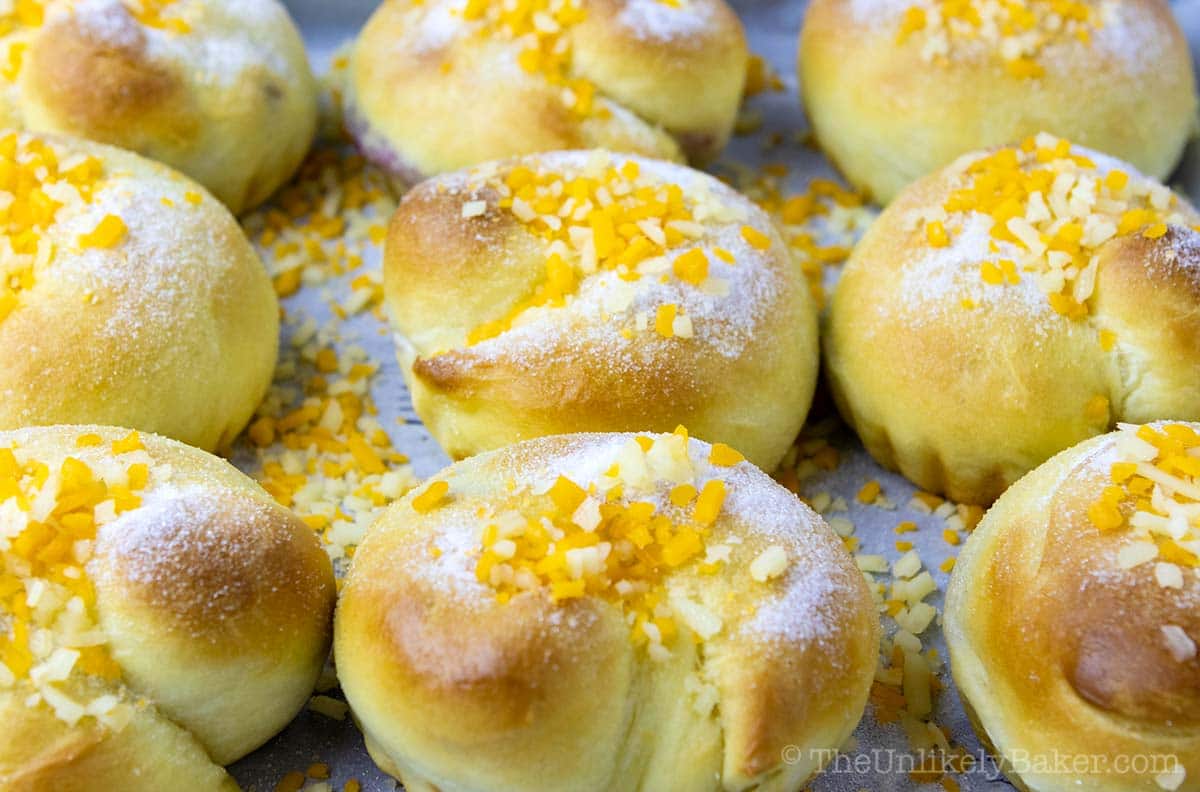
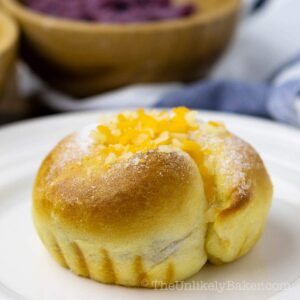
Preheat oven to 375F and bake for 20 minutes or until golden brown. Allow to cool then remove. Brush with more butter and sprinkle with grated cheese or shredded cheese. Optional: pipe some ube jam on top (I prefer to keep it a surprise).
Expert baking tips
- Room temperature ingredients. As much as possible, use room temperature butter and eggs. However, remember that the water for the yeast and the milk need to reach a certain temperature to work properly, i.e. approximately 110F and 180F respectively.
- Knead the dough enough. Kneading improves the structure of the dough, making it stretchy and pliable, and forming a structure that will trap air for a proper rise. Under-worked dough won’t have that and will result to dry, dense bread.
- But don’t knead the dough too much. Kneading the dough by hand rarely results to over kneading but is possible if you’re using your stand mixer. Once you get that perfectly elastic but still slightly sticky dough, stop.
- For the fluffiest ube ensaymada, allow your dough to rise in a warm, dry place. I use my oven for this. I usually preheat it to about 100F then turn it off just when I’m about to knead my dough. This way, the temperature would have gone down to 90F when I put my dough in.
- For evenly sized bread that won’t only look pretty but bake evenly as well, use a kitchen scale to make sure the dough is evenly divided. It’s simple: I weigh all the dough and divide by 12. Whatever that number is, I make sure each individual piece is exactly that weight.
- I use my ensaymada moulds which I bought in Manila. Here, they’re called brioche moulds and you can find them at your local baking supplies store and Amazon. You don’t need to buy them though. If you have a muffin pan, you’re good to go. You can also use a cake pan. Your ube ensaymada would just be the pull-apart kind, like cinnamon rolls.
Troubleshooting guide
Here’s a guide to help you troubleshoot common issues home bakers encounter when making bread.
Sticky dough
If your dough is sticky in the bowl as you’re stirring it, add flour a little a time until it sticks together in a ball. Not too much though, or you’ll end up with very dense bread.
If it’s sticky while you’re kneading it, avoid the temptation to add even more flour. Instead, try kneading with slightly damp hands.
Proofing yeast
Remember that yeast is a living thing and proofing is simply ensuring that your yeast is alive and active.
In this recipe, we use active dry yeast, which needs to be proofed. Note that rapid-rise yeast, instant yeast, or bread machine yeast don’t need to be, else they will lose their fast-rising ability.
Step 1: Mix yeast and warm water. The temperature of the water is important. It should feel warm but not hot. If you measure the temperature with a thermometer, it should be about 110F. Hotter than that and you’ll end up killing the yeast.
Step 2: Add sugar and stir. The yeast loves sugar and will gobble it up. If you watch the bowl or cup, you will actually see movement and this is the point when you will start to see bubbles and foam from the carbon dioxide that is forming.
Proofing usually takes about 10 minutes. If your mixture has no bubbles after this time, your yeast is old or stale or dead. You’ll need to start with fresh yeast.
And unfortunately, there’s no way to revive old yeast.
Making the dough rise
A lot of recipes say to allow the dough to rise until “double in size”.
Depending on the recipe, this can range from 30 minutes to 2 hours. Just check in at the halfway mark so you can get an indication of how much longer you have to go.
For me, what’s important is finding the proper place to leave my dough.
It’s cold here most of the year so leaving my bowl on our not-so-warm counter is not exactly ideal.
So what I like to do is turn my oven on to its lowest setting for a few minutes, then turn it off so that it’ll be about 90F when I’m ready to put my dough in to rise.
Just remember to remove the dough from the oven when you’re ready to preheat for baking.
And do you really need a damp cloth to cover your dough while rising? I do but it’s not necessary. Sometimes I use plastic wrap. And other bakers I know use pot lids.
The key is covering the bowl with something because doing so helps the dough retain moisture and prevents it from drying out.
Kneading
The most common way of testing if your dough has been kneaded enough is doing the “windowpane test”.
All this means is you pull off a small piece of dough and stretch it thin; if the gluten is well-developed, the dough will stretch into a paper-thin film without breaking. If it quickly breaks you need to keep kneading.
Here are more ways to tell when dough is kneaded enough.
I know some bakers like to use the dough hook of their stand mixers to knead their bread dough and that’s fine.
I prefer to knead by hand because there’s less chance of over-kneading. And there’s really something very relaxing about it!
Recipe FAQs
Ube ensaymada is best eaten fresh out of the oven. However, they will last for up to a week in a covered container in the fridge
To reheat, simply microwave for 30 seconds or until warmed all the way through.
I’ve personally never used bread flour to bake bread. I always use all-purpose flour because that’s what I always have on hand. And I’ve had great success with it.
So if you don’t have bread flour, no worries. You can use all-purpose flour and make very tasty bread out of it.
I did read that the higher percentage of gluten in bread flour (somewhere between 11-14%) makes it ideal for bread because it makes the dough more elastic and easier to work, resulting to lighter textured breads.
So if you’re curious, you can substitute bread flour for all-purpose flour easily. It’s a 1:1 substitution. You can read all about it and the different kinds of flour here.
I don’t add macapuno to mine but if you want to, I’d suggest adding it as a topping instead of a filling. It might lead to very soggy bread because of the excess liquid.
Other delicious Filipino bread recipes
Love baking bread as much as I do? Check these out:
Hope you like this recipe. Now you don’t need to trek to the nearest Red Ribbon, Goldilocks or pinoy bakeshop for your ube cheese ensaymada fix. You can just make some. Enjoy!
Happy baking!
Did you make ube cheese ensaymada? I’d love to hear from you in the comments section below.
And let’s get social! Find me on Facebook, Pinterest, Instagram, Twitter and YouTube.
Ube Ensaymada
Ingredients
Yeast Mixture
- ½ cup warm water approximately 110F
- 2¼ tsp active dry yeast equivalent to 1 packet or envelope
- 1 tsp granulated sugar
Milk Mixture
- ½ cup milk
- ¼ cup granulated sugar
- 1 tsp salt
- ¼ cup unsalted butter room temperature
Bread Dough
- 2 pieces large eggs lightly beaten, room temperature
- 4 cups all-purpose flour
- 1 tbsp canola oil or vegetable oil
Ube Filling and Ensaymada Toppings
- 18 oz ube halaya or ube jam about 2 heaping cups, room temperature
- melted butter
- granulated sugar
- cheddar cheese grated or shredded
Instructions
- In a measuring cup or small bowl, stir warm water (approximately 110F), active dry yeast and sugar until dissolved. Let this mixture stand until bubbly (around 10 minutes).

- In a small saucepan on medium heat, warm milk until you see bubbles forming on the edges (approximately 180F).
- Remove from heat and stir in sugar, salt and butter until the butter has completely dissolved. Set aside and allow to cool until lukewarm.
- In a large bowl, combine yeast mixture, milk mixture, eggs and 1 ½ cups flour. Stir until combined. Proceed to add the rest of the flour ½ cup at a time combining well after each addition.
- Once the dough starts pulling and sticking together in a ball and becomes harder to stir, transfer it to a lightly floured surface and knead until smooth and elastic (8-10 minutes). When in doubt, knead some more (see post for tips).
- Oil a large mixing bowl with canola oil. Place your dough into the bowl and turn to ensure the whole dough is coated.
- Cover with a damp cloth or plastic wrap and allow to rise in a warm dry place until it doubles in size (about 1 hour).
- When ready, transfer dough to a lightly floured surface and roll out slightly. Divide into 12 pieces.

- Flatten each piece into a 4×6 inch rectangle and spread 2-3 tablespoons of ube jam on each one. Be careful not to overfill and be sure to leave un-filled space around the edges.
- Roll the dough tightly up and pinch the edges to seal.
- Roll each piece unto itself (like a spiral) and place into moulds. Place the moulds on a baking sheet.
- Brush the tops of the ube ensaymada with melted butter, cover and allow to rise a second time (about 30 minutes). I usually just leave it on the counter.

- Preheat oven to 375F and bake for 20 minutes or until golden brown. Do not over bake.
- Allow to cool slightly then remove from moulds.
- While still warm, brush the ube ensaymada with more butter and sprinkle with sugar and grated cheese or shredded cheese (optional: pipe some ube jam on top). Best served warm.


Video
Notes
- I keep my dough in my oven for the 1st rise. I usually preheat it to about 100F then turn it off just when I’m about to knead my dough. This way, the temperature would have gone down to 90F when I put my dough in. You can use the stay warm feature if you have it.
- I use a kitchen scale to make sure my dough is evenly divided.
- If you don’t have ensaymada moulds, you can use a muffin pan instead.
- See post for more baking tips, a troubleshooting guide, step-by-step photos and more.
Nutrition
Nutritional information are estimates only.
Robbin
First time making ensaymada, one of my favorite desserts as a kid! I was so nervous, but your instructions were great. I definitely need to practice kneading more! I can’t believe I made this with my own two hands! (And ube halaya from the store, haha.)
Question — I wonder if I let my yeast activate TOO long as I completely forgot about it after the 10 minutes. I had a LOT of yeast as a result. I assume that’s also what made the bread too yeasty. Should I have been steaming the milk and such while waiting for the yeast to activate to get just the right amount? Thank you so much for this fantastic recipe!!
Jolina
Hi Robbin, making homemade bread is one of my favorite things to do. And yes, when making ube ensaymada, I do heat the milk while the yeast is blooming. Enjoy!
Keli
I literally just tasted ube ensaymada from a co-worker last week and wondering how to make it. Thanks for the recipe! Wish me luck 🙂
Jolina
Luck and happy baking! 🙂
Rachel
First time making ube ensaymada or any ensaymada and they came out perfect! Will do cheese ensaymada next 🙂 Thanks for your detailed instructions and tips!
Jolina
That’s awesome Rachel! Happy baking 🙂
Rachel
We loved your ube ensaymada! We added macapuno strips on top. Thanks for the recipe!
Jolina
So happy to hear that Rachel! Enjoy!
Karen
My family loves the smell of fresh bread. Can’t wait to try ube ensaymada!
Lynndee
I love ube-flavored everything. And ensaymada is one of my faves. I’m going to order ube halaya today and make this. Yum!
Marysa
This looks so tasty! I have been hearing a lot about ube lately, and I’m not sure quite where to find it! I love the color and it sounds delicious.
Jolina
Hi Marysa, your best bet would be an Asian supermarket 🙂
Aggie
We love your ensayamda recipe Jolina 🙂 So happy to see you have an ube version. Can’t wait to try!
Jolina
Thanks Aggie! Hope you love ube ensaymada too!
Leticia
Ube ensaymada looks delicious! Just when you thouught ensayamda can’t get any better…
Hollie
Wow you make these look so easy.They look so good! I want to try making them because I do love bread.
Richelle Milar
This is such a really great recipe! Thanks for sharing these awesome and helpful tips!
Tara Pittman
My family will love this bread. They will love that it has cheese in it.
Tasheena
This recipe looks really flavourful, looking forward to giving this a try.
Amber Myers
I’ve never tried anything like this before. I will have to make it. It looks like something I’d enjoy!