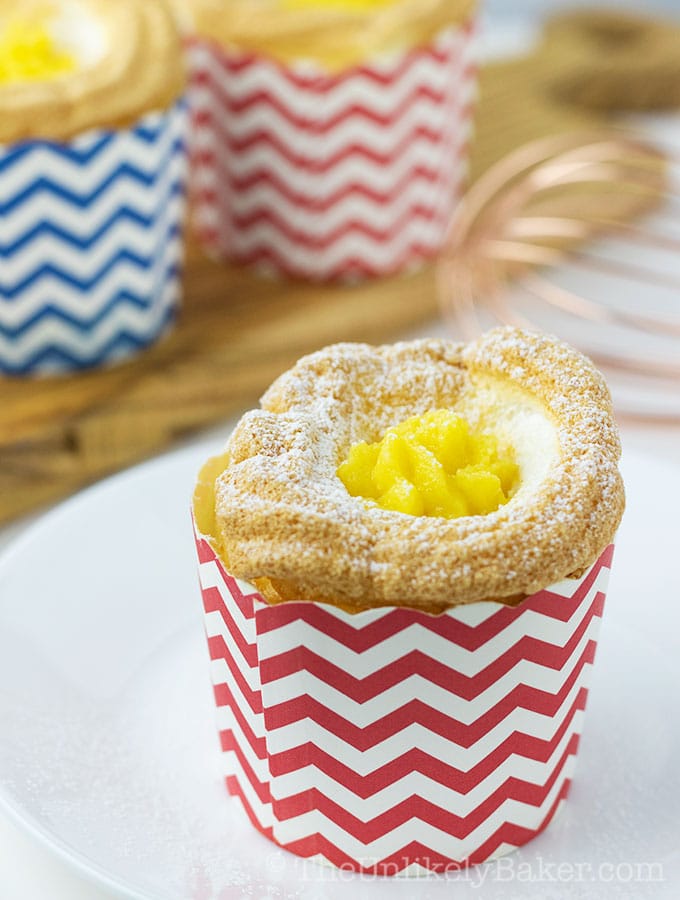
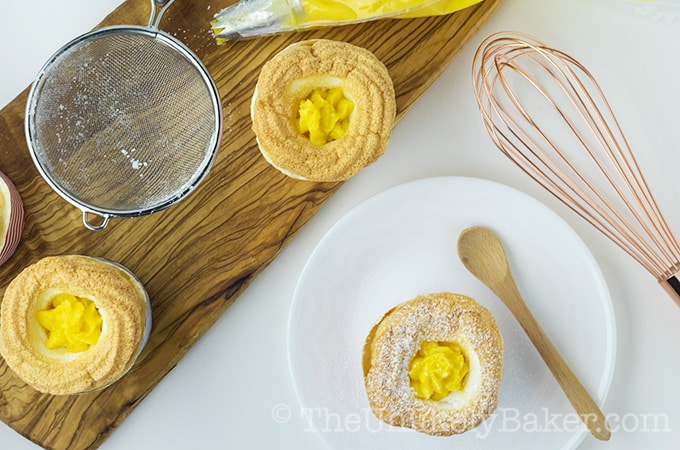
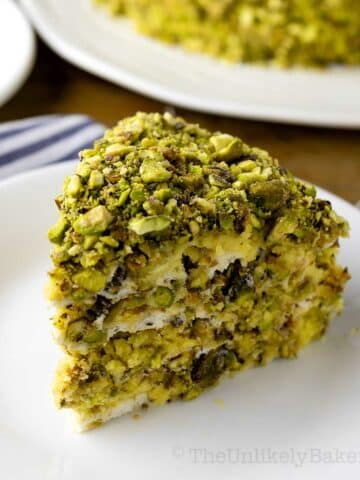
You in for a unique cupcake experience? Try Brazo de Mercedes cupcake – soft as cotton meringue filled with rich decadent custard and finished off with a sprinkling of confectioner’s sugar. You’ll love it!
(Here’s the recipe for the traditional Brazo de Mercedes if you need it. Or why not make an Ube Cheesecake this year to mix things up?)
My blog is 3 months old today. I don’t know if that’s a milestone in the blogging world but I will celebrate nonetheless.
Three months, 18 recipes (19 if you include today’s), countless hours in the kitchen, frosting in my hair, flour on my face – it’s been fun (more work than I expected, but fun).
So thought I’d go back to the beginning and re-make the cake that started it all…but make it easier and funner to do, and even funner to eat.
What is Brazo de Mercedes?
I got a lot of comments from you guys about Brazo de Mercedes. Most of you haven’t heard of it but were raring to try. Which is awesome – love it when people give Filipino cuisine a shot. It’s so unique and delicious!
If the meringue rolling is what’s stopping you from making it though, this cupcake version is a great alternative.
You just pipe the meringue into a cupcake cup. Then pipe the custard into the meringue. And off you go.
Related: Light and Fluffy Hokkaido Chiffon Cupcakes
Brazo de Mercedes cupcake tips for success
Brazo de Mercedes cupcakes are not your typical cupcakes so here are several things to keep in mind:
- Use those thicker, cardboard cupcake cups
 (like the one I used here) instead of the usual paper liners. The meringue needs something a little sturdier to latch on to. Because you’re using those kinds of liners, you don’t need to put them in a cupcake pan. You can use a regular cookie sheet.
 - The meringue will initially rise then deflate so keep in mind that whatever you pipe on is what you’ll more or less get. So if you want a massive soufflé-like brazo, pipe it high (not too high that it will topple over though).
- You’d want to leave a slight gap in the middle where the custard can be piped into later. You don’t want to poke too large a hole in the meringue as it will deflate it further. So pipe the meringue in a circular, upward motion leaving space in the centre for the custard (check out the video).
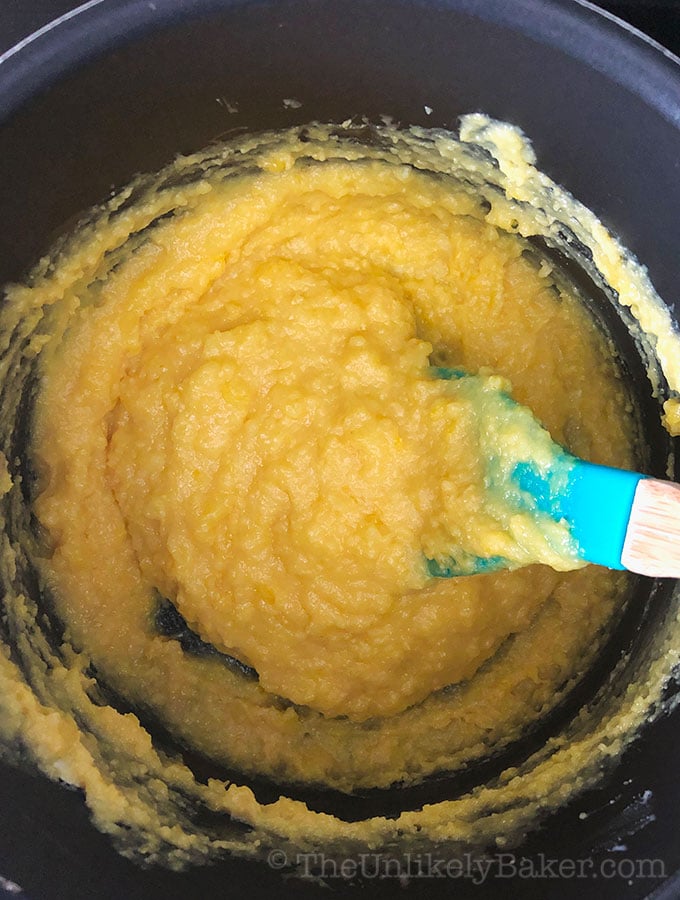
- Speaking of custard, be careful not to overcook it. You want it thick but still spreadable. Remember that you need to be able to easily pipe it into each cupcake and that it thickens further as it cools. I usually stop cooking once I reach the consistency of jam.
- Brazo de Mercedes is usually baked flat on a cookie sheet but since you’re piping these, the tops of your cupcakes might brown before the insides are cooked. I’d suggest baking them 1 rack below your middle oven rack (but not the bottom rack – if your oven only has 3 levels, then the middle rack is still your best option).
Related: Double Chocolate Meringue Cookies
Useful tools to have when making Brazo de Mercedes cupcakes
I promise it’s very easy to make these cupcakes. You do need two tools to help you along:
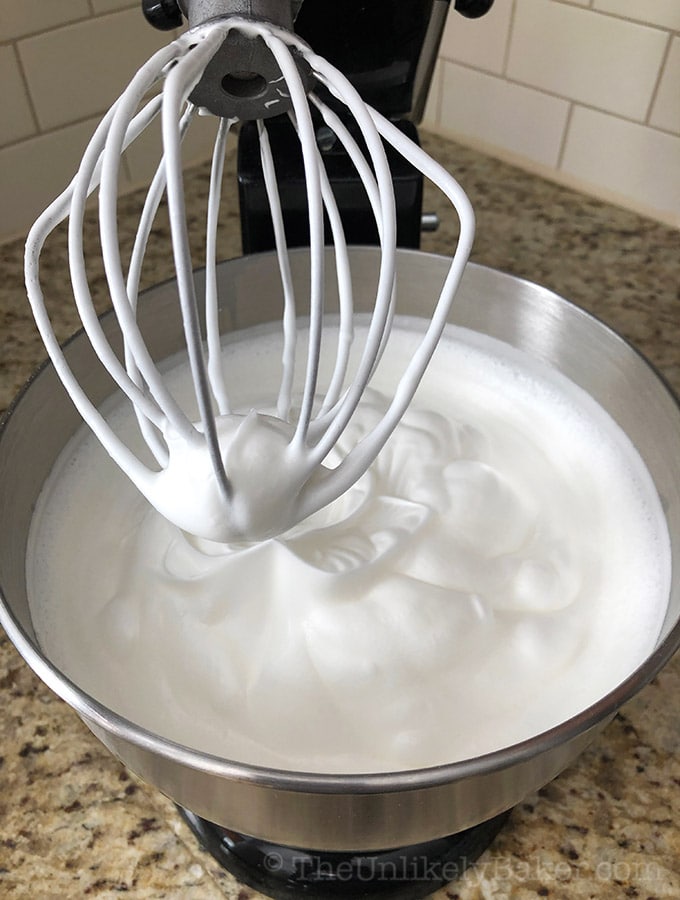
- Electric mixer. When making meringue where I need to whip egg whites to stiff peaks, I rely on my trusty old stand-mixer. You can use a handheld electric mixer too, it will just take a little longer. I’ve tried making meringue by hand and honestly, I don’t recommend it. My arm was sore and my eggs weren’t even close to done. Not fun.
- Piping bags. I like to pipe my meringue into the cupcake cups because I find it easier that way. It also gives me a lot of control. If you don’t own piping bags, no worries. Just take a Ziploc bag and cut off one corner. DIY piping bag!
In the video you’ll notice that I used piping tips or nozzles attached to the end of my piping bag. You don’t have to use them. But if you’re wondering, those are Ateco 824 star tips![]() (similar to a Wilton 1M
(similar to a Wilton 1M![]() ).
).
Related: How to Make Homemade Whipped Cream (Video)
How to successfully make meringue

A lot of bakers are afraid of making meringue. Personally, I fail 10% of the time too! It’s just one of those things that take time and lots of practice to master.
Here are some of the things I’ve learned to make meringue successfully:
- Make sure your egg whites are room temperature. They whip better and are more stable. It’s easier to separate the yolks from the whites when the eggs are cold though so what I do is separate the yolks and whites right when I take the eggs out of the fridge, place the whites in a bowl and leave them on the counter for about 30 minutes to bring them to room temperature.
- Grease is your enemy. You need to make sure that your bowl and whisk are dry, clean and oil-free. So it’s better to use glass, stainless steel, or ceramic bowls because plastic has a tendency to hide traces of oil in it.
- Add sugar gradually. It takes a lot of restraint to only add a teaspoon of sugar at a time when you have a cup of sugar to add but this really makes all the difference. You want the sugar to dissolve into your meringue properly.
- Try not to make meringue on a very humid day. Meringue has a tendency to absorb moisture so if it’s humid or rainy, your meringue has a bigger chance of falling apart.
Related: Lemon Pavlova with Toasted Almonds & Coconut
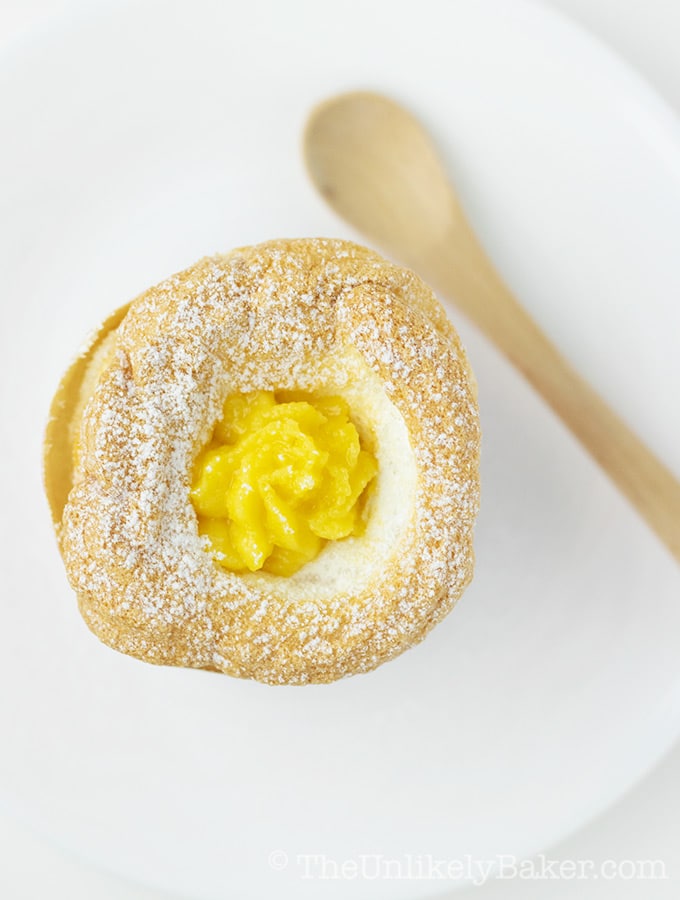
Scoop it, unwrap it, eat it however way you like
Now that you’re a meringue and Brazo de Mercedes ninja, it’s time to enjoy the fruit of your labours!
Unwrap it, plop it onto a plate and eat it like cake or scoop it out of the cup with a spoon like soup. Regardless of how you decide to devour your Brazo de Mercedes cupcake, it’s sure to be one delicious bite.

Brazo de Mercedes Cupcake (video)
Ingredients
For the Meringue:
- 10 pcs egg whites from large eggs room temperature
- ½ tsp cream of tartar
- ¾ cup granulated sugar
For the Custard:
- 10 pcs egg yolks from large eggs
- 1 300-ml can of condensed milk
- 1 tsp vanilla extract
- 1 tsp lime juice
For Dusting:
- ¼ cup confectioner’s sugar
Instructions
For the Meringue:
- Pre-heat oven to 350F. Place 15 cupcake cups (see note) on a baking pan, evenly spaced about 1-2 inches apart. No need to grease the cups or the pan. Set aside.
- Using a stand mixer fitted with the whisk attachment or a handheld electric mixer, whisk the 10 egg whites on medium speed until foamy.
- Add ½ teaspoon cream of tartar and continue whisking until soft peaks form.
- Gradually (slowly and in small quantities at a time – do not dump all the sugar in) add the ¾ cup sugar and whisk until you reach stiff peaks.
- Once the meringue is ready, transfer it to a piping bag fitted with a large star tip (you can also use a large Ziploc bag with one of the corners cut off). Using a circular, upward motion (see video), pipe the meringue into the cups (overflowing by about an inch on top). Remember to leave a slight gap in the middle where you can fill the custard later.
- Place the cookie sheet with your cupcakes into your pre-heated oven and bake for about 20-25 minutes or until the tops turn light brown (see note).
- Take out of the oven and allow to cool slightly before piping the custard filling (instructions below).
- Finish by sprinkling with confectioner’s sugar.
For the Custard:
- In a medium heavy-bottom saucepan (don’t turn on the stove yet), beat the 10 egg yolks before adding all the condensed milk.
- Mix them thoroughly then start cooking over low heat. Stir often so you don’t end up with scrambled eggs.
- When you see that your mixture is starting to take shape and form into clumps, add the 1 teaspoon of vanilla and the 1 teaspoon of lime juice.
- When you’ve reached custard consistency (thick but still spreadable), turn off the stove, remove pan from heat and set aside until you’re ready to pipe the custard into your cupcakes.
Video
Notes
Nutrition
Nutritional information are estimates only.
Happy baking!
Did you make Brazo de Mercedes cupcakes? I’d love to hear from you in the comments section below. If you’re looking for more unique, creative and delicious cupcake recipes, check out this cupcake recipes collection.
And let’s get social! Find me on Facebook, Pinterest, Instagram or Twitter.
Nakida
Yay! Congrats going this far, it’s a hectic journey, blogging is fun but it’s a full time job. I never heard about these cupcakes before and I happy I did, you really do learn something new everyday. They looked so fluffy and I love the creamy center. YUM!
Jolina
Oh yeah. It’s full time job indeed! Hope you decide to try these cupcakes 🙂 Thanks for stopping by Nakida!
Amy Scott
Oh I would love to try these but I’m not mine would look as dainty and perfect as these!
Jolina
Thanks Amy! But these are really relatively easy to make. It’s just the meringue that’s a little challenging. Let me know how it goes if you decide to try 🙂
Anvita Bhatnagar Mistry
Thanks for stopping by Jolina. Congratulations on the milestone. It is definitely time to celebrate these achievements. I am not a good baker and most of my experiments are not very successful so i can imagine how much hard work you must be putting me. Keep it up and here is wishing you many more milestones to come. BTW, love the template.
Jolina
Thanks for the kind words Anvita! If you only knew how many failed experiments I’ve had (still have). Unlike you I cannot cook so I will stick to baking 🙂 Wish you all the best as well!
Shanna
Happy 3 months! 🙂 These look absolutely delicious!
Jolina
Thanks Shanna!
Amanda
Congrats on the blog birthday! You are doing great! I also have never heard of these kind of cupcakes, I need to try them!
Jolina
Thanks Amanda! Let me know how it goes if you decide to try 🙂
Alicia
These are beautiful!
Jolina
Many thanks Alicia! 🙂
Christine - Jar Of Lemons
I’ve never heard of this type of cupcake, but these are BEAUTIFUL! And congrats on your blogaversary!
Jolina
Thanks Christine! I feel rather silly now for announcing it to everyone, it seems so mundane teehee
Liz @ Ready to Yumble
Jolina these are stunning! I’ve never heard of this dessert before, but it sounds so different and delicious. I’ll have to give them a try! Happy three month birthday BTW – definitely a milestone. My six month blog birthday is coming up and I’m practically planning a party, haha. Turns out blogging is more work than I realized – but so much fun too! And a great excuse to always be planning my next cake.
Jolina
Hi Liz! Thank you! Woohoo for 6 months! It is a lot of work, isn’t it? Some days I’m so exhausted from my day job then I have to do blog stuff. But yes, cake makes it all better 🙂 Can’t wait to see what you come up with!
Lisa | Garlic + Zest
What a unique idea! They’re beautiful too! I’m definitely going to give this one a shot!
Jolina
Thank you Lisa! Let me know how it goes if you decide to give it a go 🙂
Madi
these look so good – i’ll be thinking about desserts all day now. happy 3 months!
Jolina
Thanks very much Madi!
Carla
Wow, those look absolutely delicious!
Jolina
Thanks Carla!
Natanja
Hey our blogs are similarly old! Mine is about 3 and 1/2 months. How cute, they’ll be in the same class 😉
I still can’t get over how fluffy these look! Really gorgeous!!
Jolina
LOL! We’re almost blog twins! Thanks Natanja 🙂
LaKisha Riddick
Congratulations on your blogaversary! I like cupcakes. This is something different. I’ll pin and try when I am brave! 😉
Jolina
Thanks LaKisha! And don’t be scared. If I can do it anybody can 🙂
Jessica
Those look amazing! I hope they were as delicious as they look, great photography.
Jolina
Thanks Jessica! They were quite tasty 🙂
Robyn
Happy 3rd month blogging! Love your work !
Jolina
Thank you Robyn! 🙂