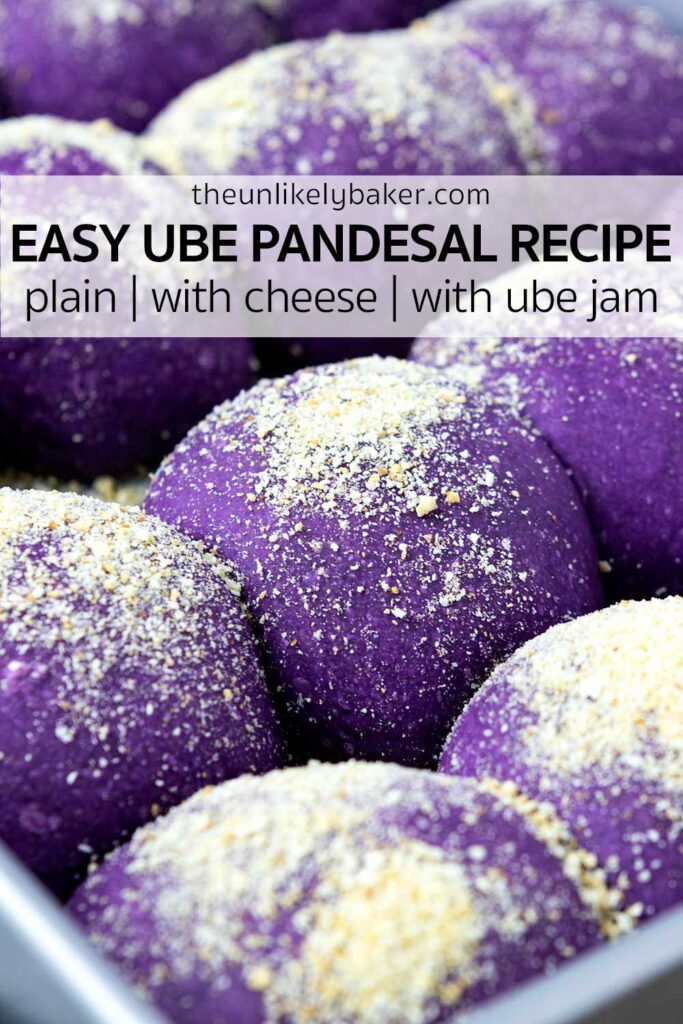
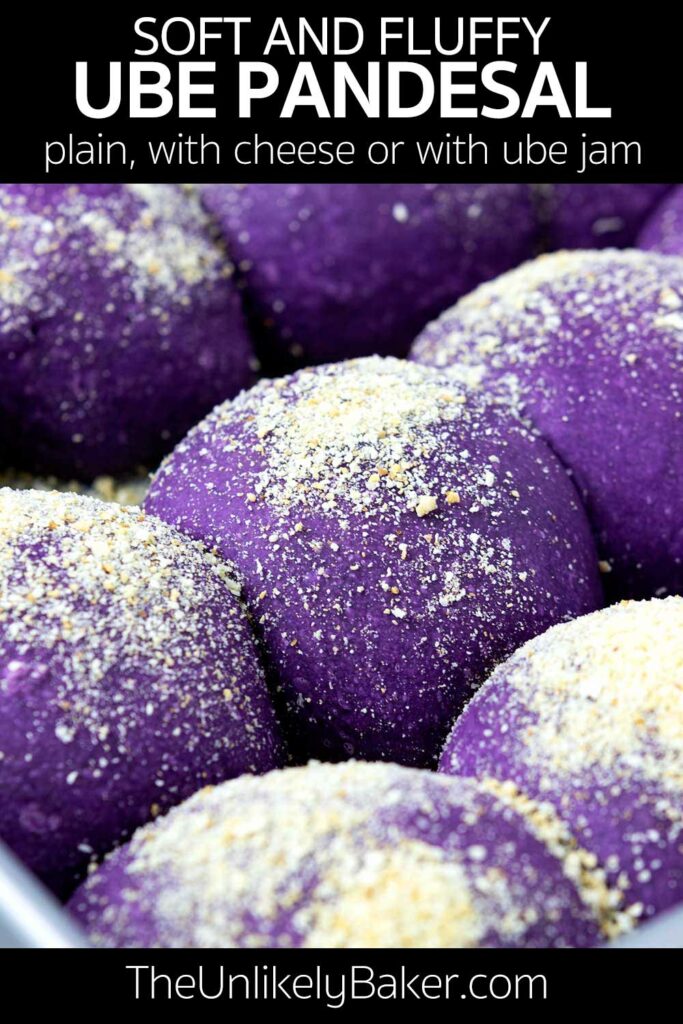
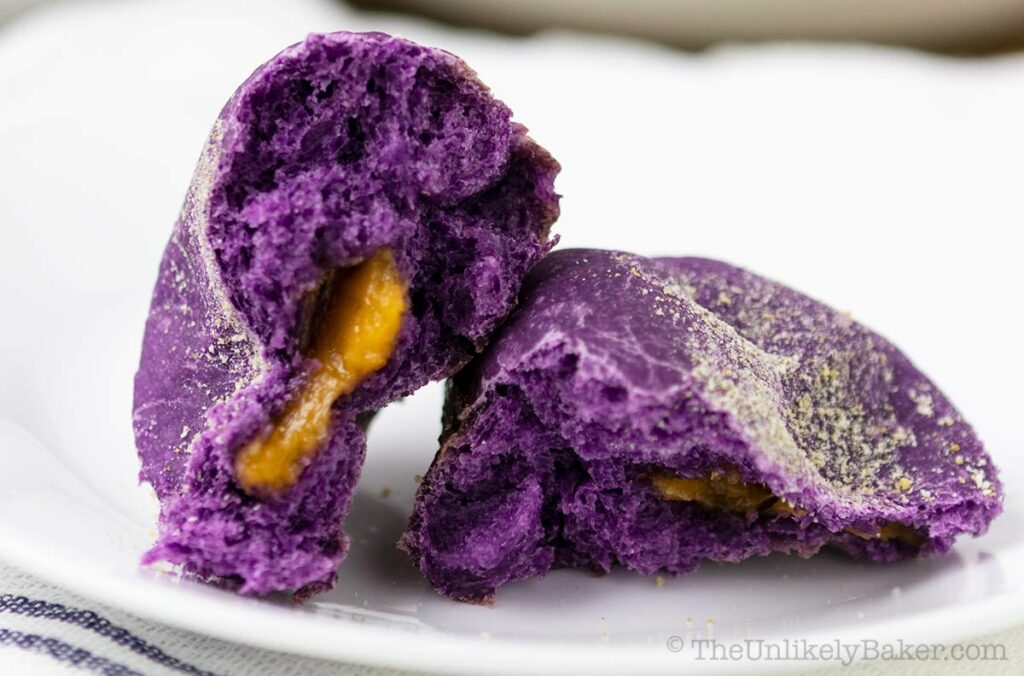
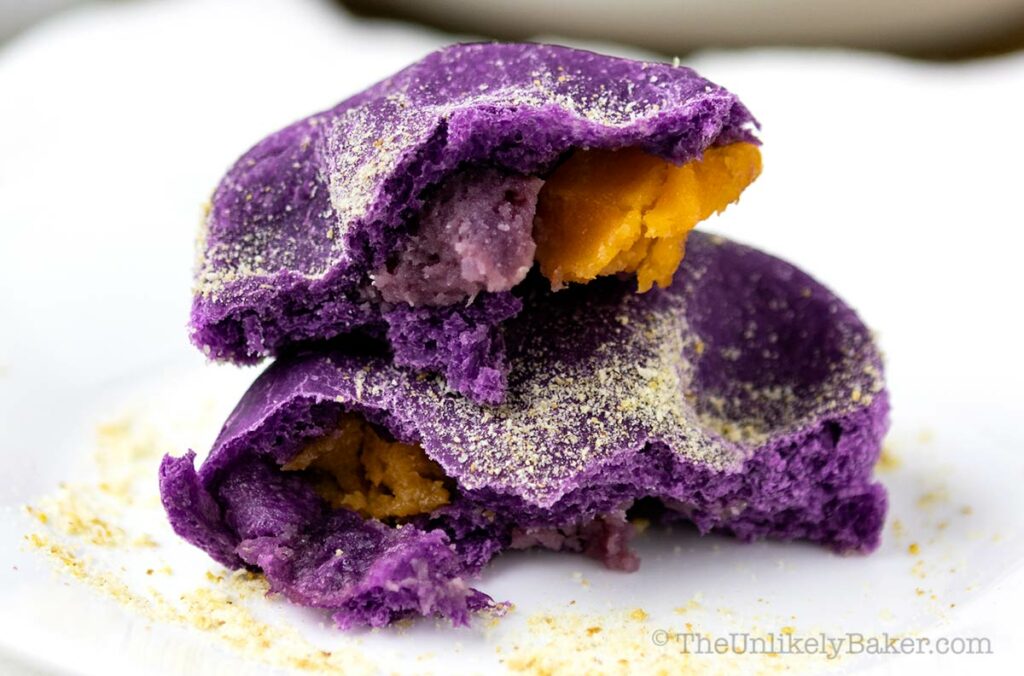
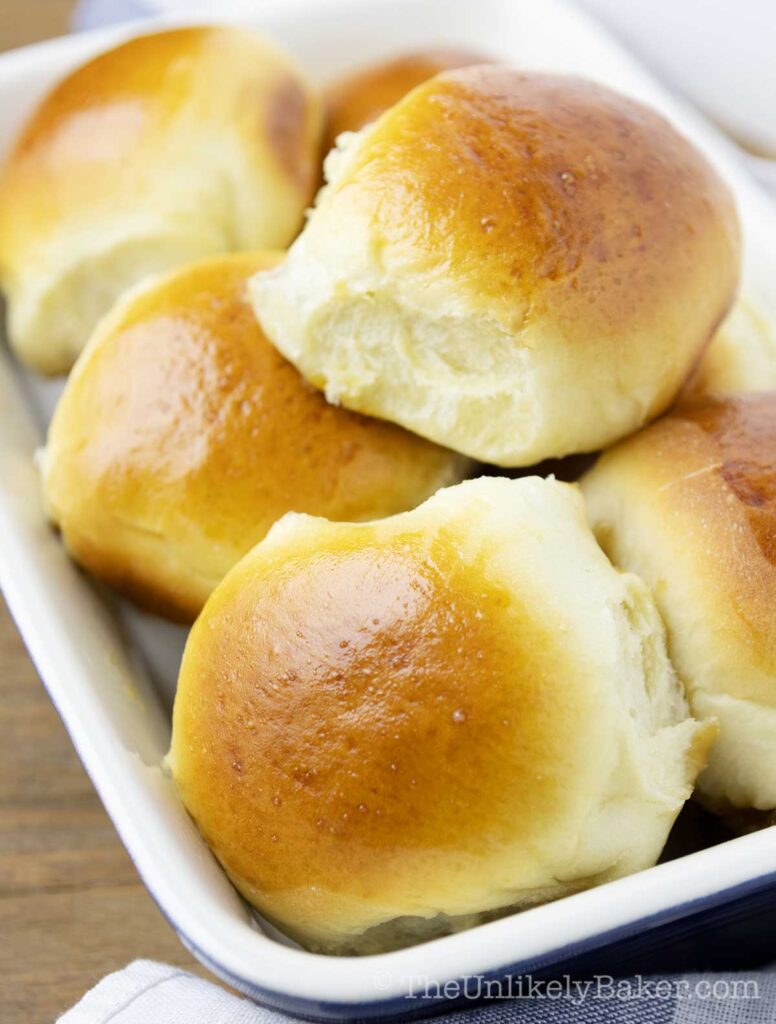
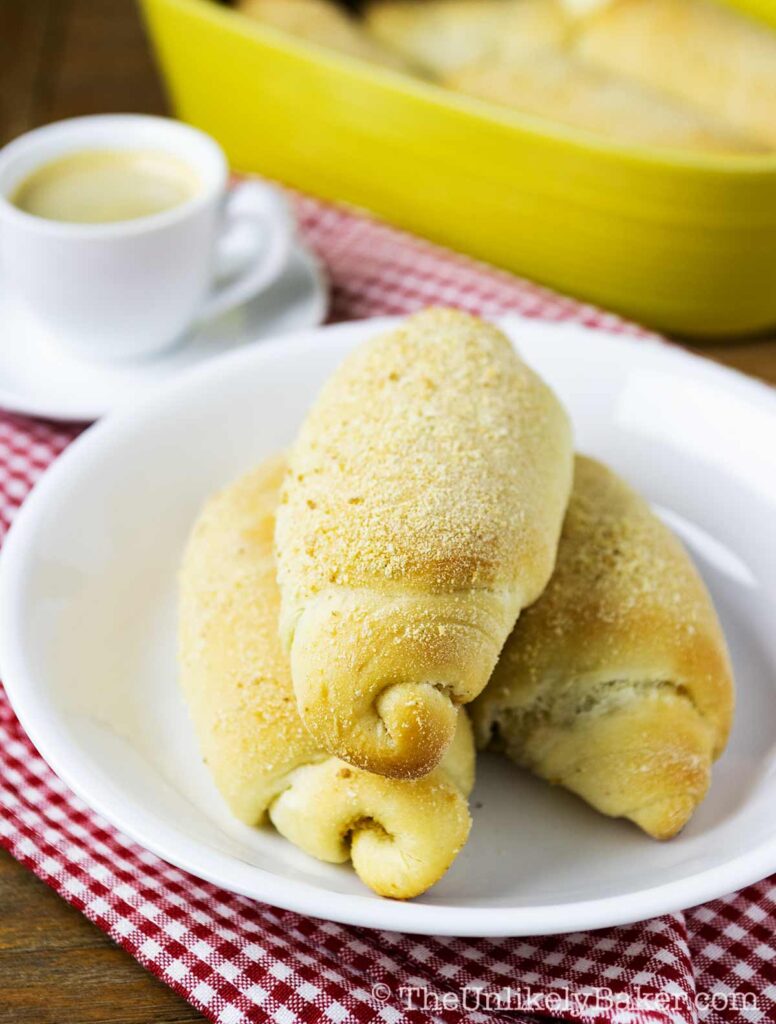
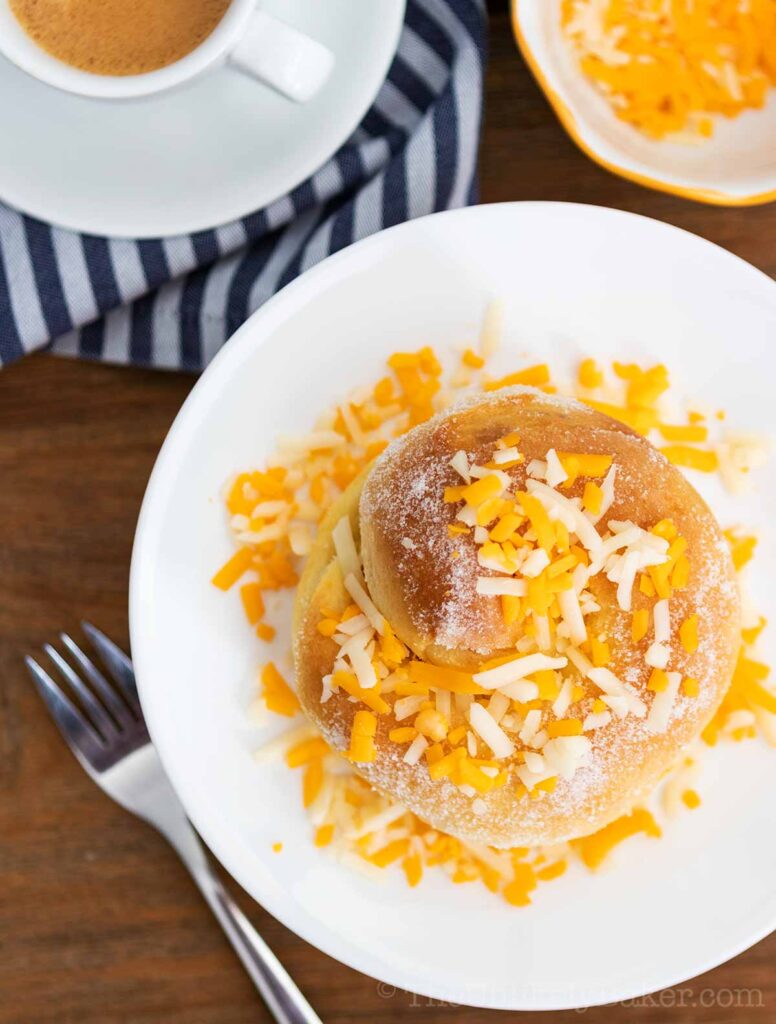
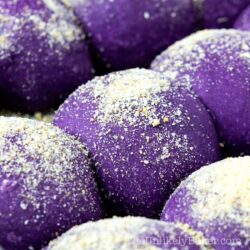
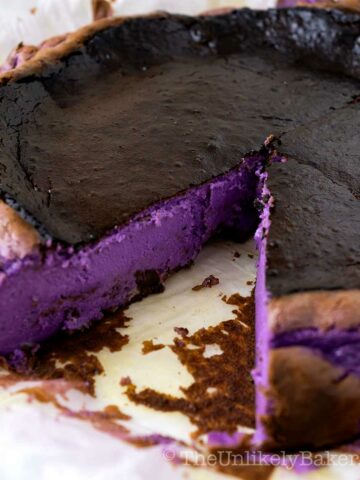
Ube pandesal is your favourite Filipino bread roll but ube flavoured! Make it plain, with cheese, with ube halaya, or with cheese and ube halaya. Have it for breakfast, dip it in coffee Filipino-style, enjoy.
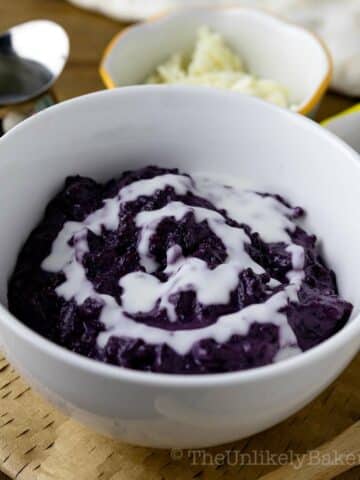
(Looking for something sweeter? Try these ube bread rolls. They’re filled with ube jam and baked with a mouthwatering coconut topping. Or make something truly special with a batch of ube ensaymada!)
Ube pandesal (also called ube cheese pandesal because it’s often made with a cheese filling) is a relatively new pandesal creation. At least for me because it was certainly not a thing when I lived in Manila.
It’s become so popular in recent years and I’ve seen a gazillion social media posts about them, enough to make me want to develop my own recipe.
Why you’ll love making this recipe
And I couldn’t be happier about the recipe I’m sharing today.
I based it on my soft pandesal recipe so these have the same fluffy and tender texture but with a hint of ube flavour.
You’ll love making it because:
- It’s easy and straightforward. Like my traditional pandesal recipe, this is easy and simple to follow. I break it down into small, manageable parts.
- The ube flavour is not overpowering. The ube flavour here is very subtle so it’s still the pandesal you love and that you can enjoy with coffee and eggs at breakfast or warm milk at merienda.
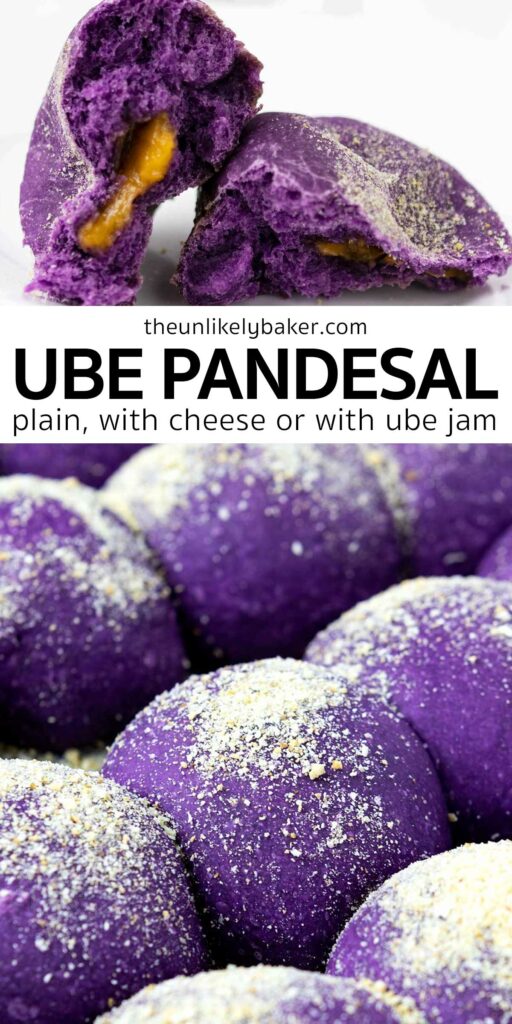
- You can customize the filling, or not put any at all. If you want a stronger ube flavour, you can fill the bread with ube halaya or ube jam. Or you can make ube cheese. You can even mix both. You can also just make plain ube pandesal, no cheese, and not have any filling at all. Just spread some ube butter and call it a day!
- Freezes well. This Filipino bread freezes very well. So you can make a big batch today, freeze them, and enjoy them tomorrow like they’re freshly baked.
How to make ube pandesal
Ingredients
To make this recipe, you’ll need:
- Warm water — around 110F. If you don’t have a thermometer, you can tell if it’s warm enough by dipping a finger in; it should be warmer than room temperature but not hot.
- Active dry yeast — see baking tips where I explain why I use this kind of yeast rather than instant yeast.
- Ube extract — I use ube extract to add ube flavour in this recipe. I’ve found that adding ube halaya or even just plain mashed purple yam to the dough changed the texture of the bread too much and I prefer the perfectly soft and fluffy bread I get with ube extract alone. I simply fill the pandesal with ube halaya if I want a stronger bite of ube in there.
- Oil — I most often use canola oil. Vegetable oil also works.
- All purpose flour — I don’t use bread flour when making bread. More on this below.
- Bread crumbs — this is one of the things that make pandesal unique. I use plain, ready-made breadcrumbs.
- Sugar and salt
Baking tools
I knead the bread dough by hand but you can definitely use the dough hook of your stand mixer.
I do use a French rolling pin, 9×13 inch baking pans, mixing bowls, measuring cups and spoons, and a bench scraper.
The top 2 items I can’t recommend enough when making homemade bread are:
- Silicone pastry mat — this makes cleanup so easy and it’s easy to wash and store as well.
- Kitchen scale — for accurate measurements and consistent results.
Easy recipe (with step-by-step photos)
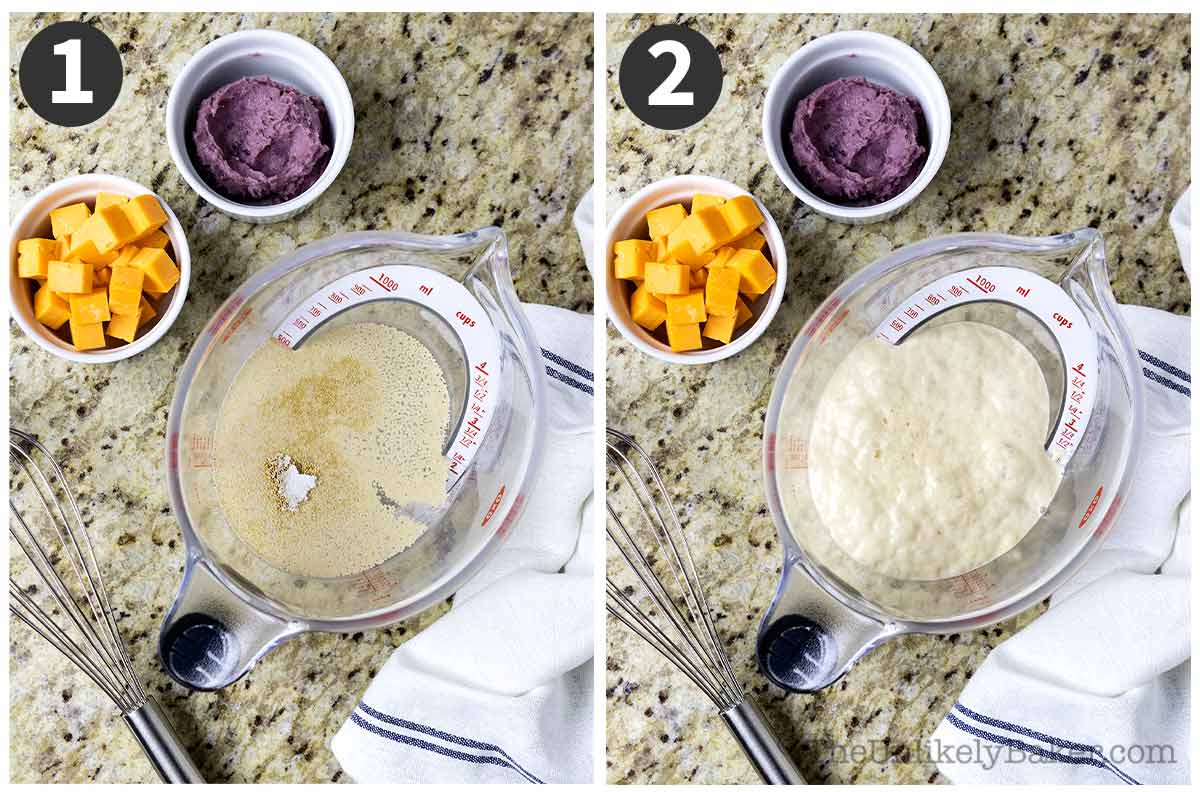
Proof yeast. Mix sugar and yeast in a cup or small bowl and wait until bubbly before using. This usually takes 10 minutes. If you’re not seeing any changes after that time, you’ll need to discard and start again.
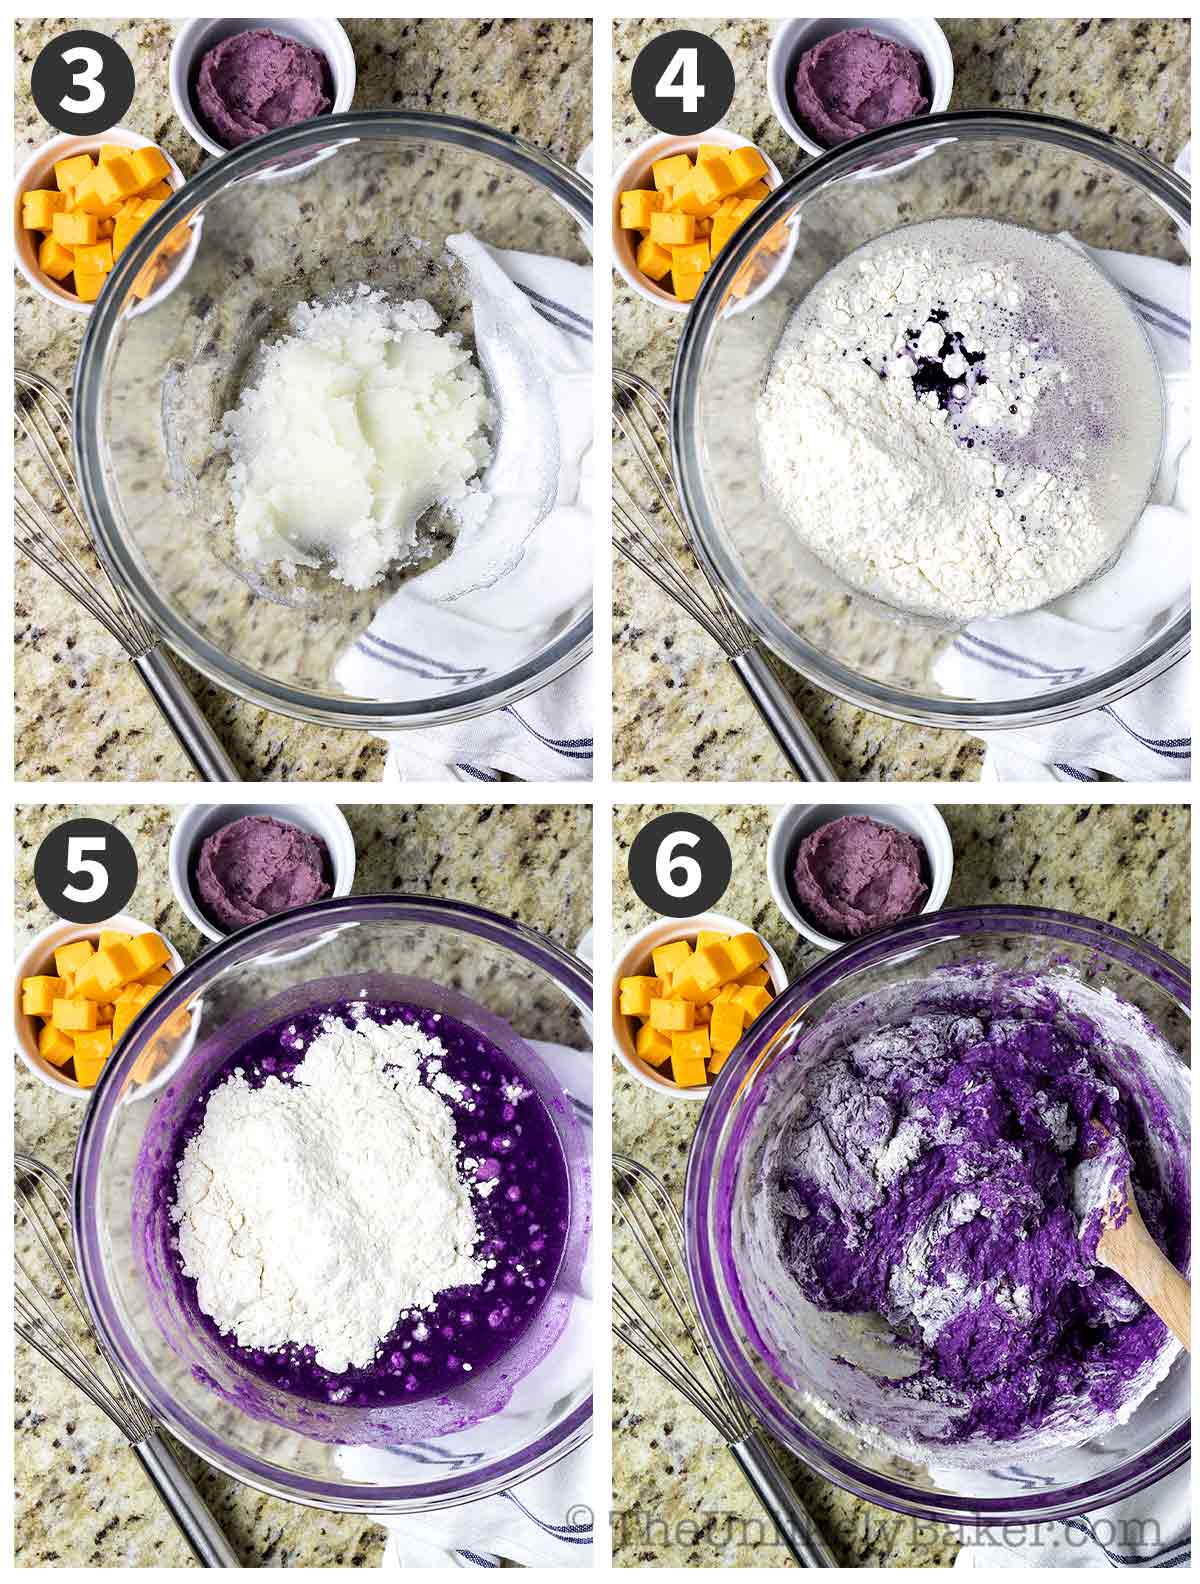
Prepare dough. Combine sugar, salt, oil, ube extract, yeast mixture and flour in a large bowl. Add the flour about ½ cup at a time until the dough starts sticking together in a ball. You can then transfer it to a floured surface and knead until smooth and elastic (see baking tips).
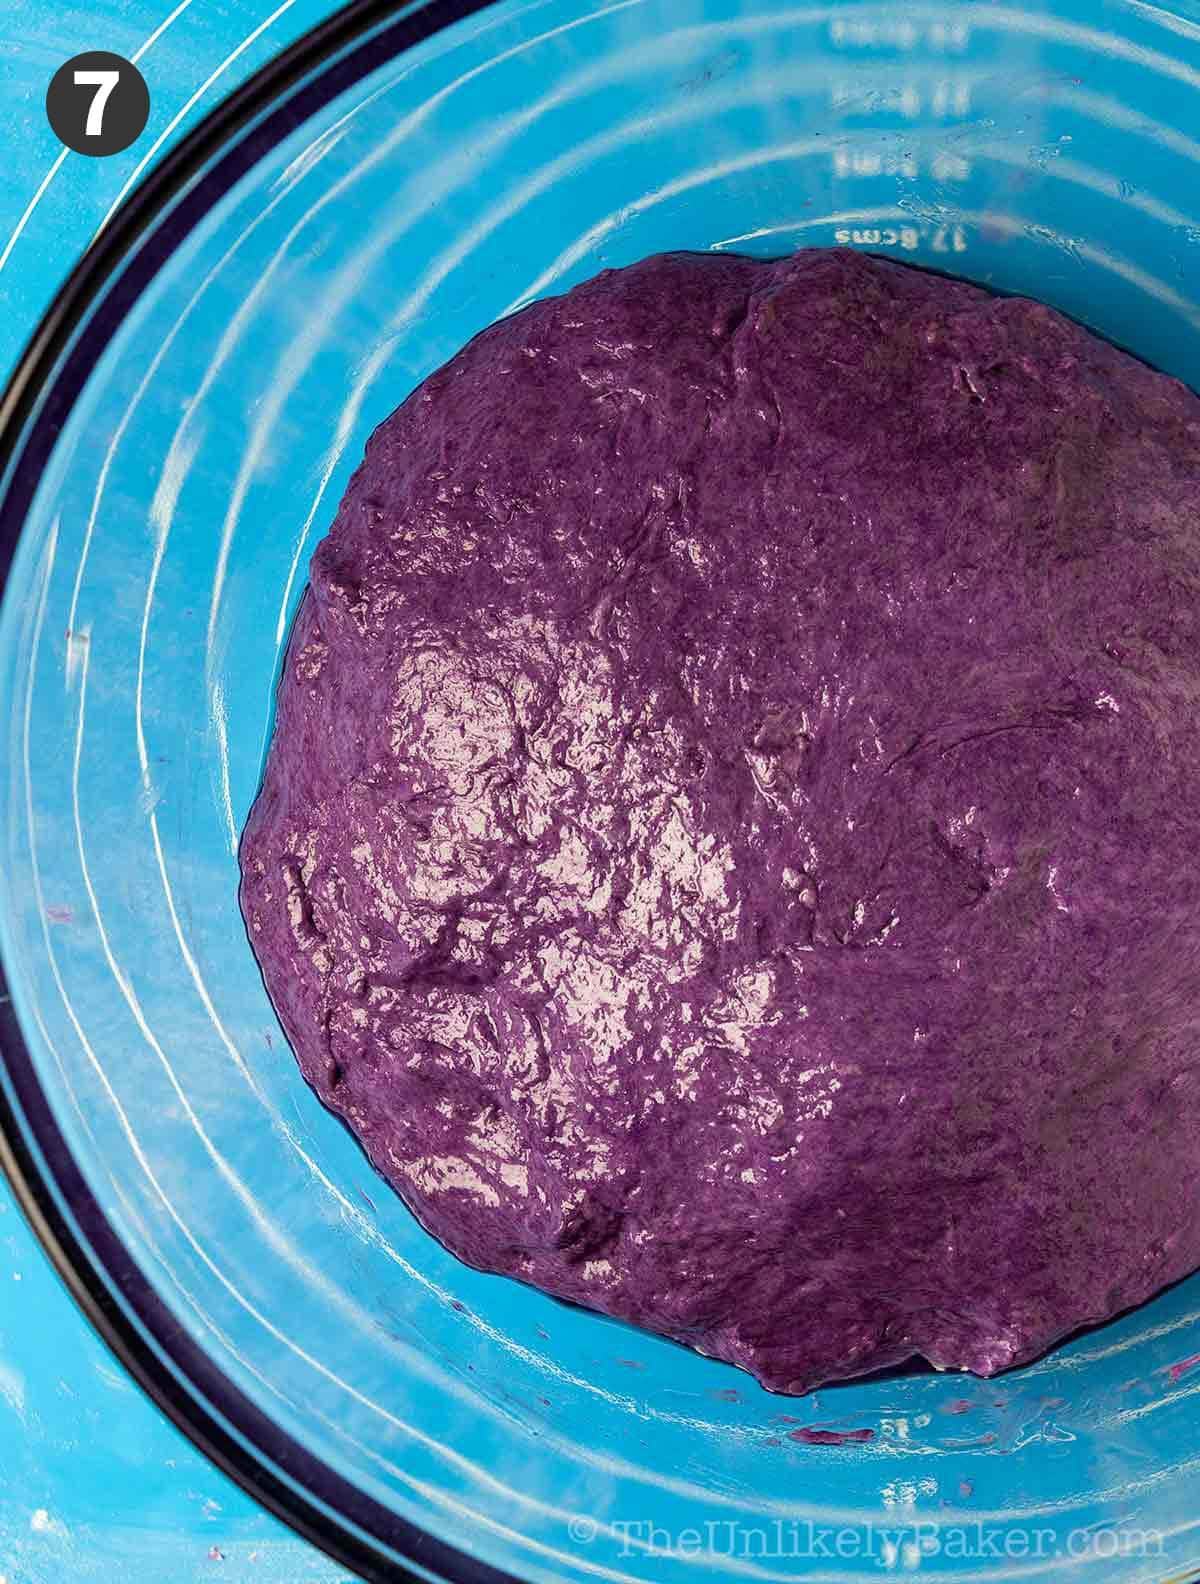
First rise. Transfer dough into an oiled bowl and cover with a damp cloth or plastic wrap. Place in a dry, warm place and allow to rise until double in size (see tips). This usually takes 2 hours for me. It may take more or less time for you; just peek at the dough and decide if it’s ready.
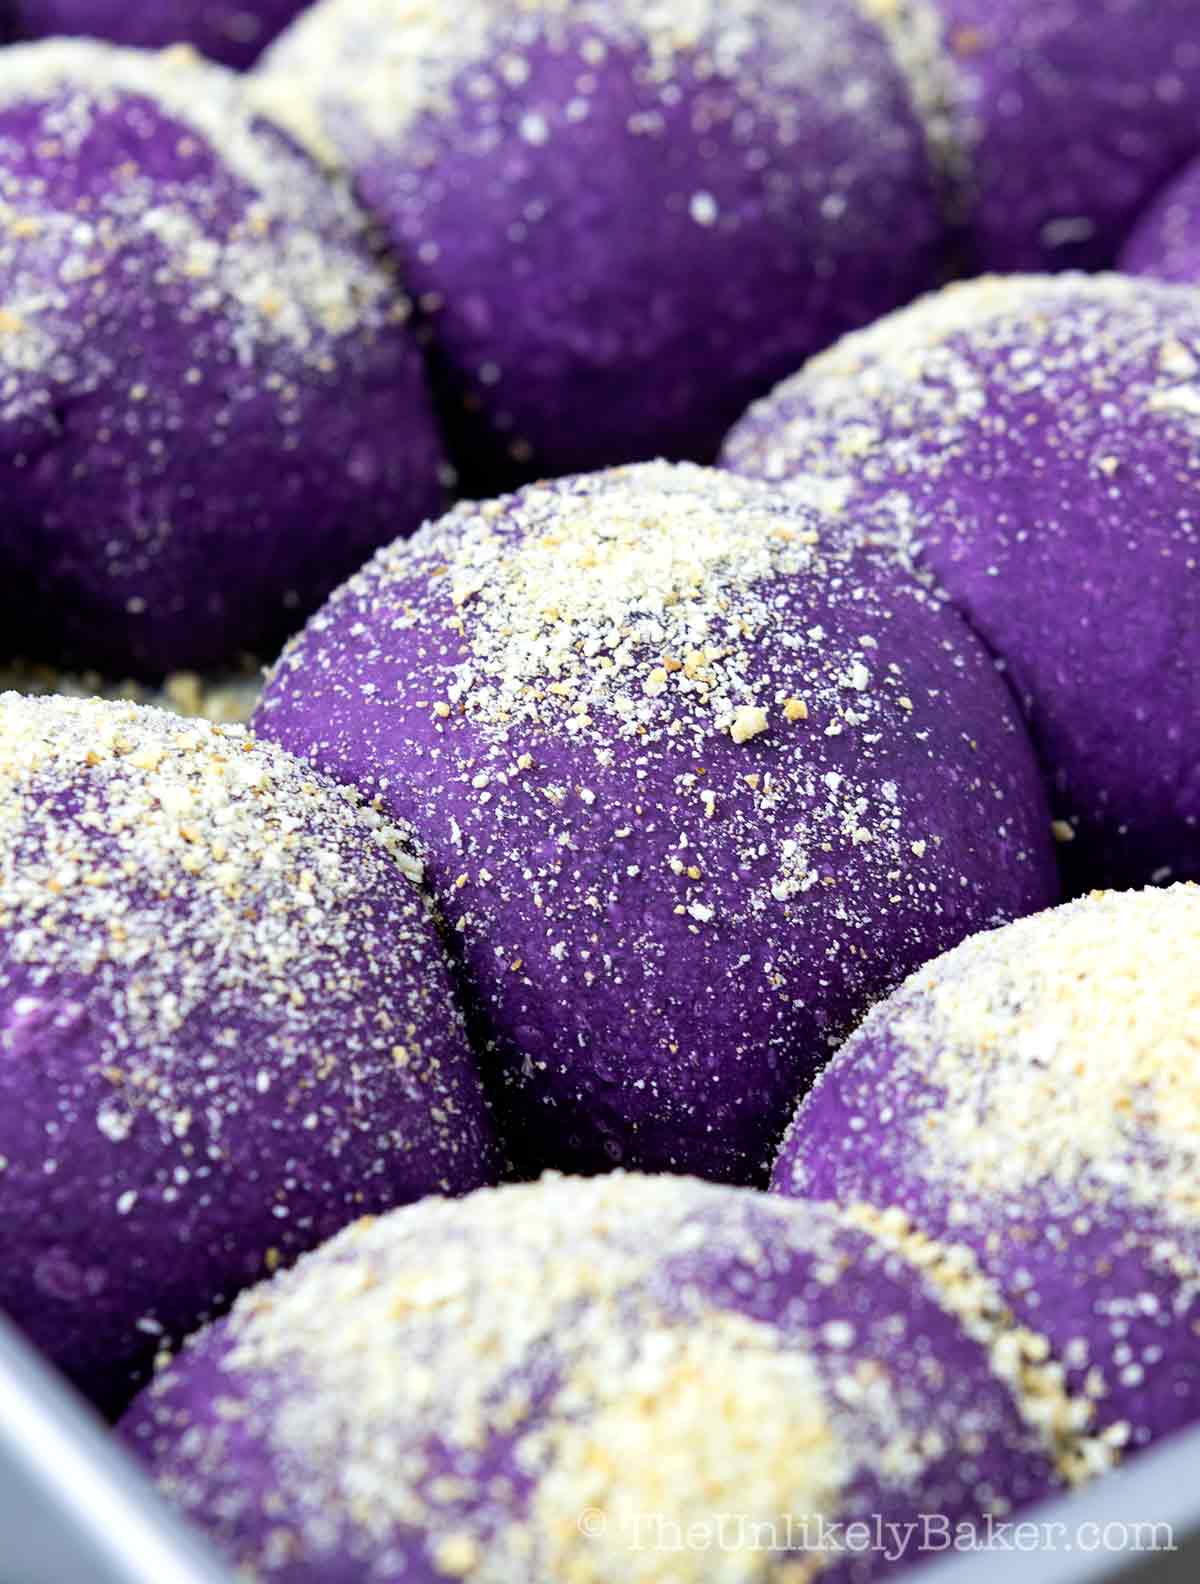
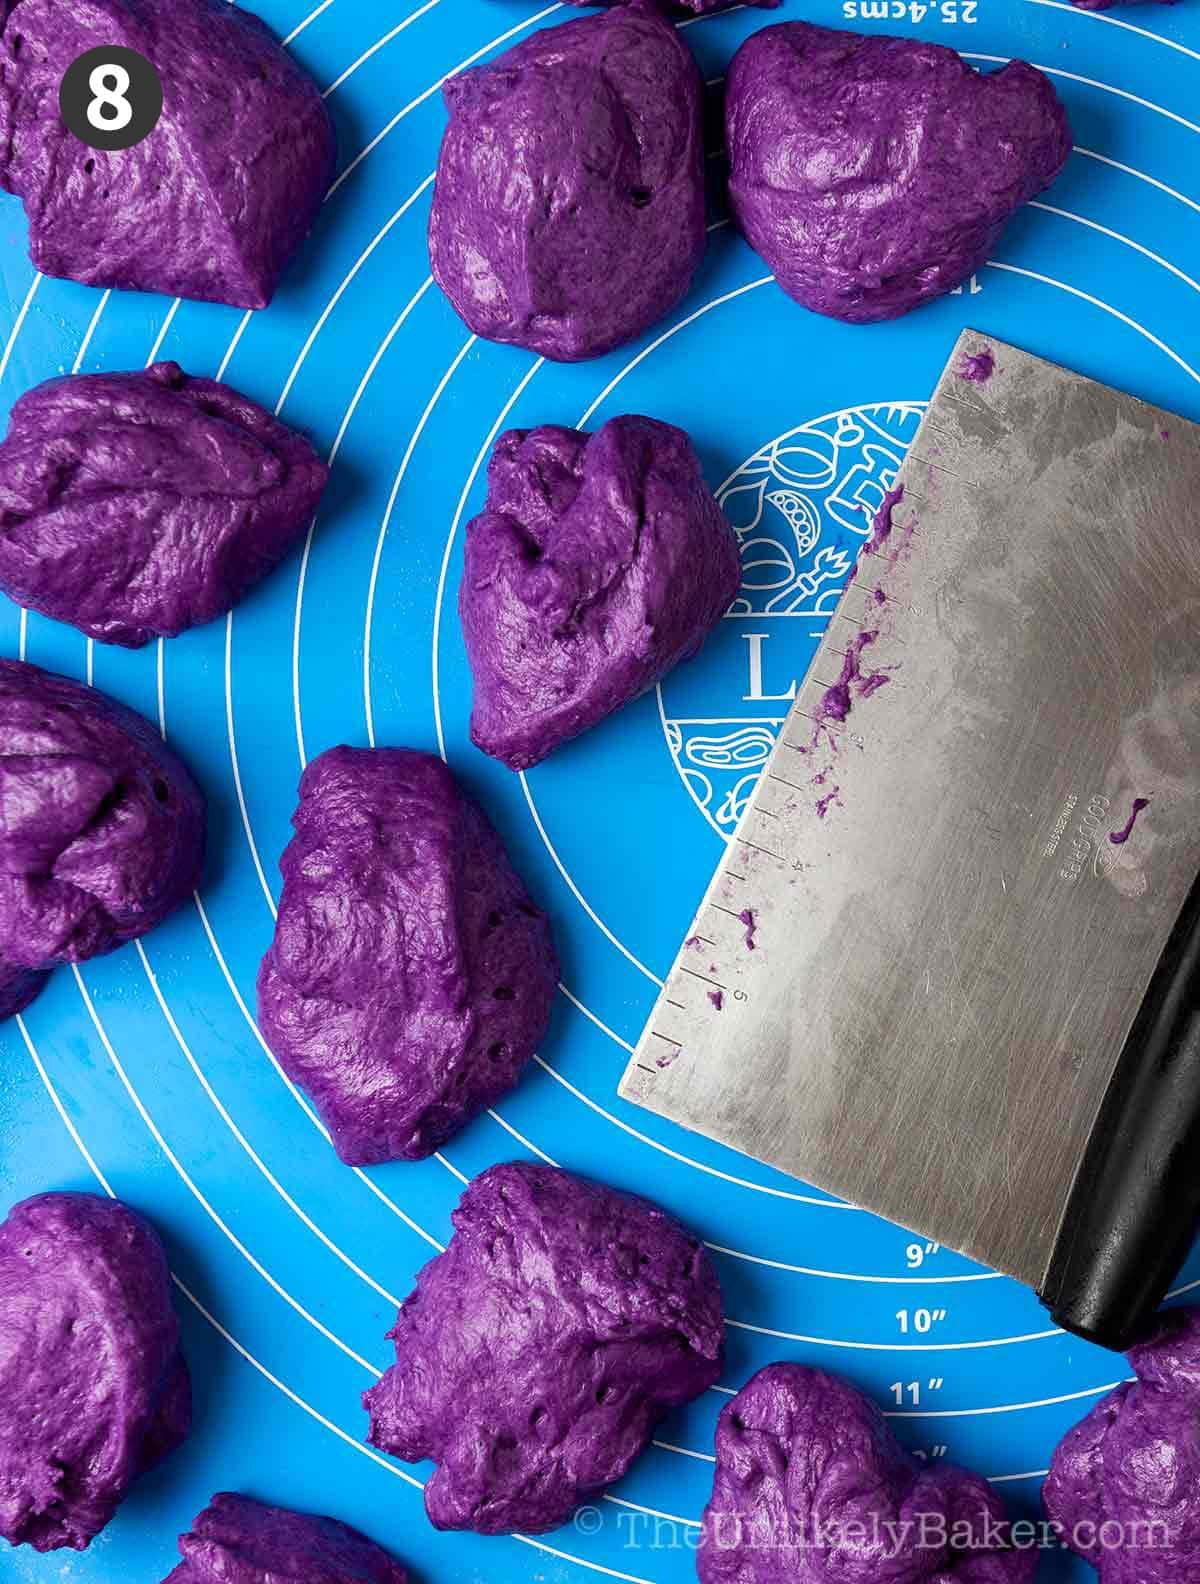
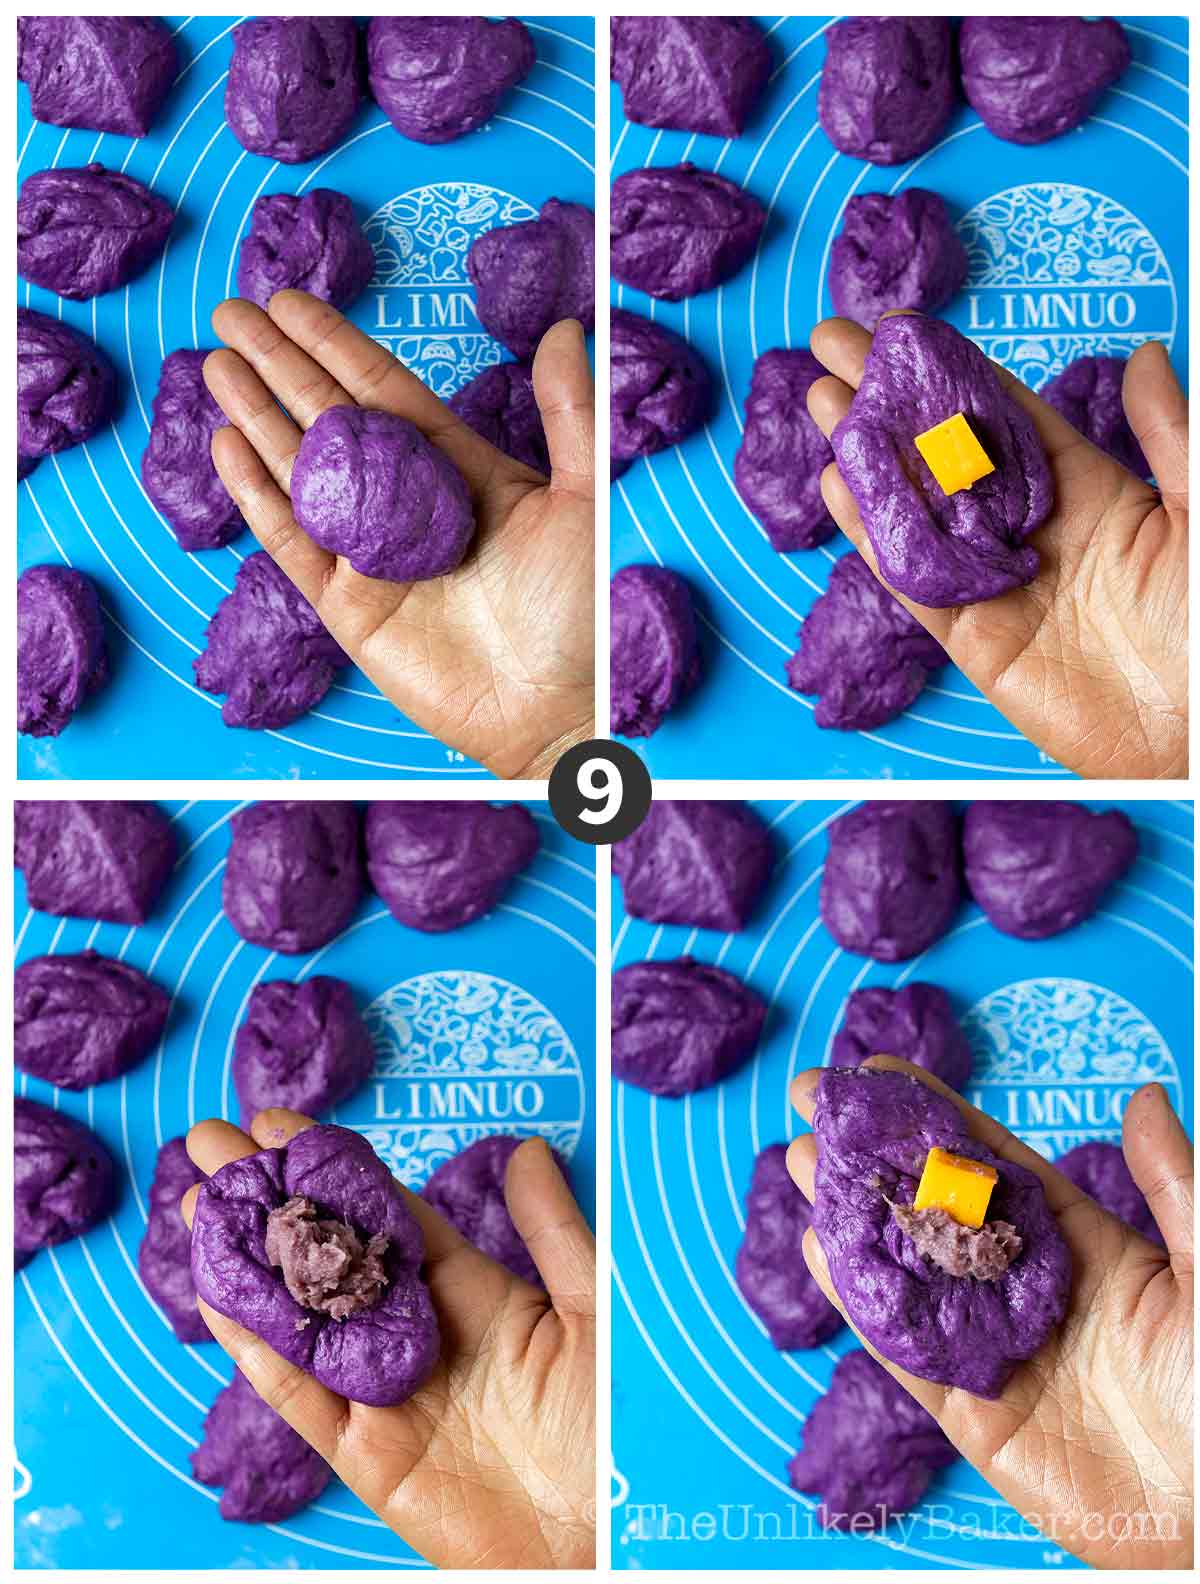
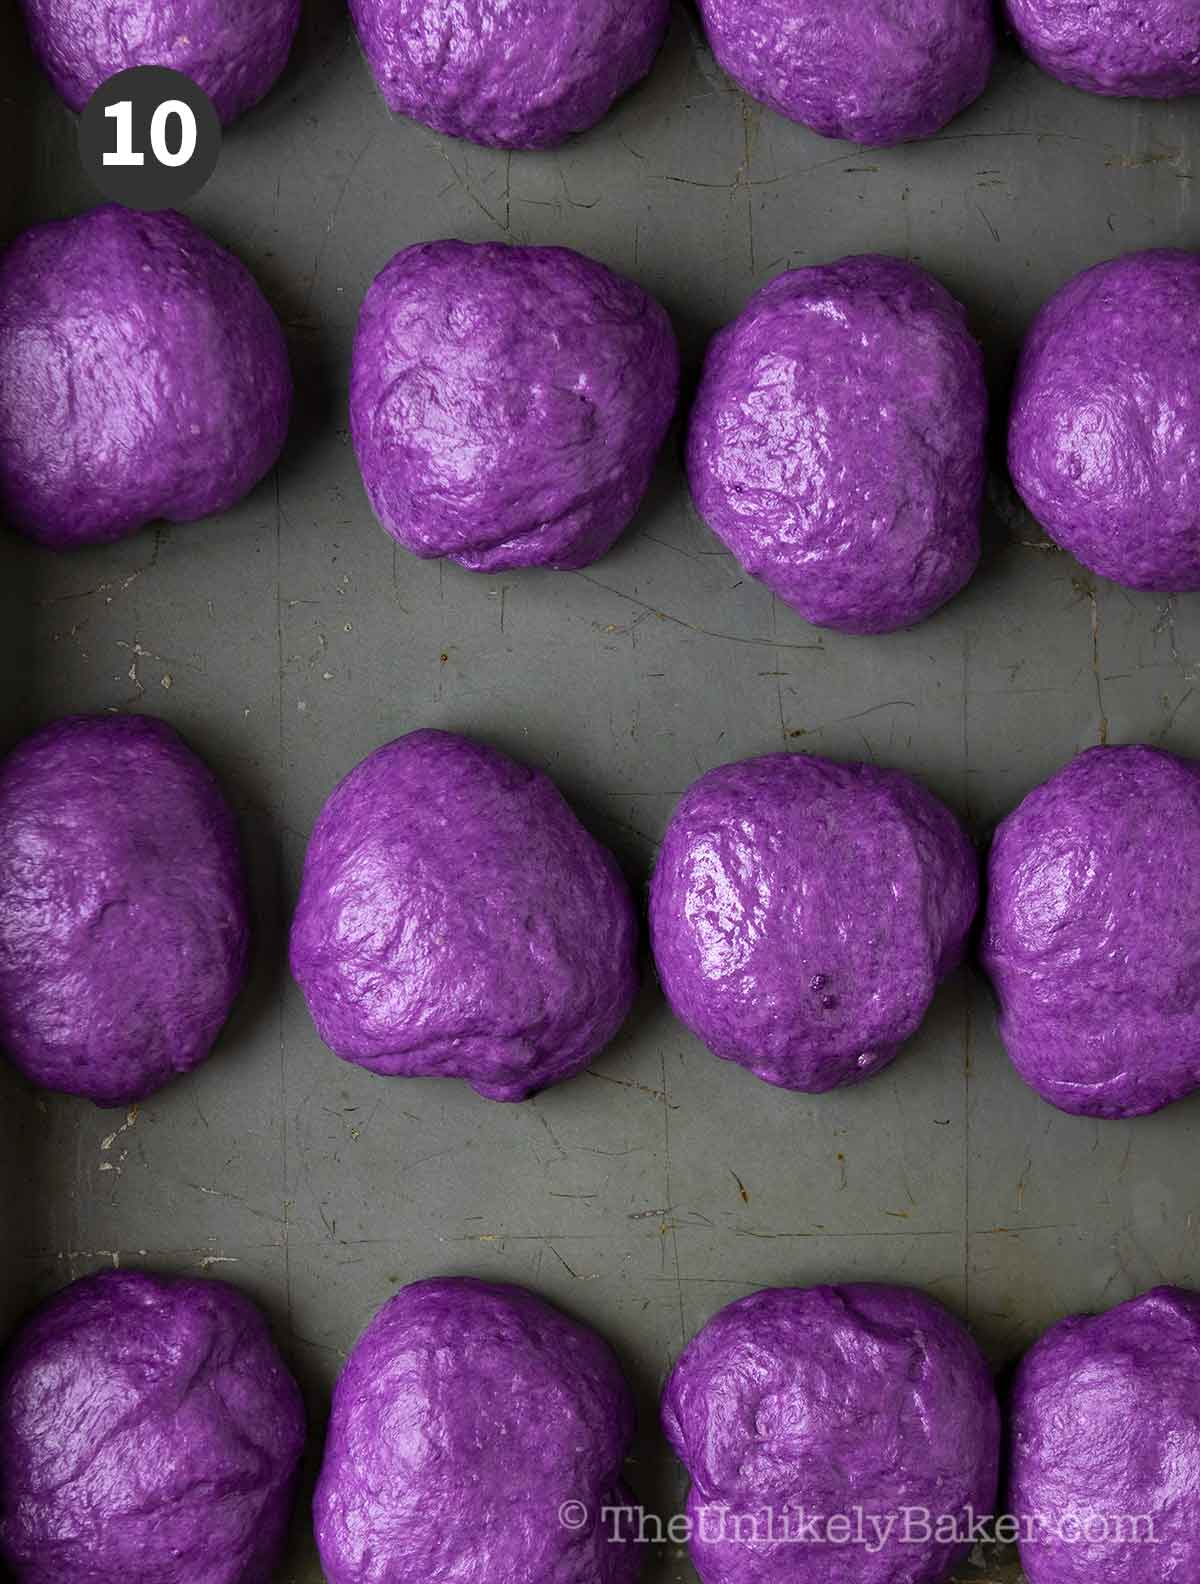
Shape and fill. When ready, turn the dough into a lightly floured surface, knead slightly and divide into 32 pieces. Shape into an oval and place on a 9×13 baking pan (you will need 2 pans). If filling, flatten slightly, place a piece of cheese, a dollop of ube jam, or both, in the middle before shaping. Cover with a damp cloth or plastic wrap and allow to rise a second time (usually takes an hour).
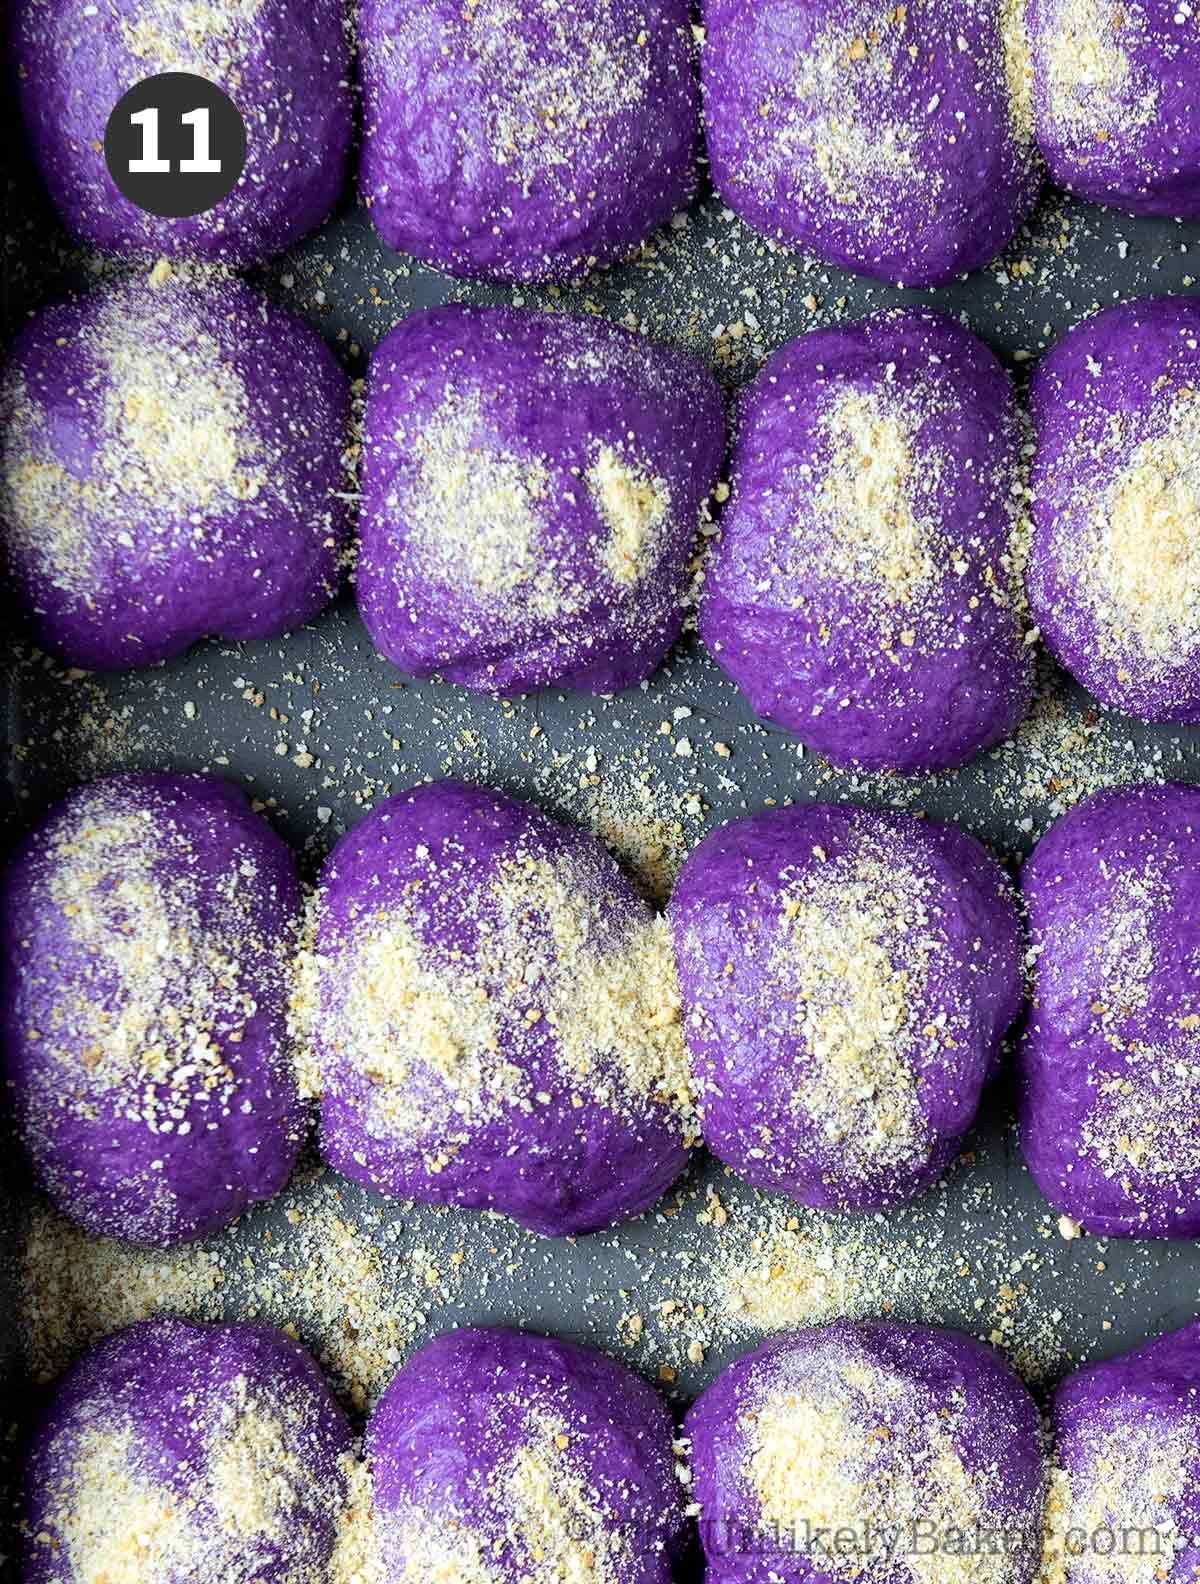
Bake. Preheat oven to 375F. Sprinkle bread crumbs on the top of the pandesal and bake for 15-20 minutes or until the bread springs back when gently pressed. Since you’re using 2 baking pans, it’s good practice to rotate the pans halfway through baking.
Expert baking tips
Easy, right? Read through these baking tips for a perfect batch of ube pandesal every time.
How to make ube pandesal soft and fluffy
- Proof yeast properly. The reason I prefer using active dry yeast vs. instant yeast is I can always ensure it’s still active before adding it to my dough, via proofing. If the yeast stays flat and doesn’t bubble after 10 minutes, it’s old and you need a fresh batch. See more tips below.
- Make sure that your dough is not too dry. This pandesal dough is on the stickier side but don’t be tempted to add too much flour when kneading or you will end up with dense bread. If you’re having a difficult time, instead of adding more flour to your surface, try kneading with lightly oiled or damp hands instead.
- Knead the dough enough. Kneading improves the structure of the dough, making it stretchy and pliable, and forming a structure that will trap air for a proper rise. Under-worked dough won’t have that and will result to dry, dense bread.
- Don’t knead the dough too much. I like kneading the dough by hand because it rarely results to over kneading. Using a stand mixer is more convenient but it’s more likely to over work the dough so be sure to watch it carefully. Once you get that perfectly elastic but still slightly sticky dough, stop.
Tips when proofing yeast
Remember that yeast is a living thing and proofing is simply ensuring that your yeast is alive and active.
In this recipe, we use active dry yeast, which needs to be proofed. Note that rapid-rise yeast, instant yeast, or bread machine yeast don’t need to be, else they will lose their fast-rising ability.
Step 1: Mix yeast and warm water.
The temperature of the water is important. It should feel warm but not hot.
If you measure the temperature with a thermometer, it should be about 110F. Hotter than that and you’ll end up killing the yeast.
Step 2: Add sugar and stir.
Yeast loves sugar and will gobble it up.
If you watch the bowl or cup, you will actually see movement and this is the point when you will start to see bubbles and foam from the carbon dioxide that is forming.
Proofing usually takes me about 10 minutes. If your mixture has no bubbles after this time, your yeast is old or stale. You’ll need to start with fresh yeast.
Unfortunately, there’s no way to revive old yeast.
Tips for dealing with sticky dough
If your dough is sticky in the bowl as you’re stirring it, add flour a little at a time until it sticks together in a ball. Not too much though, or you’ll end up with very dense bread.
If it’s sticky while you’re kneading it, avoid the temptation to add even more flour. Instead, try kneading with slightly oiled or damp hands.
How to know if dough is kneaded enough
The most common way of testing if your dough has been kneaded enough is doing the “windowpane test”.
All this means is you pull off a small piece of dough and stretch it thin; if the gluten is well-developed, the dough will stretch without breaking. If it quickly breaks you need to keep kneading.
Tips for making the dough rise
A lot of recipes say to allow the dough to rise until “double in size”.
Depending on the recipe, this can range from 30 minutes to 2 hours. Just check at the halfway mark so you can get an indication of how much longer you have to go.
For me, what’s important is finding the proper place to leave my dough.
It’s cold here most of the year so leaving my bowl on our not-so-warm counter is not ideal.
So what I do is turn my oven on to its lowest setting for a few minutes, then turn it off so that it’ll be about 90F when I’m ready to put my dough in to rise.
Just remember to remove the dough from the oven when you’re ready to preheat for baking.
And do you really need a damp cloth to cover your dough while rising? I do it most of the time but it’s not necessary. Sometimes I use plastic wrap. And other bakers I know use pot lids.
The key is covering the bowl with something because doing so helps the dough retain moisture and prevents it from drying out.
How to have evenly sized pandesal
I get evenly sized pandesal by weighing the dough and dividing the weight by the expected yield, in this case, 32. I then ensure each piece of dough is that exact weight (usually in grams).
To do this, you’ll need to invest in a kitchen scale. And it really is one of the best gadgets we’ve added to our kitchen and has improved my baking tenfold.
While you can get away with volume measurements with a lot of recipes, bread making is more exact so it’s always better to weigh your ingredients.
How to make sure the filling doesn’t ooze out
When making ube cheese pandesal or ube-filled pandesal, you’ll want to properly seal in the filling so it doesn’t ooze out during baking.
What I do is fold the dough over the filling completely, pinch to seal (much like a dumpling), then shape.
Best cheese to use
I would love to use Eden Quick Melt Cheese in my recipe but they’re very expensive where I live. So I use a block of sharp cheddar cheese that I slice into cubes instead.
You can also try using cream cheese for a different flavour profile.
What’s important is to use a cheese that you like eating on its own and cheese that would melt nicely while baking.
Frequently asked questions
The most common reasons for hard and dense pandesal include:
– Too much flour added to the dough, drying it up
– Yeast used was stale
– Dough was kneaded too much, or not enough
– Over-baking
See the notes above for tips on how to make pandesal soft.
I personally don’t use bread flour to bake bread. I always use all-purpose flour because that’s what I always have on hand. And I’ve had great success with it.
So if you don’t have bread flour, no worries. You can use all-purpose flour and make very tasty bread out of it.
I did read that the higher percentage of gluten in bread flour (somewhere between 11-14%) makes it ideal for bread because it makes the dough more elastic and easier to work, resulting to lighter textured breads.
So if you’re curious or if you have bread flour on hand, you can substitute bread flour for all-purpose flour easily. It’s a 1:1 substitution. You can read all about it and the different kinds of flour here.
You can absolutely make ube pandesal without breadcrumbs.
It’s the unique thing about this Filipino bread roll but if you’ve run out or simply don’t care for them, you can leave it out and still enjoy it.
As with classic pandesal, ube pandesal is best eaten fresh out of the oven.
Plain ones will last up to 2 days on your counter in an airtight container. If you plan to keep them for longer, freezing is a better option.
Ube pandesal filled with cheese or ube jam will need to be frozen if not consumed immediately.
Frozen pandesal can last at least a month.
Make sure the bread is completely cool then place them in a freezer-safe container or a large freezer bag and put in the freezer.
To reheat, simply pop into your toaster for a few minutes until heated through. No need to thaw.
I don’t recommend microwaving pandesal because that would make it tough and dense.
Other Filipino bread recipes
Love making homemade bread? Check out these other Filipino bread recipes you’re sure to enjoy:
Here’s a list of Filipino bread recipes and bakery favorites so you can have them all in one place.
Happy baking!
Did you make this recipe? I’d love to hear from you in the comments section below.
And let’s get social! Find me on Facebook, Pinterest, Instagram, Twitter and YouTube.
How to Make Ube Pandesal (Plain, Cheese, Ube Jam)
Ingredients
Yeast Mixture:
- 2 cups warm water around 110F
- 2 tsp active dry yeast
- 1 tsp granulated sugar
Dough:
- ⅔ cup granulated sugar
- ¼ cup canola oil plus more for the bowl
- 2 tbsp ube extract
- 2 tsp salt
- 6 cups all-purpose flour plus more for kneading, see notes
Optional Fillings:
- cheddar cheese cubed
- ube jam softened to room temperature
Topping:
- ¼ cup bread crumbs see notes
Instructions
Yeast Mixture:
- In a measuring cup or small bowl, stir warm water, active dry yeast and sugar until combined. Set aside and let stand until bubbly (about 10 minutes).
Dough:
- In a large bowl, stir sugar and oil until combined.
- Add salt, yeast mixture, ube extract and 1 cup flour. Stir until well blended.
- Proceed to add the rest of the flour ½ cup at a time, combining well after each addition.
- Once the dough starts pulling and sticking together in a ball, transfer to a lightly floured surface and knead until smooth and elastic (8-10 minutes).
- Oil another large bowl and transfer dough there. Turn to ensure all sides of the dough is coated.
- Cover the bowl with a damp cloth or plastic wrap and allow to rise in a dry, warm place (about 90F) until it doubles in size (about 2 hours).
- When ready, turn the dough into a lightly floured surface, knead slightly and divide into 32 pieces.
- Shape each piece into an oval – like an egg – and place onto a lightly greased 9×13 inch baking pan (you'll need 2 baking pans).
- Optional: if filling – flatten each piece of dough slightly, place a piece of cheese, a dollop of ube jam, or both, in the middle. Fold the dough over the filling completely, pinch to seal (like a dumpling), then shape.
- Cover baking pans and allow to rise a second time (about 1 hour).
Bake:
- Preheat oven to 375F.
- Sprinkle bread crumbs on top of the ube pandesal and bake for 15-20 minutes or until they spring back when gently pressed.
- Remove from oven. Best enjoyed freshly baked.
Video
Notes
- This dough is very sticky and you’ll need flour to make it easier to knead. Add flour a little a time, making sure not to add more than ⅓ cup in total.
- If the dough is still sticky, instead of adding more flour, knead with lightly oiled or damp hands instead.
- I use ready-made, plain bread crumbs.
- For best results, use a kitchen scale and weigh your ingredients.
- Since you’re using 2 baking pans, it’s good practice to rotate the pans halfway through baking.
- See post for more baking tips and FAQs, plus step-by-step photos.
Nutrition
Nutritional information are estimates only.
Anne
I tried this recipe and my husband really loves it. Thank you.
But it was really hard kneading the dough.
I was wondering, could i use a standmixer for kneading?
Jolina
You’re most welcome Anne! And yes, you can use a stand mixer just be careful not to over knead. Happy baking!
Phyllia
I’m a late bloomer in baking this popular Pinoy bread and I’m glad I chose your recipe. I’m very happy with the outcome. I have freshly baked pandesal at midnight haha. Better late than never. Thank you so much!
Jolina
Ube pandesal is the best midnight snack lol! Glad you enjoyed them Phyllia 🙂
Cherish
How do you use cream cheese as a filling for this recipe? My favorite Fil Thai restaurant has ube pandasal with sweet cream cheese filling, it’s my favorite!
Jolina
Hi Cherish, you can put a cube or a dollop of cream cheese (follow instructions similar to cheese) and bake as usual. Happy baking!
Marta Ott
Hi there,
Just wondering if I can freeze the buns after baking it. Thank you!
Jolina
Hi Marta, yes you can! I usually place them in a large freezer-safe Ziploc bag. To reheat, simply pop into your toaster for a few minutes until heated through. No need to thaw. Enjoy!
Janelle Villa
Hello, I don’t see any liquids in this recipe, did I miss something? I was following the instructions and then realized there’s no liquid ingredients and so I had to look for another recipe for ube pandesal.
Jolina
There is warm water and oil.
MJ
Hello! This was absolutely a hit in our household, everybody loved this! Question though, is it possible to do an overnight proof after shaping the dough? I’d love to have this freshly baked in the morning so was wondering if an overnight proof would work.
Jolina
Hi MJ, glad you liked them! I haven’t tried proofing the dough for that long so I’m uncertain how that would affect the final result.
Andrea
Hii. Can i use bread flour instead of all purpose?
Jolina
Hi Andrea, I’ve never tried but in general you can sub bread flour for all purpose flour 1:1. Happy baking!
Bee
Hello, I am making this with Fleischmann’s Traditional Active Dry Yeast. Your recipe requires 2 cups warm water but in your photos, it doesn’t seem to be that much water. In the packaging of my active dry yeast it says to just put 1/4 cup warm water. I followed that instead. Hopefully works out? Please advise. Thanks!
Jolina
Hi Bee, please follow the recipe. Happy baking!
Nico
Made this a few times now. Excellent recipe! Thank you for sharing 🙂
For others who want to try it:
> I use instant yeast and I get the same results, so don’t worry if you don’t have active dry
> Dough will be on the wet side and really sticky and you’ll be tempted to add flour to handle it better. Use other means instead of adding flour – use a mixer, add oil to your hands, dough scraper to move it around, etc. I only used additional flour on the filling step because the dough needed to be shaped.
Jolina
Hi Nico, thanks for trying the recipe and for sharing your baking tips!
Gracia
Is there really no egg in this recipe? I tried this but the dough was too dry, then I noticed there wasn’t an egg, unlike other recipes I have tried in the past.
Jolina
Hi Gracia, yup no egg in this recipe. Egg pandesal is slightly different from traditional pandesal.
Chiqui Dela Fuente
I’ve experimented with various ube cheese bun recipes, and this one stands out as the best! Your ube cookies are also exceptional. I’ve made them countless times, and it has become my go-to foolproof recipe. Thank you so much for sharing these wonderful recipes, Ms. Jolina!
Jolina
You’re most welcome Chiqui! Happy baking 🙂
Maria
I just made this for the first time today.. im not a baker but I must say this is a pretty easy recipe to follow.. the ube pandesal came out perfect!!! I filled it with cheese and ube jam and it was sooo good!!!!
Jolina
That’s awesome Maria! Happy baking!
kelly Carroll
I tried this last night but it wasn’t soft and fluffy. It was kinda hard ube pandesal the next day! Yours looks to fluffy and soft. Thanks for sharing this recipe. Hopefully next time I’ll make it perfect.
Jolina
Hi Kelly, I give lots of tips for fluffy pandesal in the post. Happy baking!
Amy
Hi Jolina! It’s my first time making bread and I chose ube pandesal to make. Thanks to your clear and detailed instructions my pandesal came out better than I had hoped LOL! I have to work on making them the same size haha but I don’t mind practicing 🙂 Thanks for the recipe!
Jolina
Hi Amy! So happy to hear that. And yes, practice makes perfect and you get delicious ube pandesal every time! Enjoy!
Kathie Yoder
My pandesal dough was not sticky at all and the buns didn’t rise very well. I used quick rising yeast that was not expired. Did I use the wrong kind of ube powder?
The package says ube powder.